Advertisement
Quick Links
ASSEMBLY INSTRUCTIONS
MODEL 50-JN23TV
SUPPLIER CODE: JNFF
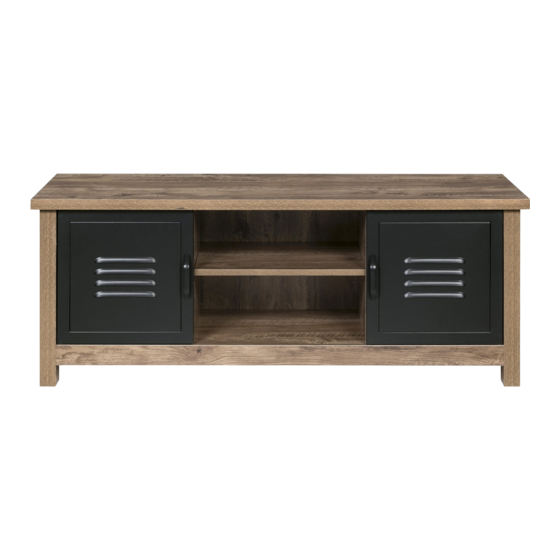
RUSTIC INDUSTRIAL LOCKER TV STAND
CUSTOMER SERVICE
o F
f r
s a
e t
t s
e s
i v r
e c
o
n
c
i a l
m
, s
e r
q
u
e
t s
f s
r o
e r
p
a l
e c
m
e
t n
p
r a
, s t
r o
q
u
e
t s
o i
n
, s
l p
a e
e s
i v
t i s
o
r u
w
e
b
i s
e t
: t a
www.comfortproducts.net/support
e-mail: customerservice@comfortproducts.net
Keep your sales receipt as documentation of your ownership.
7
Advertisement

Related Manuals for Onespace 50-JN23TV


Summary of Contents for Onespace 50-JN23TV
- Page 1 ASSEMBLY INSTRUCTIONS MODEL 50-JN23TV SUPPLIER CODE: JNFF RUSTIC INDUSTRIAL LOCKER TV STAND CUSTOMER SERVICE i v r i a l , s t t i s : t a www.comfortproducts.net/support e-mail: customerservice@comfortproducts.net Keep your sales receipt as documentation of your ownership.
-
Page 2: Parts List
PARTS LIST Please look for part indicator on the side of the part. It is either stamped or on a labeled sticker. DESCRIPTION PART STOCK# 51-JN23TVA Tabletop Left Wall 51-JN23TVB 51-JN23TVC Right Inner Wall Left Inner Wall 51-JN23TVD 51-JN23TVE Shelf Backboard 51-JN23TVF Right Wall... -
Page 3: Hardware Kit
HARDWARE KIT Stock # 51-JN23TVHA Mini x Bolt Mini x Lock 7x50mm Screw Washer Door Pin Door Handle 4x18mm Screw Door Magnet 3x14mm Screw How to use the minifix bolt and lock system:... - Page 4 ASSEMBLY Start by inserting Pegs into all the following wood pieces:...
- Page 5 Attach the Door Magnets (9) to the Tabletop (A) using two 3x14mm Screws (10) each. Mount the Floor Trim (K) to the Floor (J) use mini x bolts (1) and locks (3). Attach the Door Handles (8) to the Doors using 4x18mm Screws (7).
- Page 6 Attach the Floor (J) to the Left Wall and Right Wall using Mini x Bolts (1) and Locks (3) as shown. You will screw three bolts into each wall. (This step is shown upside down). Attach the Left Inner Wall (D) and Right Inner Wall (C) to the Floor (J) using the pre-inserted Pegs and the 7x50mm Screws.
- Page 7 Door Pins (5). (NOTE: Use a washer (6) with the bottom Door Pins.) Lastly, insert two door pins in each Inner Wall, at the level of your choice.
- Page 8 WEIGHT CAPACITY 110 LBS...
- Page 9 United States. All warranties are limited to the original purchaser for normal use. The weight capacity is de ned as 110 pounds (unless otherwise speci ed). For claims or questions concerning this warranty, please visit www. comfortproducts.net /support. e- mail : customerservice@comfortproducts.net MODEL : # 50-JN23TV Comfort Products, Inc. 122 Gayoso Avenue, Suite 101 Memphis, TN 38103 www.comfortproducts.net...
Need help?
Do you have a question about the 50-JN23TV and is the answer not in the manual?
Questions and answers