Advertisement
Quick Links
ASSEMBLY INSTRUCTIONS
MODEL 50-JN23BK8
SUPPLIER CODE: JNFF
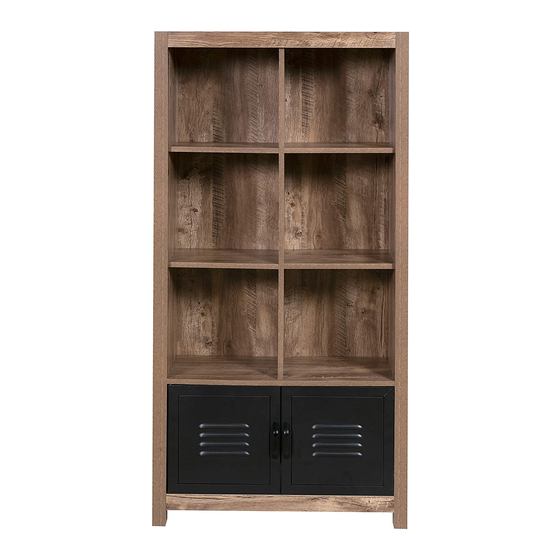
RUSTIC INDUSTRIAL LOCKER BOOKSHELF
CUSTOMER SERVICE
o F
f r
s a
e t
t s
e s
i v r
e c
o
n
c
i a l
m
, s
e r
q
u
e
t s
f s
r o
e r
p
a l
e c
m
e
t n
p
r a
, s t
r o
q
u
e
t s
o i
n
, s
l p
a e
e s
i v
t i s
o
r u
w
e
b
i s
e t
: t a
www.comfortproducts.net/support
e-mail: customerservice@comfortproducts.net
Keep your sales receipt as documentation of your ownership.
7
Advertisement

Related Manuals for Onespace 50-JN23BK8


Summary of Contents for Onespace 50-JN23BK8
- Page 1 ASSEMBLY INSTRUCTIONS MODEL 50-JN23BK8 SUPPLIER CODE: JNFF RUSTIC INDUSTRIAL LOCKER BOOKSHELF CUSTOMER SERVICE i v r i a l , s t t i s : t a www.comfortproducts.net/support e-mail: customerservice@comfortproducts.net Keep your sales receipt as documentation of your ownership.
-
Page 2: Parts List Overview
PARTS LIST Overview Please look for part indicator on the side of the part. It is either stamped or on a labeled sticker. -
Page 3: Parts List
PARTS LIST Please look for part indicator on the side of the part. It is either stamped or on a labled sticker. DESCRIPTION PART STOCK# 51-JN23BK8A Left Wall Roof 51-JN23BK8B 51-JN23BK8C Right Shelf Cabinet Top 51-JN23BK8D 51-JN23BK8E Divider Right Cabinet Door 51-JN23BK8F Back Board 51-JN23BK8G... -
Page 4: Hardware Kit
HARDWARE KIT Stock # 51-JN23BK8HA Cam Bolt & Lock Set Wood Peg Door Pin 4x14mm Nail Bracket 7x50mm Screw Washer 4x18mm Screw Door Handle Door Magnet Anchor Strap 4x32mm Screw Wall Anchor... - Page 5 ASSEMBLY Start by inserting Pegs into all the following wood pieces: Insert Pegs into the Roof (B) and Cabinet Floor (K). Then attach the related Trim pieces using a Cam Bolt & Lock (1).
- Page 6 Attach the Door Magnets (11) to the Cabinet Top (D) using two 4x14mm Screws (4) each. Attach the Door Handles (10) to the Doors (H and F) using two 4x18mm Screws (9) each.
- Page 7 Attach the Cabinet Top (D) to the Divider (E) using two 7x50mm Screws (7). Sit the Roof (B) on top of the Divider using the pegs. Connect the Left Shelves (L) using Cam & Bolt locks (1).
- Page 8 Attach what you assembled in the previous step to the Left Wall (A) using Cam Bolts & Locks (1). Hang the Doors (F, H) between the Cabinet Top and the Cabinet Floor using door Pins (3), two for each door. Use a washer (8) between the bottom Door Pin (3) and the Cabinet Floor.
- Page 9 Screw twelve Cam Bolts (1) into the Right Wall (J) and four into the Divider (E). Then insert Cam Locks into the bottom of the Right Shelves (C). Set the Right Shelves onto the Bolts in the Divider and tighten the locks. Then attach the Right Wall in the same manner.
- Page 10 Tack the back panels on with nails (6) following the pattern shown below.
- Page 11 United States. All warranties are limited to the original purchaser for normal use. The weight capacity is de ned as 100 pounds (unless otherwise speci ed). For claims or questions concerning this warranty, please visit www. comfortproducts.net /support. e- mail : customerservice@comfortproducts.net MODEL : # 50-JN23BK8 Comfort Products, Inc. 122 Gayoso Avenue, Suite 101 Memphis, TN 38103 www.comfortproducts.net...
Need help?
Do you have a question about the 50-JN23BK8 and is the answer not in the manual?
Questions and answers