Crestron APAD Operating And Installation Manual
Crestron apad wall mount lcd controller: operations guide
Hide thumbs
Also See for APAD:
- Out-of-the-box functionality manual (16 pages) ,
- Dimension manual (38 pages)
Table of Contents
Advertisement
Quick Links
Advertisement
Table of Contents

Subscribe to Our Youtube Channel
Related Manuals for Crestron APAD


Summary of Contents for Crestron APAD
- Page 1 Crestron APAD Wall Mount LCD Controller Operations & Installation Guide...
- Page 2 This document was prepared and written by the Technical Documentation department at: Crestron Electronics, Inc. 15 Volvo Drive Rockleigh, NJ 07647 1-888-CRESTRON All brand names, product names and trademarks are the property of their respective owners. ©2006 Crestron Electronics, Inc.
-
Page 3: Table Of Contents
Crestron APAD Contents Wall Mount LCD Controller: APAD Introduction ... 1 Features and Functions ... 1 Specifications ... 2 Physical Description... 3 Industry Compliance ... 6 Setup ... 7 Network Wiring... 7 Identity Code ... 7 Installation ... 7 Hardware Hookup ... 11 Configuring the APAD... -
Page 5: Wall Mount Lcd Controller: Apad
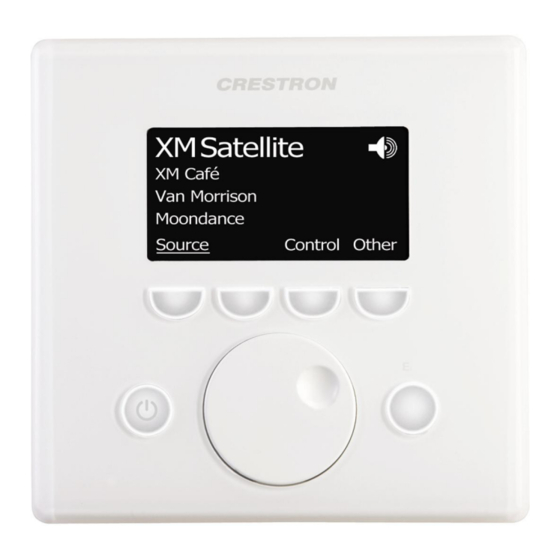
The white-on-black LCD display presents the user with a large amount of information in a small space. With graphical support for scrolling text, icons, and bargraphs, the APAD delivers an ideal user interface for controlling audio and a range of other possible functions throughout the home or office. Four "softkey"... -
Page 6: Specifications
Fully bidirectional communications enables true-feedback for display of current status of audio, lighting, or climate control settings. Versatile Mounting Options Several mounting options are available for the APAD to facilitate a clean, attractive installation in any wall or similar flat surface. Specifications Specifications for the APAD are listed in the following table. -
Page 7: Available Accessories
Mud Ring WMKT-1000L Lectern or Post-Construction Wall Mount Kit with Trim Ring WMKM-1000L Post-Construction Wall Mount Kit with Mud Ring WMKB-1000L Post Construction Wall Mount Kit - Bracket Wall Mount LCD Controller DETAILS Wall Mount LCD Controller: APAD • 3... - Page 8 (1.50 cm) 0.43 in (1.09 cm) 3.95 in (10.03 cm) 0.43 in (1.09 cm) 0.78 in (1.96 cm) 4 • Wall Mount LCD Controller: APAD 4.9 in (12.5 cm) 4.8 in (12.2 cm) 0.33 in 3.74 in (0.83 cm) (9.50 cm) 4.16 in...
-
Page 9: Controls And Indicators
Crestron APAD APAD Front and Rear Face (Bezel Removed) APAD Controls, Connectors, & Indicators Operations & Installation Guide – DOC. 6455 CONNECTORS, CONTROLS, & INDICATORS Display Screen Programmable display shows pages, menus, and soft button functions of a project used to control one or more devices in a Cresnet system. -
Page 10: Industry Compliance
Wall Mount LCD Controller Industry Compliance As of the date of manufacture, the APAD has been tested and found to comply with specifications for CE marking and standards per EMC and Radiocommunications Compliance Labelling. NOTE: This device complies with part 15 of the FCC rules. Operation is subject to... -
Page 11: Setup
For more details, refer to “Check Network Wiring” on page 19. Identity Code The Net ID of the APAD has been factory set to 2E. The Net IDs of multiple APAD devices in the same system must be unique. Net IDs can be changed from the “Setup Mode”... - Page 12 Mounting the APAD The APAD is designed for mounting in a wall or lectern. Two overlay cutout templates (0V40087) are supplied. One is in the shape of the required opening; the other is similar to a frame, with the inner area of the frame the shape of the required opening.
- Page 13 Operations & Installation Guide – DOC. 6455 4.17 in (10.60 cm) TEMPLATE - 0V40087 FOR LC–1000, CT–1000 OR APAD ( 1 OF 2 ) 4.27 in CUT ALONG THIS EDGE TEMPLATE - 0V40087 FOR LC–1000, CT–1000 OR APAD ( 2 OF 2 ) 4.27 in...
- Page 14 APAD Mounting Example (Mounting Surface Not Shown) Mounting Removal from the Mounting Surface If it is necessary to remove the APAD after it has been installed, complete the following steps in the order provided. The only tool required is a #1 Phillips screwdriver.
-
Page 15: Hardware Hookup
Operations & Installation Guide – DOC. 6455 1. Pull the bezel away from the APAD. 2. Loosen and remove the two screws that secure the top of the APAD to the mounting surface. 3. Loosen but do not remove the two screws that secure the bottom of the APAD to the mounting surface, and shift the APAD in the hole so the brackets will fall away from their top position on the mounting surface. -
Page 16: Configuring The Apad
Load in Progress Screen Setup Mode Screen Setup Mode can be entered from the Main Menu, as stated above, or, if the APAD has not yet been installed, by pressing and holding any button when power is applied. If the unit is installed and power is already applied, the easiest method is to remove the bezel, press and hold any button, and press the Reset button;... - Page 17 Use the ON and OFF soft buttons to turn the Key Click feature on and off (default is off). Press the Default soft button to return to the default setting; press Ok to accept the new setting and return to the Setup Mode screen. Wall Mount LCD Controller Wall Mount LCD Controller: APAD • 13...
-
Page 18: Programming Software
Have a question or comment about Crestron software? Answers to frequently asked questions (FAQs) can be viewed in the Online Help section of the Crestron website. To post a question or view questions you have submitted to Crestron’s True Blue Support, log in at http://support.crestron.com. - Page 19 C2Net Device, Slot 9 Operations & Installation Guide – DOC. 6455 • To incorporate the APAD into the system, drag the APAD from the Wired Keypads folder of the Device Library and drop it in the System Views. • The system tree of the control system displays the device in the appropriate slot with a default Net ID as shown in the following illustration.
-
Page 20: Programming With Visiontools Pro-E
The APAD LCD screens should be created in VisionTools Pro-e to allow selection of functions, and control of system devices. Note that the APAD design permits the six buttons to be programmed individually per project or for each page in a project. -
Page 21: Uploading And Upgrading
• Display the network device tree (Tools | Network Device Tree); to show all network devices connected to the control system. Right-click on the APAD Cresnet ID to display actions that can be performed on the APAD, such as: ⇒... -
Page 22: Operation
Wall Mount LCD Controller Operation Operation of the APAD is determined by the program developed for the system in which it is used. 18 • Wall Mount LCD Controller: APAD Crestron APAD Operations & Installation Guide – DOC. 6455... -
Page 23: Problem Solving
Cresnet power usage of each network unit to be daisy-chained must be added together to determine the Cresnet power usage of the entire chain. If the unit is a home-run from a Crestron system power supply network port, the Cresnet Operations & Installation Guide – DOC. 6455... -
Page 24: Reference Documents
For assistance in your local time zone, refer to the Crestron website (http://www.crestron.com/) for a listing of Crestron worldwide offices. You can also log onto the online help section of the Crestron website to ask questions about Crestron products. First-time users will need to establish a user account to fully benefit from all available features. -
Page 25: Future Updates
Future Updates As Crestron improves functions, adds new features, and extends the capabilities of the APAD, additional information may be made available as manual updates. These updates are solely electronic and serve as intermediary supplements prior to the release of a complete technical documentation revision. -
Page 26: Return And Warranty Policies
Purchasers should inquire of the dealer regarding the nature and extent of the dealer's warranty, if any. CRESTRON shall not be liable to honor the terms of this warranty if the product has been used in any application other than that for which it was intended, or if it has been subjected to misuse, accidental damage, modification, or improper installation procedures. - Page 27 Crestron APAD Wall Mount LCD Controller This page intentionally left blank Wall Mount LCD Controller: APAD • 23 Operations & Installation Guide – DOC. 6455...
- Page 28 Crestron Electronics, Inc. Operations & Installation Guide – DOC. 6455 15 Volvo Drive Rockleigh, NJ 07647 (2014585) Tel: 888.CRESTRON 04.06 Fax: 201.767.7576 Specifications subject to www.crestron.com change without notice.
Need help?
Do you have a question about the APAD and is the answer not in the manual?
Questions and answers