Outdoor GreatRoom Company Sierra Installation Instructions Manual
Fire pit tables
Hide thumbs
Also See for Sierra:
- Installation instructions manual (12 pages) ,
- Installation instructions manual (12 pages) ,
- Manual (11 pages)
Table of Contents
Advertisement
Quick Links
Advertisement
Table of Contents

Related Manuals for Outdoor GreatRoom Company Sierra


Summary of Contents for Outdoor GreatRoom Company Sierra
- Page 1 Fire Pit Tables Sierra and Grandstone Installation Instructions P a g e...
-
Page 2: Table Of Contents
Contents Contents……………………………………..2 Required Tools….………………………..3 Placing the Table…………………..……4 Igniter Installation ……………….…….5 Gas Connection…………….….………...6 Thermocouple Installation…….…...7 Electrode Installation………………….7 Placing the Top…………………………..8 Locating Propane tank………..……...8 Door Installation………………………...9 Notice: This unit is listed for use in North America for both residential and commercial applications. In the event that the appliance can be used by those unfamiliar with the appliance, we suggest the use of a master Key Valve to prevent unauthorized use. -
Page 3: Required Tools
Required Tools Utility Knife To cut and remove packaging 2 Open Ended Wrenches To make gas connections Leather Gloves To protect hands from rough edges found on the coffee table. One (1) AAA Battery (not included) Required for igniter installation for Crystal Fire Plus burners. -
Page 4: Placing The Table
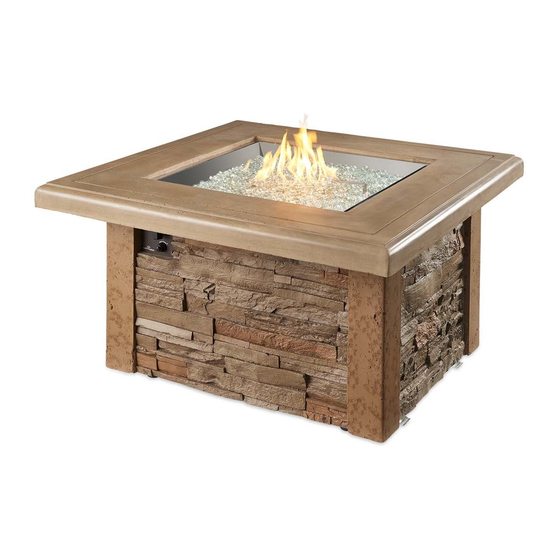
4. When locating your coffee table, refer to the Crystal Fire Plus manual and maintain clearance to combustibles. Sierra fire pit table shown, finishes and styles may vary Before completing the following steps, read and understand the Crystal Fire Plus owner’s manual. -
Page 5: Igniter Installation
Igniter Installation Locate CF-SPARKER inside of crystal fire burner box. Remove CF-SPARKER cap and hex nut. Insert AAA battery (not included) with + end out. Install CF-SPARKER into control panel as shown below. Depress CF-SPARKER button to test your ... -
Page 6: Gas Connection
Gas Connection See Crystal Fire Plus instructions for burner installation. All gas connections were completed at the factory. Check all connections for leaks. If needed, tighten connection with 2 wrenches and re-check for leaks. Attach burner valve to control panel with provided screws as shown below. -
Page 7: Thermocouple Installation
Thermocouple Installation • Refer to Crystal Fire Plus instruction manual for detailed attachment of thermocouple. • Attach thermocouple to burner valve as shown below. Electrode Installation • Plug both BLACK wires hanging from the burner into the back of the CF-SPARKER. If an orange wire is present, do not use it. -
Page 8: Placing The Top
Placing the top 1. With the help of at least one other person, remove concrete, granite, or tile top from packaging and gently lower on to your fire pit table base. Construction adhesive or silicone may be used on the top of the base for a more stable and permanent placement in heavy use areas. -
Page 9: Door Installation
Door Installation Door support Set door on supports and close. Magnet will hold door in closed position. IMPORTANT Please consult your Crystal Fire Plus instruction manual for detailed instructions and important information related to hooking up your burner, including safety information, proper tightening of connections with two wrenches and full burner setup and lighting instructions. - Page 10 ENTIONALLY LEFT AWESOME. Warranty: Fire pit tables are covered under a 1- year manufacturer’s warranty. Please visit http://www.outdoorrooms.com/warranty-form to register your product. 14400 Southcross Drive West • Suite 100 • Burnsville, MN 55306 Toll Free: 1-866-303-4028 • Sales@OutdoorRooms.com 10 | P a g e...
- Page 11 Notes: _________________________ _________________________ _________________________ _________________________ _________________________ _________________________ _________________________ _________________________ _________________________ _______________ 11 | P a g e...
- Page 12 © 2015 The Outdoor GreatRoom Company 12 | P a g e...
Need help?
Do you have a question about the Sierra and is the answer not in the manual?
Questions and answers