Table of Contents
Advertisement
Advertisement
Table of Contents

Related Manuals for Heidolph Hei-VAP Precision


Summary of Contents for Heidolph Hei-VAP Precision
- Page 1 Intelligent Evaporation Leading Safety Standards Superior Ease of Use Reduced Cost of Ownership Operating Manual Rotary Evaporator Hei-VAP Precision Operating manual must be read before initial start-up. Please follow the safety instructions provided. Please keep for future reference.
-
Page 2: Table Of Contents
Operation Operating the control panel ................21 Operating the lift ....................24 Feed the distilled material ..................24 Operation of the Hei-VAP Precision ..............25 Setting the language ..................26 Setting the rotation speed ................27 Setting the heating bath temperature ..............27 Calculating the vapor temperature ..............28 Process modes ....................28... - Page 3 Contents Troubleshooting Allgemeine Fehler .....................44 Additional conditions ..................45 Hei-VAP Precision .....................46 Cleaning and Maintenance Maintenance ....................50 Cleaning ......................52 Assembly Electrical connections / Connexions Electriques .............53 Mount device ....................55 Assembly parts ..................55 Transportation safety device ................56 Base unit ....................57 Heating bath ....................58 Glassware sets ....................59...
-
Page 4: About This Document Inhaltsverzeichnis
2. Warnings may be found in the introductions throughout of the chapters and prior to instruction sections. Heidolph Instruments GmbH & Co. KG has the copyright for images and texts.. Reference documents Information for the Heidolph vacuum pumps Rotavac valve control... - Page 5 About this Document Icons and symbols / Signaux et symboles Mandatory signs Icon Explanation Icon Explanation Observe information Use eye protection Follow additional Use hand protection information Use protective clothing Use foot protection Pull the power plug after Use ear protectors use.
- Page 6 About this Document Warnings / Avertissements The following symbols and signal words will be continuously used in this documentation./ Les symboles et les mots d’avertissement suivants sont utilisés dans la présente documentation. The combination of icon and a signal word classifies the respective safety instruction./ L’association d’un pictogramme est d’un mot d’avertissement définit chaque consigne de sécurité./ The symbol can vary according on the type of risk./...
- Page 7 About this Document Structure of warnings / Présentation des avertissements DANGER/ The type and source of the risk is located here! / DANGER Type et origine du danger ! The potential consequences, if actions are not taken to preventthe risk are listed here./ Conséquences éventuelles si aucune mesure n’est prise pour éviter le danger.
- Page 8 These warnings will precisely explain how you must conduct yourself to protect yourself, other persons and objects from injuries or damages. These instructions are for the following evaporator models, the Hei-VAP Precision rotary evaporator. ➜ Always keep the instructions available.
-
Page 9: Safety Instructions / Consignes De Sécurité
Safety Instructions Safety Instructions / Consignes de sécurité General safety instructions / Consignes de sécurité générales EC Declaration of Conformity / Déclaration de conformité CE This device complies with the following EC-Directives*: ▪ 2006/42/EC Machinery Directive ▪ 2006/95/EC Low-Voltage Directive ▪... -
Page 10: Intended Use / Utilisation Conforme
Safety Instructions Intended use / Utilisation conforme Hei-VAP Precision is a rotary evaporator for:/ Hei-VAP Precision est des évaporateurs rotatifs pour: ▪ distillation or evaporation of solvents/ Distillation, évaporation ▪ purification of chemicals, substances, mixtures and preparations/ Purification de produits chimiques, substances, mélanges et préparations ▪... -
Page 11: Responsibilities Of The Operator / Obligations De L'opérateur
Responsibilities of the operator / Obligations de l’opérateur ➜ Only operate the equipment in perfect condition, contact a certified Heidolph Service representative if equipment does not meet the outlined conditions for operation./ Utiliser l’appareil uniquement dans des conditions techniques parfaites. -
Page 12: Responsibilities Of The Operating Personnel / Obligations Du Personnel Opérateur
Safety Instructions Responsibilities of the operating personnel / Obligations du personnel opérateur ➜ Verify that the distillation material can be evaporated safely and that the distillation residue is not explosive./ S’assurer que la matière à distiller et à évaporer peut s’évaporer sans danger et que les résidus de distillation ne sont pas explosibles. -
Page 13: Qualifications Of Personnel / Qualifications Du Personnel
Safety Conscious Working / Utilisation en toute sécurité Heidolph Instruments is not liable for personal injuries and/or property damages caused by an incorrect and improper usage of the rotary evaporator./ Heidolph Instruments décline toute responsabilité quant aux dommages corporels et/ou matériels dus à... - Page 14 Overcurrent protection on lift motors (only Hei-VAP Ad-vantage and Hei-VAP Precision)/ Protection contre les surcharges de courant sur le dispositif de levage motorisé (uniquement sur les modèles Hei-VAP Advantage et Hei-VAP Precision) ▪ Thermal over temperature protection on the drive motor/ Protection contre la surchauffe sur le moteur de commande ▪...
-
Page 15: Remaining Hazards / Dangers Résiduels
Safety Instructions Remaining hazards / Dangers résiduels Obvious residual risks may still exist, despite all precautions! Residual risks can be reduced if the safety instructions for the intended use and the oper- ating instructions are all observed!/ Malgré toutes les mesures prises, des risques résiduels évidents peuvent subsister ! Les risques résiduels peuvent être réduits dans le cadre du respect général des con-signes de sécurité... - Page 16 Safety Instructions WARNING/ Malfunctions! / Défaillances AVERTISSEMENT Risk of injury. / Risque de blessure. Malfunctions or operating conditions that may affect the safety of operating personnel require a shutdown of the equipment by disconnecting the power supplies./ Les défaillances ou les états de fonctionnement qui peuvent com-promettre la sécurité...
- Page 17 Safety Instructions WARNING/ Imploding glass devices! / Appareils en verre implosifs ! AVERTISSEMENT Serious injuries from shattering glass./ Risque de blessure grave en cas de bris de glace. ➜ Check glass devices for damages (stars, breaks, cracks, etc.)./ Contrôler que les appareils en verre ne soient pas endom- magés (étoiles, bulles, etc.).
-
Page 18: Disposal
Safety Instructions DANGER/ Risks of injuries and mortal danger when disregarding safe- DANGER ty instructions and safe distances!/ Danger de mort et risque de blessure en cas de non-respect des consignes et des distances de sécurité ! Risk of injury. / Risque de blessure. Risks exist when disregarding safety instructions and the safe distance to the machine./ Des dangers peuvent surgir en cas de non-respect des consignes et... -
Page 19: Device Description
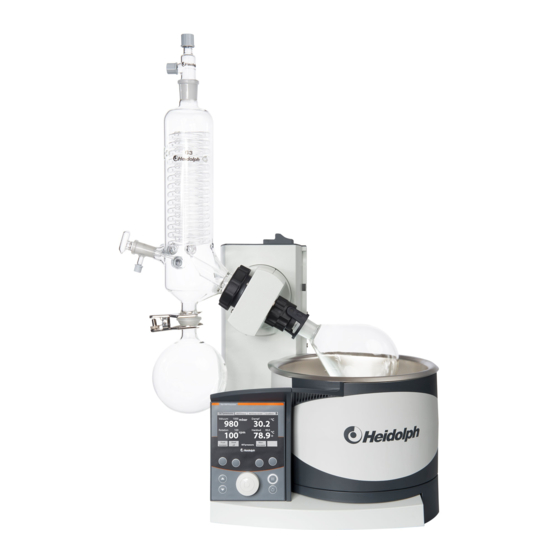
Device Description Device Description Device overview Hei-VAP Precision: Overall view The solvent to be evaporated is present in the evaporator flask (2). Depending on the thermodynamic properties of the solvent, the solvent is evaporated by a suitably selected combination of the heating bath temperature (3) and the vacuum. The settings are made on the control panel (5) of the base unit (4). -
Page 20: Start-Up
Start-Up Start-Up Switching on the base unit 1. Switch on the base unit by pressing the toggle switch of the power switch. 2. 2The power switch of the base unit must be in the “1” position. Figure 5-1: Base unit Power switch Temperature sensor connector... -
Page 21: Operation
Operation Operation Operating the control panel Figure 4-31: Control panel (for Hei-VAP Precision) The control panel can be removed from the base unit. The 1.3 m connecting cable between the control panel and the base unit can be adjusted to the optimal length by a cable run and reel. - Page 22 Operation 2. The cable reel is surrounded by a shell. 3. Pull the control panel apart, so that the cable reel can be seen. The cable reel is surrounded by a shell. 4. Reel in the cable to the desired length by wrapping the cable around the reel. 5.
- Page 23 Operation 3. 3Press the shell to the control panel. The shell can be turned by 180° as desired, in order to adjust the surface and view to the control panel. 4. Place the control panel on the prefabricated guide rails that snap in and attach on the wall or deposit it on a stable surface.
-
Page 24: Operating The Lift
Figure 4-5: Hand/motor lift Hand lift Motor lift arrow keys Version Hei-VAP Value, Hei-VAP Advantage, Hei-VAP Precision (hand lift) 1. Push hand lift (1) down and shift to the left (lower) or right (upward) while keeping handle depressed.. 2. Release the hand lift (1) at the desired position. -
Page 25: Operation Of The Hei-Vap Precision
✓ The system will be ventilated. Operation of the Hei-VAP Precision The basic steps of operating the rotary evaporator Hei-VAP Precision will be explained in this chapter. The parameters for the distillation are set and monitored via the control panel. -
Page 26: Setting The Language
The context sensitive help menu function shows detailed information of the just selected menu item (such as „heating bath”, „rotation”...). This provides additional information to aid operator in use of the Hei-VAP Precision controller. It can be switched on and off in the setup menu. When the context-sensitive help is shown, it hides all current actual values on the right side. -
Page 27: Setting The Rotation Speed
Operation Setting the rotation speed (actual value displays of all modes) ✓ The unit is switched on. ✓ The rotation is switched off (pushbutton Rotation start/stop). ✓ Actual value display The range can be set from 10 - 280 [rpm] in 1 [rpm] increments. 100 [rpm] are set as default when shipping from the factory. -
Page 28: Calculating The Vapor Temperature
Process modes The Hei-VAP Precision forms a unit with the control panel, the vacuum box and the vacuum valve, in which the vacuum is controlled by opening and closing a valve. The vacuum valve is not required when using a speed-controlled pump The ventilation valve in the vacuum box is always open when the vacuum control is switched off. -
Page 29: Set Pressure Mode
Operation SET pressure mode The vacuum is controlled and maintained at the set pressure in the SETpressure mode. Menu display The following values can be changed in the menu view: Setting of the bath temperature. Setting range is between Heating bath 20 °C and maximum heating bath temperature (MAX TEMP is adjustable in Setup) with a highest range of 210 °C. -
Page 30: Auto Easy Mode
Operation Vacuum control 1. Select the entry „vacuum” by turning the Hei-GUIDE (6) and calling up the selected entry to be changed by pressing the Hei-GUIDE (6) again. 2. Set the absolute pressure by using the rotary pushbutton controller Hei-GUIDE (6). The pressure is readjusted synchronously at an active vacuum control. -
Page 31: Auto Accurate Mode
It is also necessary that a constant temperature (Heidolph Rotacool or Rotachill recommended) is present in the condenser prior to the start of the process. The Hei-VAP Precision automatically checks the tempera- ture consistency and informs the user, if necessary. The temperature difference between the condenser temperature and the temperature at the AUTO accurate sensor used for controlling the vacuum will be increased when increasing the Distillation rate (dT). - Page 32 Operation Menu display The following values can be changed in the menu view: Heating bath Setting of the bath temperature. Setting range is between 20 °C and maximum heating bath temperature (MAX TEMP is adjustable in Setup) with a highest range of 210 °C. Rotation Setting of rotation speed of the distillation flask.
-
Page 33: Timer Functions
“Start All” soft key. The distillation is interrupted after completing the set time. ▪ The system will be ventilated. ▪ The rotation is switched off. ✓ The lift is raised (only Hei-VAP Precision).Ggf. im Setup das Abschaltverhalten des Heating bathes festlegen. -
Page 34: Distillation Parameters: Favorites
Operation Defi ne the shutoff response of the heating bath in the setup. 1. Select the menu element program „Setup” by turning the rotary pushbutton controller Hei-GUIDE (6).. 2. Select the entry „Bath Power at End” by turning the Hei-GUIDE (6) and call up the selected entry to be changed by pressing the Hei-GUIDE (6) again. -
Page 35: Gradient Function
Operation Apply data record The data record is called up and the stored mode is activated. The actual value display is then changed to the stored parameters on the display. The process can be started with “start vacuum“ or “start all”. Rename the data record The name can be entered similar to the „save”... - Page 36 Operation The following values can be changed in the menu view: Heating bath Setting of the bath temperature. Setting range is between 20 °C and maximum heating bath temperature (MAX TEMP is adjustable in Setup) with a highest range of 210 °C. Rotation Setting of rotation speed of the distillation fl ask.
-
Page 37: Softkeys
Operation Start pressure ramp The pressure ramp is started with softkey „start all“ (1) or „start vacuum“ (1). The pressure/time segments are processed. Note: The maximum attainable increase of the pressure/time curve is limited by the pump capacity and the leak rate of the system. The process is terminated when reaching the last entry. -
Page 38: Overview Of All Softkeys
Operation Overview of all softkeys Softkey Function Store Favorite Storing the data record for Favorites (program list). Cancelling the entry and backing up on step, no storage of changes Hold The vacuum is held at the value when soft key is depressed. Start all Vacuum control on, rotation on, lower motor lift Stop all... -
Page 39: Setup
Operation Connecting to a PC The vacuum box can be connected to a PC via USB. 1. Connect the vacuum box to a PC using an USB cable. 2. Configure HyperTerminal on the PC. 3. Interface settings: ▪ Bits per second: 115200 ▪... -
Page 40: Menu Topology
Operation Menu topology Actual value display for all modes Menu entry Value range Vacuum 1 and 1200 mbar; default value: 1000 mbar Dampf Vapor temperature measured at the vapor temperature sensor. Rotation 10 and 290 rpm in 1 rpm increments; default value: 100 rpm Heating bath 20 °C and the max. - Page 41 Operation Modus Auto accurate Menu entry Value range / Zustand Heating bath 20 °C and the max. temperature of the heating bath (to be assigned in Setup), however, no more than 210 °C. Rotation 10 and 280 rpm in 1 rpm increments; default value: 100 rpm Distillation rate ▪...
- Page 42 Operation Gradient Menu entry Sub-menu Element Value range Heating bath 20 °C … max. temp. of the heating bath not higher than 210 °C. Rotation 10 … 280 rpm in 1 rpm increments; default value: 100 rpm Hysteresis 1 to 50 mbar; default value: 10 mbar Eingabe Druck-/ Druck/Zeit Zeitschritte...
- Page 43 Operation Favorites Menu entry Value range / Zustand (empty) [name of Favorite] ▪ Apply ▪ Rename ▪ Copy ▪ Delete Back Softkey 4 Cancelling the entry and backing up on step, no storage of changes Setup Menu entry Value range / status Online-Help On/Off Safety pressure...
-
Page 44: Troubleshooting
Troubleshootimg Troubleshooting Allgemeine Fehler Error / Cause Remedy message Unit cannot be Main plug not connected to ➜ Connect the main plug with the switched on the main power supply power supply ➜ Replace fuses (see chapter Fuses defective or blown fuse “Assembly, Electrical connection”) ➜... -
Page 45: Additional Conditions
„Operation, Timer functions”) Fuses defective or blown fuse ➜ Replace fuses (see chapter “Assembly, Electrical connection”) ➜ The Hei-VAP Precision is reset When pressure is detected, the Hei-VAP Precision is emer- to the starting condition when gency stopped. pressing any key. -
Page 46: Hei-Vap Precision
Troubleshootimg Hei-VAP Precision Error / message Cause ▪ Vapor sensor broken ➜ Let the boiling temperature The temperature sensor for calculating the vapor ▪ not connected sensor cool ▪ above the temp. ➜ Connect the vapor temperature is not connected, defective or the... - Page 47 Troubleshootimg Error / message Cause Remedy The heating bath is Heating bath is ➜ Deactivate the unit completely evaporated. completely evaporated ➜ Check if the maximum Please refill the heating bath temperature limiter has medium. responded. If yes, reset (see chapter “Cleaning and maintenance, Maintenance”) ➜...
- Page 48 ▪ Drive unit is defective ➜ Deactivate the unit The rotation drive was overloaded or is ▪ Motor overload shutdown ➜ Stop drive unit for cooling defective. down ➜ Contact service Table 7-3: Troubleshooting table - Hei-VAP Precision...
- Page 49 Troubleshootimg The rotary evaporator is checked after „power on” in an initialization phase for connected components. The function scope of the rotary evaporator is based on the connected units. Description and response Missing component Remedy of the evaporator Vacuum box ▪...
-
Page 50: Cleaning And Maintenance
Cleaning and Maintenance Cleaning and Maintenance Maintenance ➜ Only use genuine parts approved by the manufacturer ! The vapor tube and PTFE 26 vacuum seal must be routinely serviced. 5. Remove and clean the vapor tube and the PTFE 26 vacuum seal (see chapter “Assembly, Glassware sets”, section “Install the vapor tube”). - Page 51 Cleaning and Maintenance Evacuate heating bath / Vider le bain chauffant WARNING/ Verify that the basic device is only plugged to or unplugged from AVERTISSEMENT the heating bath if the main switch is switched off and/or the main power supply is disconnected./ Brancher la base de l’appareil au bain chauffant ou débrancher la base de l’appareil du bain chauffant uniquement hors tension.
-
Page 52: Cleaning
Cleaning and Maintenance WARNING/ Glass breakage! / Bris de glace ! AVERTISSEMENT Cuts. / Risque de coupure. ➜ Work carefully; do not readjust the adjusting screw too much./ Travailler attentivement, ne pas serrer trop fort la vis de ré-glage. 1. Screw the valve into the G6 center piece (2) up to the stop. 2. -
Page 53: Assembly
Les fusibles ne peuvent être remplacés que par un Electricien professionnel. ▪ Repairs of any kind are allowed by qualified professionals only. Any improper repair can result in a dangerous situation. Contact your local Heidolph Instruments distributor for any repair you may have./ Les réparations de toute nature sont autorisées uniquement par un professionnel... - Page 54 Assembly Étiquette du bain chauffant Étiquette de l’instrument Connecteur Système Electrique Fusibles Color code for electrical connections: / Connexion électrique, code couleur Green/Yellow PE: Protective conductor (Earth) Vert/Jaune PE: fil de protection (Terre) Blue N: Neutral conductor Bleu N: Conducteur Neutre Brown P: Phase P: Phase...
-
Page 55: Mount Device
Assembly Mount device Assembly parts Base unit Base plate heating plate Housing Flask Lift Control panel clamp evaporating flask Heating bath Isolated Pouring rim Isolated handle handle Minimum - Maximum - Marks Control panel Control panel Easy-Clip... -
Page 56: Transportation Safety Device
Assembly Transportation safety device The motor lift units have a transportation safety device, which must be removed prior to the initial start-up of the unit or reattached prior to the return shipment. This is very important in shipping any return or repair of motor lift unit to make sure transport lock is assembled. -
Page 57: Base Unit
Assembly 2. Remove the screws and the transportation safety device (1) and store. 3. Move the hoist up by using the „lift up” (5) button. Switch the unit off and on. Attaching the transportation protection device before packing ✓ All hose and cable connections to other devices and the coolant/vacuum connection are disconnected. -
Page 58: Heating Bath
Assembly Heating bath Installing Heating bath ✓ The basic unit is located on a suitable place. Figure 4-2: Heating bath Heating bath Basisplatte 1. Place the base plate (2) on the surface for the heating bath (1) into the provided rail, so that the heating bath cannot tilt. -
Page 59: Glassware Sets
Chiller extension. 1. Place the two screws on the right side of the extension plate of the Chiller. (Contact a local Heidolph Distributor if using a previously purchased Chiller before July, 2009 for proper attachments of the extension plate. -
Page 60: Install The Condenser Mounting
Assembly WARNING/ Glass breakage! / Bris de glace ! AVERTISSEMENT Serious injuries from shattering and breaking glass./ Risque de blessure grave en cas de bris de glace. ➜ Check glass devices for damages (stars, breaks, etc.)./ Contrôler que les appareils en verre ne soient pas endom-magés (étoiles, bulles, etc.). -
Page 61: Install The Vapor Tube
Assembly CAUTION/ Unintentionally rotating drive!/ ATTENTION Entraînement rotatif involontaire ! Injuries to hands. / Blessure des mains. ➜ Verify that the rotation is displayed./ S’assurer de l’arrêt de la rotation. WARNING/ Risk of injuries due to retracting or entrapment! AVERTISSEMENT Risk of injury. - Page 62 Assembly WARNING/ Risk of injuries due to retracting or entrapment!/ AVERTISSEMENT Risque de blessure, risque d’être attiré ou happé ! Risk of injury. / Risque de blessure. A risk of entanglement exists on the movable parts of the unit./ Risque d’écrasement près des pièces mobiles de l’installation. ➜...
-
Page 63: Install The Condenser
Assembly 4. Remove the screw coupling connection of the vapor tube (Figure 4-7 (6) from the drive unit. 5. Pull out the clamping sleeve (Figure 4-7 (5). 6. Push the vapor tube coupling clamp (Figure 4-7 (6)) and clamping sleeve (Figure 4-7 (5)) with the bead fi rst to the vapor tube (Figure 4-7 (7)). - Page 64 Assembly WARNING/ Glass breakage! / Bris de glace ! AVERTISSEMENT Serious injuries from shattering and breaking glass./ Risque de blessure grave en cas de bris de glace. ➜ Check glass devices for damages (stars, breaks, etc.)./ Contrôler que les appareils en verre ne soient pas endom-magés (étoiles, bulles, etc.).
- Page 65 Assembly Condenser Tension spring Threaded clamping screw Drive unit 1. Version glassware sets G1 and G3: ▪ Push the threaded clamping screw (2) over the condenser flange. ▪ Push the spring (3) over the condenser flange. ▪ Attach the condenser (1) to the drive unit (4) with the threaded clamping screw. 2.
- Page 66 Assembly Figure 4-12: Condenser bracket (Glassware set G3 and G6) Support rod Boss head clamp Condenser clamp Version glassware set G3 and G6: 1. Push the boss head clamp (3) onto the support rod (1) and position with the clamping screw.
-
Page 67: Install The Evaporator Flask
Assembly Install the evaporator fl ask WARNING/ Glass breakage! / Bris de glace ! AVERTISSEMENT Serious injuries from shattering and breaking glass./ Risque de blessure grave en cas de bris de glace. ➜ Check glass devices for damages (stars, breaks, etc.)./ Contrôler que les appareils en verre ne soient pas endom-magés (étoiles, bulles, etc.). - Page 68 Assembly The correct seating of the swing clamp on the fl ange of the evaporator fl ask must be observed! Setting the evaporator fl ask inclination The inclination of the evaporator fl ask can be set by turning the drive unit. WARNING/ Glass breakage! / Bris de glace ! AVERTISSEMENT...
- Page 69 Assembly Fixate Lift 1. Grasp the condenser with the left hand. 2. Unlock the locking device (1) at the lift column toward the right by applying pressure with your right hand. 3. Set the evaporator fl ask inclination by carefully swinging the condenser. 4.
- Page 70 Assembly Height stop (1) in the top position. 1. Version without a protective cover: ▪ Open the locking lever of the height (2) on the right of the lift column. ▪ Manually push the height stop (1) down. ▪ Move the lift down until the desired immersion depth is reached. 2.
-
Page 71: Insert The Inlet Tube
Assembly CAUTION/ Unintentionally rotating drive!/ ATTENTION Entraînement rotatif involontaire ! Injuries to hands. / Blessure des mains. ➜ Verify that the rotation is displayed./ S’assurer de l’arrêt de la rotation. WARNING/ Risk of injuries due to retracting or entrapment!/ AVERTISSEMENT Risque de blessure, risque d’être attiré... - Page 72 Assembly Figure 4-15: Insert the inlet tube PTFE tube Stopcock Drain-off plate 1. Shorten the PTFE tube (1) to the desired length. 2. Grease the stopcock (3) (optional) for ideal vacuum. 3. Position the drain-off plate (2) so that the condensed liquid cannot return to the evaporator flask via the PTFE tube (1).
-
Page 73: Assemble The Collecting Flask
Assembly Assemble the collecting flask 1. Hold the receiving flask with the ball-socket clamp KS 35 (1) to the condenser. 2. Secure with a knurled head screw (2). ✓ The socket joint of the receiving flask is attached to the ball joint of the condenser via pinch clamp KS 35. -
Page 74: Connect The Vacuum
Assembly Connect the vacuum The Woulff fl ask is connected to the vacuum valve (except in the Hei-VAP Precision with Rotavac vario control or with Rotavac vario tec). WARNING/ Imploding glass devices! / Appareils en verre implosifs ! AVERTISSEMENT Serious injuries from shattering and breaking glass./ Risque de blessure grave en cas de bris de glace. - Page 75 Assembly 1. Unscrew the threaded fitting (4) from the Woulff bottle, remove the hose clamp ring (5). 2. Place the enclosed PTFE tube section (3) in the cap nut (2) and tighten the cap nut (2). 3. Push the threaded connection (4) on the PTFE tube section (3), also push on the ferrule compression fitting (5).
- Page 76 Assembly Abbildung 4-22: Hei-VAP Precision mit Rotavac valve control und Vacuumbox Condenser Ventilation / inert gas Y-piece Vacuum tube Vacuum valve Vacuum valve cable connection Condensate cooler (optional) USB PC connection Vacuum valve cable Vacuum sensor connection Switch box connection...
- Page 77 Assembly Figure 4-23: Hei-VAP Precision with Rotavac valve control and vacuum box and with Woulff bottle Condenser Ventilation / inert gas Woulff bottle Vacuum tube Vacuum valve Vacuum valve cable connection Condensate cooler (optional) USB PC connection Vacuum valve cable...
- Page 78 Assembly Figure 4-24: Hei-VAP Precision with Rotavac vario tec and vacuum box Condenser Vacuum tube Y-Stück Vacuum valve cable connection Condensate cooler (optional) USB PC connection Vacuum valve cable Vacuum sensor connection Rotavac vario control / Rotavac vario tec Switch box connection...
- Page 79 Assembly Figure 4-25: Hei-VAP Precision with Rotavac vario tec and Vacuumbox and Woulff bottle Condenser Vacuum tube Woulff bottle Vacuum valve cable connection Condensate cooler (optional) USB PC connection Vacuum valve cable Vacuum sensor connection Rotavac vario control / Rotavac vario tec...
-
Page 80: Accessories
Assembly Accessories Schutzhaube Figure 4-27: Assemble the protective cover Height stop Lock screw Allen screws Protective hood Support cover Height stop lock 1. Screw the support cover (3) to the height stop (1) by using the two enclosed Allen screws (2). 2. - Page 81 Assembly 1. Move the lift upward. 2. Attach the protective shield (1) on the edge of the heating bath (2) and position so that the (possibly available) cover can be easily opened. 3. Turn the eccentric screw (3) by 180° and use it to attach the protective shield on the heating bath.
- Page 82 4. Screw together the Autoaccurate sensor with the threaded fi tting (1). 5. Connect the plug (2) in the socket on the tower to the left of the unit (see chapter 5). Vacuum box Figure 4-32: Vacuum box (for Hei-VAP Precision) USB PC connection Ventilation / inert gas...
-
Page 83: Connect The Base Unit
Assembly Connect the base unit CAUTION/ Supply voltage and the voltage information on model tag do ATTENTION not match! / La tension du secteur et la tension du secteur indiquée sur la plaque signalétique ne correspondent pas ! Damage due to incorrect voltage/ Dommages matériels dus à... - Page 84 Operation The plug sockets are located on the back of the unit. ✓ The unit is switched off. ✓ The heating bath is installed on the base console. Figure 4-3: Connections Heating bath unit plug Power supply connector Heating bath connecting line (symbolically without a cable and connector) Figure 4-4: Heating bath connector...
-
Page 85: Disassembly And Storage
Disassembly and Storage Disassembly and Storage Dismantling WARNING/ Glass breakage! / Bris de glace ! AVERTISSEMENT Serious injuries from shattering and breaking glass./ Risque de blessure grave en cas de bris de glace. ➜ Check glass devices for damages (stars, breaks, etc.)./ Contrôler que les appareils en verre ne soient pas endom-magés (étoiles, bulles, etc.). -
Page 86: Storage
Disassembly and Storage Remove the Woulff bottle WARNING/ Glass breakage! / Bris de glace ! AVERTISSEMENT Serious injuries from shattering and breaking glass./ Risque de blessure grave en cas de bris de glace. ➜ Check glass devices for damages (stars, breaks, etc.)./ Contrôler que les appareils en verre ne soient pas endom-magés (étoiles, bulles, etc.). -
Page 87: Accessories And Spare Parts
Accessories and Spare Parts Accessories and Spare Parts Scope of delivery Component Variant Quantity Product number Hei-VAP Precision Hand lift 563-01300-00 glassware set G3: Hei-VAP Precision Motor lift 564-01300-00 glassware set G3: PTFE seal 23-30-01-01-30 Vapor tube 514-00000-01 Clamping sleeve... -
Page 88: Attachments
Attachments Attachments Technical data Hei-VAP Value, Hei-VAP Value Digital, Hei-VAP Advantage Standard supply voltage 230 V (50/60 Hz) Operational voltage (V) 100 - 240 Supply power (W) 1400 ▪ IP 20 device Protection class ▪ IP 67 cable heating bath (DIN EN 60529) Lift distance (mm) Drive... -
Page 89: Solvent Data
Attachments Solvent data The graph shows the relationship between the pressure and vapor temperature of a selection of solvents. The temperature difference between the vapor temperature and the cooling medium should be at 20 K to result in suffi cient condensation. The temperature difference between the heating bath and vapor temperature should be at 20 K to reach a suffi cient Distillation rate (dT). -
Page 90: Service
Questions / Repair work If any aspect of installation, operation or maintenance remains unanswered in the present manual, please get in touch with the following address. For repairs please call Heidolph Instruments or your local authorized Heidolph Instruments distributor. Warning: / Avertissement... -
Page 91: Warranty
In the case of a part or manufacturing defect, the device shall be repaired or replaced free of charge under the terms of the warranty. Heidolph Instruments shall not assume liability for any damages incurred as a result of improper handling or transport. -
Page 92: Confirmation Of Condition Of Unit
Is the unit in a condition which does not represent any health threats for the staff of our service department? If not, which substances has the unit come into contact with? Legally binding declaration The customer is aware of being legally liable to Heidolph Instruments for any damages arising from incomplete and incorrect information. Date Signature... -
Page 93: Déclaration De Non-Opposition
Service Déclaration de non-opposition ➜ En cas de panne, vous pouvez copier, remplir, puis nous envoyer / faxer la présente déclaration à Heidolph Ins-truments GmbH & Co KG. Description de l’appareil Type Numéro de série Motif de l’envoi L’appareil a-t-il été nettoyé, le cas échéant décontami-né / désinfecté ? L’appareil représente-t-il des risques sanitaires pour les réparateurs ? - Page 94 Service...
- Page 96 01-005-004-92-2, 18.04.2016 © Heidolph Instruments GmbH & Co. KG This is a translation of the original operating manual. We reserve the right to make any technical modifications without prior notification. This documentation is not subject to revision; the latest version of this documentation can be found on our homepage.
Need help?
Do you have a question about the Hei-VAP Precision and is the answer not in the manual?
Questions and answers