Table of Contents
Advertisement
Advertisement
Table of Contents

Related Manuals for FLIR BLACKFLY S GIGE


Summary of Contents for FLIR BLACKFLY S GIGE
- Page 1 FLIR BLACKFLY S GIGE Getting Started guide...
-
Page 2: Hardware Setup
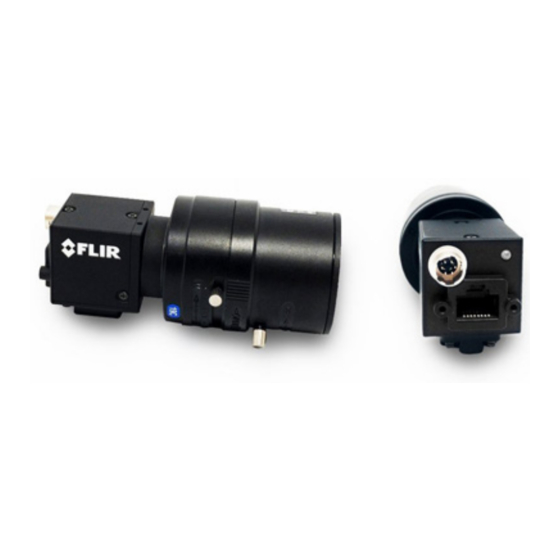
HARDWARE SETUP Follow these steps after unboxing your camera: Attach the tripod adapter to the camera body using the 4 black Phillips head screws included with the camera. Unpack the lens and make sure to remove the plastic lens covers. Remove the sensor cover from the camera and attach the lens to the camera with a twisting motion. -
Page 3: Adjusting The Camera Lens
ADJUSTING THE CAMERA LENS This lens has three adjustments, from top to bottom: Focus: Adjusting towards the ∞ symbol will make objects further away come into focus. Aperture: The iris adjustment controls how much light is able to pass through the lens. A more closed aperture will result in a sharper image, but the image will also be darker. -
Page 4: Installing The Network Card
INSTALLING THE NETWORK CARD The ethernet card is needed to run our PoE cameras. One card can run up to two cameras. Please make sure that your computer has an available PCI Express slot for this card. To install the dual port network card, please watch the video tutorial below (clicking the image will open the video link). -
Page 5: Driver Installation
DRIVER INSTALLATION Visit www.swingcatalyst.com/downloads, select ”see all drivers” and download the driver for ”Blackfly S & Spinnaker compatible cameras”. Once downloaded, click on the executable and follow the setup wizard. Choose ”Camera Evaluation”. Leave ”I will use GigE Cameras” box checked. - Page 6 IP CONFIGURATION After driver installation you should be prompted to run AdapterConfigGUI. If not it can be located in: C:\Program Files\FLIR Systems\ Spinnaker\shortcuts\utilities Click ”Start” and select any ”Intel(R) 82574L” adapters. Click on ”Smart Config” and the utility will do the rest.
-
Page 7: Configuring The Camera
CONFIGURING THE CAMERA Make sure the camera is connected to your computer and that the LED in the back of the camera is blinking green. Start Swing Catalyst and click Settings, and Cameras. Select your camera from the list, and click Advanced. -
Page 8: Advanced Camera Settings
ADVANCED CAMERA SETTINGS Changing the frame rate Frame rate indicates how many frames the camera is capable of recording per second. Checking the Frame rate control enable box will allow you to manually set the frame rate, if this box is unchecked the frame rate is essentially set to auto (note: the maximum frame rate of this camera is 291 FPS. -
Page 9: Changing The Shutter Speed
ADVANCED CAMERA SETTINGS Changing the shutter speed Shutter speed is the duration of time which the camera shutter is open, which affects the amount of light the camera sensor is exposed to and the time it takes to Unless we’re outdoors in sunlight it’s better to use a manual shutter speed, otherwise it’s likely the video will be too blurry for sports analysis. - Page 10 ADVANCED CAMERA SETTINGS Changing camera gain Gain is an electronic amplification of the video signal. The higher the dB value, the brighter the image, however there will also be more noise as a result which may make the overall video quality seem poor. Sometimes it is worth having a slightly higher gain at the expense of noise in order to bring the shutter speed down to get sharp frame by frame video of an object (e.g club at impact, baseball bat etc).
- Page 11 ADVANCED CAMERA SETTINGS Changing gamma and black levels Black level can be considered a form of brightness adjustment, where the black level corresponds to the minimum value that any pixel on the camera sensor will return. By increasing the black level value we can make the image brighter.
- Page 12 ADVANCED CAMERA SETTINGS Changing the camera’s white balance White balance will affect the color temperature of the video image. The wrong white balance can cause the colours of the image to look strange, often appearing too red or too green. Normally we recommend to leave this setting to auto (continuous) but in order to achieve the maximum frame rate this needs to be turned off.
- Page 13 ADVANCED CAMERA SETTINGS Device link throughput On GigE cameras, device link throughput and packet size are connected to each other in the sense that in order to use the largest throughput the packet size needs to be set to 9000. In order to achieve the full frame rate this must be done.
- Page 14 ADVANCED CAMERA SETTINGS Applying Region Of Interest (ROI) Region of Interest is a way to reduce the image size and by extension also the bandwidth required for each image. By reducing the image size we can increase the frame rate as the overall pixel readout requirement is smaller.
- Page 15 ADVANCED CAMERA SETTINGS Applying Region Of Interest (ROI) cont. To change the region of interest we can drag the height slider to the left to reduce the height of the image. Since we’ve changed the height of the image, we can also now change the Y offset which can be helpful as an alternative to physically moving the camera due to the reduced image size.
-
Page 16: Troubleshooting
TROUBLESHOOTING Please see our GigE Vision/Gigabit Ethernet recommendations. Dropped frames: Although most GigE cameras are very reliable, depending on the network setup and camera setup it may be necessary to tweak the settings to avoid dropped frames. Make sure the packet size is set to 9000 - this is crucial for good performance. - Page 17 TROUBLESHOOTING PT. 2 Region Of Interest (ROI): Using a region of interest will reduce the overall image size and boost the FPS, but also it can help lower the bandwidth usage which in turn could reduce dropped frames (please refer to pages 14 and 15 on how to use ROI).
- Page 18 contact@swingcatalyst.com www.swingcatalyst.com...
Need help?
Do you have a question about the BLACKFLY S GIGE and is the answer not in the manual?
Questions and answers