Table of Contents
Advertisement
Available languages
Available languages
Quick Links
Advertisement
Chapters
Table of Contents

Related Manuals for Kindermann MultiSwitch 41 4K60


Summary of Contents for Kindermann MultiSwitch 41 4K60
- Page 1 MultiSwitch 41 4K60 MultiSwitch 41 4K60 Multiformat Video- und Audio Umschalter Multiformat presentation switcher Art.-Nr. 5778 000 153 Ref. No. 5778 000 153 Montage- und Bedienungsanleitung Mounting and operating instructions 02.2021...
-
Page 2: Table Of Contents
Inhaltsverzeichnis 1. Vorwort ................................3 2. Sicherheitshinweise und Vorsichtsmaßnahmen ...................3 3. Produktbeschreibung ...........................4 3.1. Eigenschaften ............................4 3.2. Lieferumfang ............................4 4. Gerätebeschreibung ..........................5 - 6 4.1. Vorderseite ............................5 4.2. Rückseite .............................6 5. Anschlussschema ............................7 6. Bedienung ..............................7 - 8 6.1. Manuelles Umschalten ........................7 6.2. Automatisches Umschalten ......................7 6.3. EDID Einstellungen .........................8 7. IR Fernbedienung ............................9 8. RS232 Steuerung ..........................10 - 13 8.1. Gerätesteuerung ..........................10 8.2. Quellenschaltung ........................... -
Page 3: Vorwort
Im ständigen Bemühen, das Produkt zu verbessern, behalten wir uns das Recht vor, Funktionen oder Parameter ohne vorherige Ankündigung oder Verpflichtung zu ändern. Die neuesten Informationen erhalten Sie von Ihrem Kindermann Fachhändler. Sicherheitshinweise und Vorsichtsmaßnahmen • Lesen Sie die Bedienungsanleitung sorgfältig durch und bewahren Sie diese auf. -
Page 4: Produktbeschreibung
3. Produktbeschreibung Der MultiSwitch 41 4K60 erlaubt das Umschalten von 4 verschiedenen Eingangsquellen (1x HDMI, 1x USB-C, 1x DisplayPort und 1x VGA mit Audio) auf einen HDMI Ausgang. Er unterstützt Video- aufl ösungen bis zu 4K@60Hz 4:4:4 8bit, 1080p und 3D. Der MultSwitch 41 4K60 verfügt über ein integriertes EDID Management. -
Page 5: Gerätebeschreibung
LED illuminates green. switching mode, and its LED illuminates green. switching mode, and its LED illuminates green. Der MultiSwitch 41 4K60 unterstützt CEC. Mit den Tasten kann ein kompatibles Display entsprechend ③ DISPLAY CONTROL: ③ DISPLAY CONTROL: ferngesteuert werden. -
Page 6: Rückseite
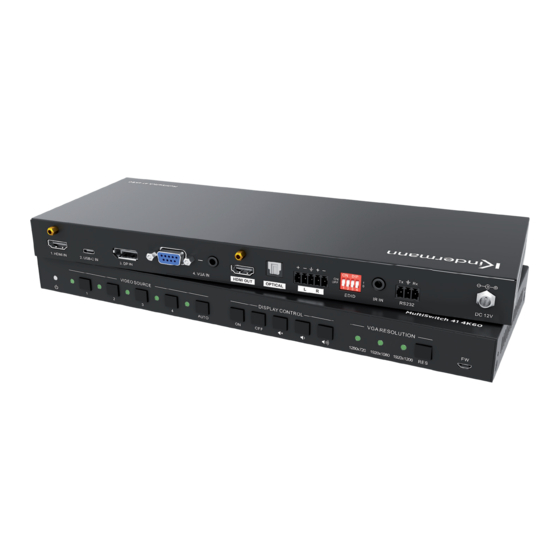
4.2 Rückseite HDMI V2.0 4x1 Presentation Switcher with Audio Extraction 3.2 Rear Panel 1 2 3 4 1. HDMI IN 2. USB-C IN 3. DP IN 4. VGA IN HDMI OUT OPTICAL EDID IR IN RS232 ① 1. HDMI IN: Connects to HDMI video source. HDMI IN: HDMI Eingang (Typ A) ②... -
Page 7: Anschlussschema
6. Bedienung 6.1 Manuelles Umschalten Der MultiSwitch 41 4K60 befi ndet sich im manuellen Modus, wenn die LED nicht leuchtet. Zum Umschalten des Eingangssignals verwenden Sie die Tasten 1, 2, 3 oder 4. Die entsprechende LED leuchtet grün. -
Page 8: Edid Einstellungen
Die EDID (Extended Display Identifi cation Data) wird von der Videoquelle genutzt, um das Ausgangs- signal an die Vorgaben bzw. Möglichkeiten des verbundenen Displays anzupassen. Unter bestimmten Umständen kann es hilfreich sein, eine dedizierte EDID festzulegen. Der MultiSwitch 41 4K60 unterstützt das durch ein ausgefeiltes EDID Management. -
Page 9: Ir Fernbedienung
6. IR Remote Control Connect the IR IN port to an IR receiver, the switcher can be controlled by the below IR 7. IR Fernbedienung remote. Stecken Sie den Infrarotempfänger aus dem Lieferumfang an den Eingang , so können Sie die Umschalter durch die mitgelieferte Fernbedienung steuern. -
Page 10: Rs232 Steuerung
• Die Befehle müssen exakt übernommen werden, inkl. der Groß- und Kleinschreibung • Ein Programm wie Hterm oder Docklight kann bei der Fehlersuche wertvolle Dienste leisten 8.1 Gerätesteuerung Sobald sich der „Zustand“ des MultiSwitch 41 4K60 ändert, z. B. bei einem Tastendruck, sendet er das entsprechende Feedback. Befehl... -
Page 11: Quellenschaltung
DIP0000! DIP EDID0000! STA. Abfrage des Systemstatus (Fortsetzung) SPDIF OUT ON! IIS OUT ON! AUDIO OUT OFF! RS232 COMMANDS LIST: 1 - POWON 2 - POWOFF HELP. Listet die verfügbaren Befehle auf 3 - RST 4 – UNLOCK … 8.2 Quellenschaltung Befehl Funktion Feedback... -
Page 12: Edid Management
8.4 EDID Management Es können bis zu vier individuelle EDIDs gespeichert werden. Hinweis: Bitte denken Sie daran, die DIP Schalter auf „1111“ einzustellen, um die EDID Auswahl per RS232 zu ermöglichen. Eine Beschreibung dazu finden Sie im Kapitel 6.3. Befehl Funktion &... -
Page 13: Displaysteuerung Per Cec
8.6 Displaysteuerung per CEC Befehl Funktion Feedback TVON. CEC Befehl “DISPLAY ON” senden, um CEC TV POWER ON! das Display einzuschalten TVOFF. CEC Befehl “DISPLAY OFF” senden, um CEC TV POWER OFF! das Display auszuschalten TVVOL+. CEC Befehl “VOLUME UP” senden, um CEC TV VOLUME INCREASE! die Lautstärke am Display zu erhöhen TVVOL-. -
Page 14: Firmware Upgrade
2. Trennen Sie den Umschalter vom Strom und verbinden Sie dann den PC mit dem FW Anschluss des Umschalters. 3. Versorgen Sie den MultiSwitch 41 4K60 wieder mit Strom, der PC wird ihn als Wechseldatenträger mit dem Namen “BOOTDISK” erkennen. -
Page 15: Technische Daten
10. Technische Daten Videoeingänge Eingänge 1x HDMI, 1x USB-C, 1x DP, 1x VGA Schnittstellen HDMI (Typ A), USB (Typ-C), DisplayPort, VGA (15-Pin SubD), alle Buchse HDMI Auflösung Bis zu 4K@60Hz 4:4:4 8bit, HDR10 USB-C Auflösung Bis zu 4K@60Hz 4:4:4 (HDMI Alt Mode) DisplayPort Auflösung Bis zu 4K@60Hz 4:4:4 VGA Auflösung... -
Page 16: Fehlerbehebung
Ihren Händler oder Händler vor Ort, um weitere Unterstützung zu erhalten. 12. CE-Konformitätserklärung Hinweis: Die aktuelle Inbetriebnahme- und Bedienungsanleitung kann von unserer Webseite heruntergeladen werden: www.kindermann.com Die aktuell gültige CE-Erklärung kann unter folgender URL eingesehen und heruntergeladen werden: https://shop.kindermann.de/erp/webshop/navigationPath/5778000153.html... - Page 17 Table of Contents 1. Foreword ................................ 18 2. Safety instructions and precautions ...................... 18 3. Device description ............................. 19 3.1. Features ............................19 3.2. Package List ............................ 19 4. Panel Description ..........................20 - 21 4.1. Front Panel ............................20 4.2. Rear Panel ............................21 5. System Connection ............................ 22 6. Button Control .............................22 - 23 6.1. Manual Switching ........................... 22 6.2. Automatic Switching ........................22 6.3. EDID Setting ............................ 23 7. IR Remote Control ............................
-
Page 18: Foreword
Contact your local dealer for maintenance assistance. • In a constant effort to improve the product, we reserve the right to change functions or parameters without prior notice or obligation. For the latest information, please contact your local Kindermann dealer. -
Page 19: Device Description
The switcher features multiple methods of control. In the AUTO mode it will automatically switch to the first detected source. When the active source is removed, the switcher will automatically select the next active input signal. MultiSwitch 41 4K60 can be manually controlled by the front panel buttons, IR remote and RS232 commands. -
Page 20: Panel Description
LED illuminates green. switching mode, and its LED illuminates green. The MultiSwitch 41 4K60 supports CEC, and the buttons are designed to remote control any Press ON to turn on the display device. ③ DISPLAY CONTROL: ③... -
Page 21: Rear Panel
HDMI V2.0 4x1 Presentation Switcher with Audio Extraction 4.2 Rear panel 3.2 Rear Panel 1 2 3 4 1. HDMI IN 2. USB-C IN 3. DP IN 4. VGA IN HDMI OUT OPTICAL EDID IR IN RS232 HDMI IN: Type A HDMI input ①... -
Page 22: System Connection
6. Button control 6.1 Manual switching The MultiSwitch 41 4K60 is in manual switching mode when the auto mode LED is off . To change the input source, please press button 1, 2, 3 or 4, the corresponding LED illuminates green. -
Page 23: Edid Setting
In some circumstances it is helpful to set the EDID to a fi xed value. The MultiSwitch 41 4K60 supports an advanced EDID management including an extensive list of ication Data (EDID) is used for the source device to match predefi ned EDID settings, please check the table below for further details. -
Page 24: Ir Remote Control
6. IR Remote Control Connect the IR IN port to an IR receiver, the switcher can be controlled by the below IR 7. IR remote control remote. Connect the supplied IR receiver to IN port to controll the switcher by the below infrared remote control. -
Page 25: Rs232 Control
• Using a PC based software like Hterm or Docklight could be helpful for the initial setup and troubleshooting 8.1 Device control As soon as the status of the MultiSwitch 41 4K60 changes (e. g. by pressing a button), it will send the related feedback via RS232. Command... -
Page 26: Source Switching
DIP0000! DIP EDID0000! STA. Report system status (continued). SPDIF OUT ON! IIS OUT ON! AUDIO OUT OFF! RS232 COMMANDS LIST: 1 - POWON 2 - POWOFF HELP. Get the command list. 3 - RST 4 – UNLOCK … 8.2 Source switching Command Function Command feedback... -
Page 27: Edid Management
8.4 EDID management It’s possible to store up to four individueal EDID values. Please follow the description below and use the commands to upload them. Note: Please don‘t forget to set DIP switches to „1111“ in order to control them via RS232. Please check chapter 6.3 for further information. -
Page 28: Display Control
8.6 Display control via CEC Command Function Command Example and Feedback TVON. Send CEC “DISPLAY ON” command to CEC TV POWER ON! power on the display. TVOFF. Send CEC “DISPLAY OFF” command to CEC TV POWER OFF! power off the display. TVVOL+. -
Page 29: Firmware Upgrade
9. Firmware Upgrade Please follow the steps below to upgrade firmware by the FW port on the front panel: Prepare the latest upgrade file (.bin) and rename it to “FW_MERG.bin”. 2. Power off the switcher, and connect the FW port to the PC using a suitable USB cable. 3. -
Page 30: Specification
10. Specification Video inputs Input 1x HDMI, 1x USB-C, 1x DP, 1x VGA Connector HDMI (type A), USB (type-C), DisplayPort, VGA (15-pin), all female HDMI resolution Up to 4K@60Hz 4:4:4 8bit, HDR10 USB-C resolution Up to 4K@60Hz 4:4:4 (HDMI alternate mode) DP resolution Up to 4K@60Hz 4:4:4 VGA resolution... -
Page 31: Troubleshooting
12. CE Declaration of Conformity Note: The current commissioning and operating instructions can be downloaded from our website: www.kindermann.com The currently valid CE declaration can be viewed and downloaded at the following URL: https://shop.kindermann.de/erp/webshop/navigationPath/5778000153.html... - Page 32 5778 000 153 D/GB 2021-02 Änderungen vorbehalten / Subject to alterations Printed in Germany Kindermann GmbH · Mainparkring 3 · D-97246 Eibelstadt · E-Mail: info@kindermann.de · www.kindermann.com...
Need help?
Do you have a question about the MultiSwitch 41 4K60 and is the answer not in the manual?
Questions and answers