Table of Contents
Advertisement
Available languages
Available languages
Quick Links
Advertisement
Chapters
Table of Contents

Related Manuals for Kindermann QuickSelect 3.0


Summary of Contents for Kindermann QuickSelect 3.0
- Page 1 QuickSelect 3.0 Multiformat HDBaseT Umschalter kaskadierbar in Reihenschaltung (Daisy Chain) Multiformat HDBaseT switch cascading in serial circuit (Daisy Chain) Art.-Nr. 7447000400 Ref. No. 7447000400 Installations- und Bedienungsanleitung Installation and operating instructions 11.2016...
-
Page 2: Table Of Contents
Inhaltsverzeichnis Sicherheitshinweise Anschlüsse Vorder- und Rückseite Lieferumfang Systembeschreibung und Funktionen Schnell-Inbetriebnahme 5.1. Geräte verkabeln 5.2. Geräte-Adressen manuell konfigurieren 5.3. Geräte-Adressen automatisch konfigurieren (Adresse “99“) 5.4. EDID-Information vom Wiedergabegerät lesen und speichern Konfiguration mit dem grafischen Benutzerinterface 6.1. Basis Konfiguration 6.2. Experten Konfiguration RS232 Steuerung Bedienung per ShowMe-Taster Technische Daten 10. Verfügbares Zubehör 11. Anwendungsbeispiele 11.1. Eintischlösung mit HDBaseT-Wandanschlussfeld 11.2. Zwei Tische oder Bodentanks mit HDBaseT-fähigem Projektor 11.3. Konferenztisch mit WiPG und Bedienmöglichkeiten an jedem Platz... -
Page 3: Sicherheitshinweise
1. Sicherheitshinweise • Bitte die Anleitung sorgfältig durchlesen und aufbewahren • Der QuickSelect 3.0 darf nur mit Sicherheitskleinspannung betrieben werden • Das Gerät darf nur in trockener Umgebung gelagert und eingesetzt werden • Die Geräte aus thermischen Gründen immer mit der Beschriftung nach oben montieren •... -
Page 4: Lieferumfang
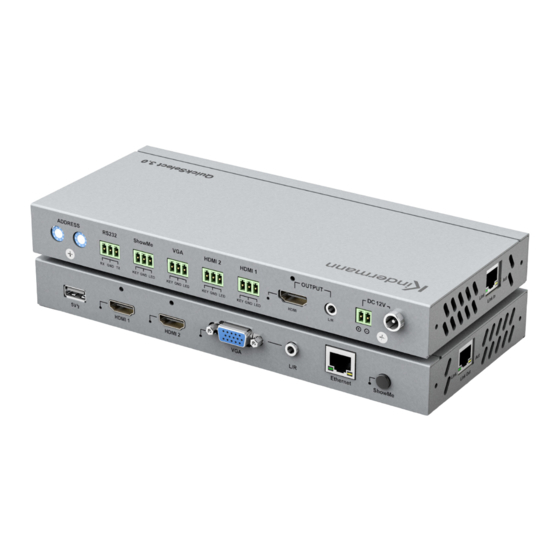
Das QuickSelect 3.0 ist ein Multiformat Umschalter für die Übertragung von analogen und digitalen AV-Signalen über ein HDBaseT-Bussystem in Reihenschaltung (Daisy Chain). Das QuickSelect 3.0 ist Sender und Empfänger zugleich. Das Gerät besitzt Signal-Eingänge für: 2 x HDMI, 1 x VGA plus analogem Stereo-Audio, sowie einen Ethernet-Anschluss. Wird ein QuickSelect über einen Ethernet-Anschluss mit einem Netzwerk-Switch verbunden, steht der Netzwerkzugang an jedem Gerät... -
Page 5: Schnell-Inbetriebnahme
Steckdose stecken. QuickSelects im ausgeschalteten Zustand mit einem Cat-6 Kabel (AWG 23) verbinden, Link-Ausgang des ersten Gerätes mit dem Link-Eingang des nächsten QuickSelect 3.0 verbinden, entsprechend fortfahren bis alle Geräte in Reihe verbunden sind. Wiedergabegeräte an den HDMI-Ausgang oder den HDBaseT Link-out des letzten QuickSelects der Reihe anschließen. -
Page 6: Geräte-Adressen Manuell Konfigurieren
HDMI max. 10 m RS232 Medien- steuerung Audio RS232 Link Out Link Out HDMI VGA AUDIO Link In HDMI Link Out HDMI VGA AUDIO Link In RS232 HDMI VGA AUDIO HDMI VGA AUDIO 5.2 Geräte-Adressen manuell konfigurieren Mit Hilfe eines kleinen Schlitz-Schraubendrehers die beiden BCD-Drehschalter an der Rückseite jedes QuickSelect Gerätes auf eine individuelle Adresse zwischen 01…98 einstellen. -
Page 7: Basis Konfiguration
Die kostenlose Konfigurations-Software zum Download finden Sie in unserem Händlerportal (nur für Wiederverkäufer): http://shop.kindermann.de/erp/webshop/navigationPath/7447000400.html Bitte stellen sie eine Verbindung zwischen Ihrem PC und dem QuickSelect 3.0 System per RS232 her (Pinbelegung für GUI auf S. 15). Falls Ihr PC keinen RS232-Anschluss haben sollte, bedienen Sie sich bitte eines RS232/USB Adapters. - Page 8 Folgekomponente gelegt wird. Über die Taste ‚HDMI Out‘ wird bestimmt, welcher dieser Eingänge auf den HDMI-Ausgang des ausgewählten QuickSelect 3.0 gelegt wird. Somit kann ein lokal angeschlossener Vorschaumonitor das über ‚HDBaseT-In‘ ankommende oder über ein lokal per HDMI/VGA...
- Page 9 Das Quellgerät fragt vor dem Bildaufbau das Ausgabegerät nach dieser Tabelle und wählt daraus eine möglichst passende Auflösung für die Bildausgabe. Das QuickSelect 3.0 System leitet die EDID Tabelle des Endgerätes nicht automatisch an die Bildquelle weiter. Unter bestimmten Umständen wäre dies auch unerwünscht, da z. B. DVI Endgeräte keine Ton- informationen enthalten –...
- Page 10 ‚EDID schreiben‘ in den Speicher für ‚Nutzerspezifisches EDID‘ abgelegt werden. Um diese Tabelle zu aktivieren muss der EDID Modus des jeweiligen QuickSelect 3.0 auf Nutzer stehen. Im Pulldown Menu können Sie wählen ob der Nutzer EDID Speicher für den Eingang HDMI1, HDMI2 oder für beide aktiviert wird.
- Page 11 VGA zu HDMI Wandler: Der integrierte VGA zu HDMI Scaler wandelt analoge Video- und Audiosignale in ein HDMI-Signal. Um eine möglichst hohe Qualität der Ausgabe des zugespielten VGA Signals zu erreichen, kann die Auflösung des über VGA anliegenden Bildsignals ausgabeseitig angepasst werden. Links für alle Geräte die unter ‚Auto Suche‘...
- Page 12 - Valens Chipset Eingang - Valens Chipset Ausgang Um eine neuere Firmware auf ein QuickSelect 3.0 zu laden gehen Sie bitte wie folgt vor: Kopieren Sie den über Kindermann zur Verfügung gestellten Firmware File auf einen USB Stick ins Hauptverzeichnis.
-
Page 13: Rs232 Steuerung
Mit dem Schaltflächen kann die gesamte aktuelle Konfiguration des ausgewählten QuickSelect 3.0 (roter Rahmen) als Datei gesichert – und ebenso zurückgeschrieben werden. Hinweis: Sichern Sie sich diese Einstellungen für Ihre Projektdokumentation, so können gleiche Settings schnell wieder eingespielt werden (Vorlage&Datensicherung). -
Page 14: Bedienung Per Showme-Taster
8. Bedienung per ShowMe-Taster Jedes QuickSelect verfügt an der Rückseite über Anschlüsse für drei externe Taster mit Status-LED, damit der Anwender jeden Eingang auch separat, z. B. in einem Tischanschlussfeld anwählen kann. Montieren Sie das QuickSelect mit Hilfe der Montagewinkel mit der Beschriftung nach oben unter dem Tisch, verkabeln Sie das Anschlussfeld mit dem QuickSelect entsprechend. -
Page 15: Verfügbares Zubehör
Allgemein Betriebs- 0°C bis 35°C HDMI: 1080P/1080i/720P/57 temperatur 6P/480P/576i/480i DP & VGA: 10% bis 90%, Luftfeuchte Auflösungsbereich 800x600/1024x768/1280 nicht kondensierend x 800/1280x1024/1400 x1050/1600 x1200/1920 Lagertemperatur -20°C bis 70°C x1080/1920 x1200 Eingangspegel 0,5 – 1,0 Vp-p (DDC: 1,2Vp-p) Audio Output DTS-HD, Dolby HD Unterstützt Extended Display Identification Data (EDID) und Display Data Chan- EDID/DDC nel (DDC) Daten über DVI und HDMI Standarts, EDID und DDC Signale... -
Page 16: Zwei Tische Oder Bodentanks Mit Hdbaset-Fähigem Projektor
11.2 Zwei Tische oder Bodentanks mit HDBaseT-fähigem Projektor 2 x HDMI, VGA 2 x HDMI, VGA Control + LED Control + LED Link Out Link In Link In Link Out HDBaseT-fähiger Projektor 11.3 Konferenztisch mit WiPG und Bedienmöglichkeiten an jedem Platz CablePort flex CablePort flex CablePort flex... - Page 17 Table of Contents Safety instructions Connections front and rear Scope of delivery System description and functions Quick system setup 5.1. Wiring devices 5.2. Manual device address awarding 5.3. Automatic device address awarding (address “99“) 5.4. Reading and saving EDID information of playback devices Configuration with the graphical user interface 6.1. Basic configuration 6.2. Expert configuration RS232 control Operation by ShowMe button Technical data 10. Available accessories 11. Application examples 11.1. Single-table solution with HDBaseT-wall connection panel 11.2. Two tables or flood tanks with HDBaseT-capable projector 11.3. Conference table with WiPG and operating options in every position...
-
Page 18: Safety Instructions
1. Safety instructions • Please read the instructions with care and keep them • The QuickSelect 3.0 must only be operated with safety extra-low voltage • The device must only be stored and used in dry environments • Always install the device with the label up for thermal reasons •... -
Page 19: System Description
4. System description The QuickSelect 3.0 is a multi-format switch for transmission of analogue and digital AV signals via a HDBaseT bus system in serial circuit (Daisy Chain). The QuickSelect 3.0 is transmitter and receiver at the same time. The device has signal inputs for: 2 x HDMI, 1 x VGA plus analogue stereo-audio, as well as an Ethernet connection. -
Page 20: Quick System Setup
Connect deactivated QuickSelects with a cat-6 cable (AWG 23), connect link output of the first device to the link input of the next QuickSelect 3.0, proceed accordingly until all devices are connected in series. Connect playback device to the HDMI output or to the HDBaseT Link-out of the last QuickSelects in the series. -
Page 21: Automatic Device Address Awarding (Address "99")
5.3 Automatic device address awarding (address “99“) Alternatively to manual address awarding according to 5.2 the addresses of all units can awarded automatically. Make sure that in this case all BCD switches must be kept in their default position “99”. We recommend using the free configuration software. -
Page 22: Configuration With The Graphical User Interface
The free configuration software for download can be found on our dealer portal (for resellers only): http://shop.kindermann.de/erp/webshop/navigationPath/7447000400.html Please connect your PC to the QuickSelect 3.0 System by RS232 (for pin assignment for GUI, see p. 15). If your PC has no RS232 connection, please use a RS232/USB adapter. - Page 23 The button ‚HDMI Out‘ determines which of these inputs is put on the HDMI output of the selected QuickSelect 3.0. This way, a locally connected preview monitor can display the picture signal arriving via ‚HDBaseT-In‘ or fed in via locally by HDMI/VGA.
- Page 24 The QuickSelect 3.0 system does not automatically forward the EDID table of the end device to the picture source. Under certain circumstances, this would also not be desired, singe, e.g., DVI end devices do not contain any sound information –...
- Page 25 ‚user- specific EDID‘ under ‚Write EDID‘. To activate this table, the EDID mode of the respective QuickSelect 3.0 must be set to User. In the pulldown menu, you can choose if the user EDID memory is to be activated for the input HDMI1, HDMI2 or for both.
- Page 26 VGA Timing characteristics VGA signals: Available resolutions and refresh rates Native/preferred timing 1920x1080p at 60Hz (16:9) Modeline „1920x1080“ 148,500 1920 2008 2052 2200 1080 1081 1085 1125 +hsync +vsync Detailed timing #1 1366x768p at 60Hz Modeline „1366x768“ 85,500 1366 1436 1579 1792 768 771 774 798 +hsync +vsync Detailed timing #2 1920x1200p at 60Hz (16:10)
- Page 27 Pre-set resolution assignment between VGA in- and output Common VGA formats VGA special formats Input resolution Output resolution Input resolution Output resolution 1024x768 1024x768 832x624 (MAC) 1920x1080P 1280x720 1280x720 1152x864 (MAC) 1920x1080P 1280x800 1280x800 1152x870 (MAC) 1920x1080P 1280x1024 1280x1024 1360x768 1360x768 1366x768 1366x768...
- Page 28 To load a newer firmware onto a QuickSelect 3.0, proceed as follows: Copy the firmware file provided by Kindermann to the main directory of an USB stick. 2. Disconnect the QuickSelect 3.0 to be flashed from the power supply and connect the USB stick to its USB charge socket.
-
Page 29: Rs232 Control
Enter RS232 commands and read out answers: You can use these text fields to send RS232 commands and read the response of the QuickSelect 3.0 chain. All values are displayed in HEX. The commands of the respective control commands are automatically entered under RS232-TxD (Hex) and may be copied, e. -
Page 30: Technical Data
Scrensaver: If a Quickselect unit is activated without any active source being connected (by pressing the internal or external Show-Me button), the screensaver of the internal VGA-to-HDMI scaler appears. The screensaver shows the current installed firmware version of the individual Quickselect module. If required in specific cases the screensaver can be deactivated (or re-activated) by using the RS232 “Send”... -
Page 31: Available Accessories
10. Available accessories Rx GND Tx RS232 • RS232 cable pre-configurated (7447 000 410) Quickselect • VGA cable (7483 000 4xx) • HDMI cable, typ A, 19-pin (5809 000 1xx) • DP to HDMI cable (5809 000 60x) • HDMI media switch cable (5809 000 099) •... -
Page 32: Conference Table With Wipg And Operating Options In Every Position
CablePort flex CablePort flex with Neets SieRRa II with Neets NEB keyboard with Neets NEB keyboard 7447 000 400 D/GB 2016-11 / 842 115 Änderungen vorbehalten/Subject to alterations Printed in Germany Kindermann GmbH · Mainparkring 3 · D-97246 Eibelstadt · E-Mail: info@kindermann.de · www.kindermann.com...
Need help?
Do you have a question about the QuickSelect 3.0 and is the answer not in the manual?
Questions and answers