Advertisement
Ceramic glass induction hob
Dear customer !
Instructions for use
Installation instructions
Rating plate
Fire hazard protection
The built-in ceramic-glass cooktop is intended for household use
only. Materials used for packaging are nature friendly and may
be recycled, deposited or destroyed without any threats to the
environment. In order to recognize these features, all packing
materials are marked with relevant symbols.
Once your appliance has become obsolete and you do not
intend to use it any longer, take adequate care not to litter the
environment. Deposit your old appliance with the authorized
depot dealing with used household appliances.
Instructions for use have been prepared for the user, and
describe the particulars and handling of the appliance. These
instructions apply to different models from the same family of
appliances, therefore you may fi nd information and descriptions
that may not apply to your particular appliance.
The appliance should be connected to the power supply in
accordance with the instructions from the chapter "Electrical
connections" and in line with the standing regulations and
standards. The connections should be carried out by a qualifi ed
personnel only.
The rating plate with basic information is located underneath the
appliance.
Appliances are allowed to be mounted on one side next to a
high kitchen cabinet, the height of which may exceed that of the
appliance. On the opposite side however, only a kitchen cabinet
of equal height as the appliance is allowed.
Important warnings ................................................... 22
Ceramic-glass cooktop ............................................. 23
Energy saving tips..................................................... 26
Hob control ................................................................ 27
Mounting the built-in cooktop .................................. 35
Connection to the power supplay ............................ 36
Technical information ............................................... 38
GB
IE
MT
21
Advertisement

Related Manuals for Gorenje EIT 2600 P2


Summary of Contents for Gorenje EIT 2600 P2
-
Page 1: Table Of Contents
Ceramic glass induction hob Dear customer ! The built-in ceramic-glass cooktop is intended for household use only. Materials used for packaging are nature friendly and may be recycled, deposited or destroyed without any threats to the environment. In order to recognize these features, all packing materials are marked with relevant symbols. -
Page 2: Important Warnings
Important warnings • The appliance may be built-in and connected to the power supply only by a qualifi ed technician. • Particular areas of the cooktop surface (adjacent to the hotplates) are hot during operation. Prevent the children to hang around the appliance and warn them properly against the danger of burns. -
Page 3: Ceramic-Glass Cooktop
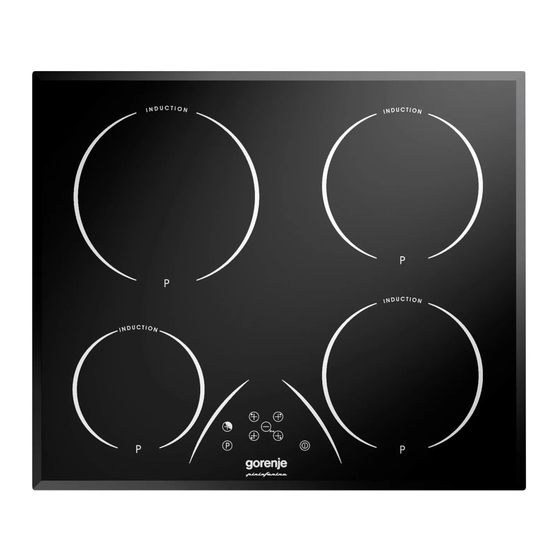
Ceramic-glass cooktop 1. Induction hotplate rear left 2. Induction hotplate rear right 3. Induction hotplate front left 4. Induction hotplate front right 5. Hob control panel Hob control elements A ON/OFF sensor B Hotplate power or remaining heat displays B1 Decimal dot on the power displays: - On: hotplate power control is possible - Off: hotplate power control is not possible C Hotplate selection and ON/OFF sensors (+) - Page 4 Induction hotplate • Ceramic glass hob is fi tted with three or four hotplates. Hob function principle surface is completely fl at and smooth, without edges to accumulate dirt. • The hob is fi tted with high power induction hotplates. Heat is generated directly at the bottom of the dish, where it is most needed, without any losses through the ceramic glass surface.
- Page 5 Magnet test Use small magnet to test if the dish bottom is magnetic. Only dishes where magnet sticks to the bottom are suitable for induction cooking. Dish recognition One of great advantages of the induction hotplate is dish recognition. Even if there are no dishes upon the hotplate, or the dish diameter is smaller than the diameter of the relevant hotplate, there are no thermal energy losses.
-
Page 6: Energy Saving Tips
Energy saving tips • When buying cookware be careful in selecting size: pot diameter usually refers to the top edge of the dish, which is often larger than the dish bottom. • Steam-pressure pots (economic pots), which use pressure in tightly sealed interior, are especially economic, and save both time and energy. -
Page 7: Hob Control
Hob control • After turning the ceramic glass hob on all displays come on for a moment. The hob is ready for operation. • The hob is fi tted with electronic sensors which are switched on if you touch the relevant circle for at least one second. •... - Page 8 Fast deactivation • Selected hotplate must be activated, decimal dot (B1) is on. • Press both (+) and (-) (C and E) sensors simultaneously, and the hotplate is immediately switched off. Turning the hob off • The hob can be switched off any time by pressing the ON/OFF sensor (A).
- Page 9 During the time extra power is activated, the power of other hotplates is limited. This is indicated on the power display by intermittently showing the selected cooking level and limited power. Activating extra powerful setting • First select the hotplate by touching its relevant sensor, and immediately after press the sensor “P”.
- Page 10 Hint • If the power selection knob remains at level 0 three seconds after the automatic fast heating is activated, that is if you fail to select the power setting for regular cooking, the fast heating function is switched off. •...
- Page 11 Example: Set the hotplate to power level 6 and leave it operate for some time. If you do not change the above setting, the safety mechanism will switch the hotplate off after one hour and a half. Protection from overheating Induction hotplate is also fi...
- Page 12 Switching the timer off When the preset time expires a beep is heard which you can either turn off by touching any sensor or leave it to turn off automatically after 2 minutes. Switching the timer of prior expiry of preset time: •...
- Page 13 Safety functions and The hob is equipped with the overheat safety sensors. When error display they are activated they turn off the hotplates nearest to the control board. Error, possible cause, remedy • Constant sound signal or Err 33 - Water is spilled over sensor surface (Wipe the sensor surface) •...
-
Page 14: Cleaning And Maintenance Of Ceramic-Glass Hob
Cleaning and maintenance of ceramic-glass hob Ceramic glass hob should be cleaned only when completely cooled down, preferably after each use, otherwise even the slightest stains remaining after cooking may burn into the hob surface with each following use. For regular maintenance of ceramic-glass hob use special cleansing agents, produced in such way to create protective fi... -
Page 15: Mounting The Built-In Cooktop
Mounting the built-in cooktop Caution ! • To avoid any possible hazard, the appliance may be installed by qualifi ed personnel only. • Panels and furniture lining of the kitchen cabinet receiving the hob must be treated with temperature resistant adhesives (100°C), otherwise they might be discoloured or deformed because of inadequate temperature resistance. -
Page 16: Connection To The Power Supplay
• Induction hob may be built into the 30 to 50 mm thick worktops. • Bottom kitchen element must not have a drawer. It must be fi tted with a horizontal plate 140 mm away from the worktop bottom surface. Space between the plate and the hob must be empty and no objects may be stored or kept there. - Page 17 open position. This may be done by means of fuses, safety switches, etc. • The connection should be selected in accordance with the declared charge capacity of the mains and the fuse power. • Such appliances are allowed to be mounted on one side next to a high kitchen cabinet, the height of which may exceed that of the appliance.
-
Page 18: Technical Information
Technical information Type SIVK 61TS 600 mm Electrical connection 2N AC 400 V Working voltage 230 V, 50 Hz Type of switch Electronic sensors Cooking zones (ø mm/kW) Induction Forward left 145/1.4 (P=1.8) 210/2.3 (P=3.2) Rear left 180/1.85 (P=2.5) Rear right 180/1.85 (P=2.5) Forward right Total power (kW) - Page 20 SIVK 61 TS (P2) 137815/01 (01-10)
Need help?
Do you have a question about the EIT 2600 P2 and is the answer not in the manual?
Questions and answers