Table of Contents
Advertisement
Available languages
Available languages
Quick Links
KALTZONEN-FRITTEUSE
COOL-ZONE DEEP FAT FRYER
FRITEUSE À ZONE FROIDE SKF 2800 B3
KALTZONEN-FRITTEUSE
Bedienungsanleitung
FRITEUSE À ZONE FROIDE
Mode d'emploi
FRITÉZA SE STUDENOU ZÓNOU
Návod k obsluze
FRITADEIRA COM ZONAS FRIAS
Manual de instruções
IAN 300405
COOL-ZONE DEEP FAT FRYER
Operating instructions
KOUDEZONE FRITEUSE
Gebruiksaanwijzing
FREIDORA CON TECNOLOGÍA
DE ZONA FRÍA
Instrucciones de uso
Advertisement
Chapters
Table of Contents

Related Manuals for Silvercrest 300405


Summary of Contents for Silvercrest 300405
- Page 1 COOL-ZONE DEEP FAT FRYER Bedienungsanleitung Operating instructions FRITEUSE À ZONE FROIDE KOUDEZONE FRITEUSE Mode d’emploi Gebruiksaanwijzing FREIDORA CON TECNOLOGÍA FRITÉZA SE STUDENOU ZÓNOU DE ZONA FRÍA Návod k obsluze Instrucciones de uso FRITADEIRA COM ZONAS FRIAS Manual de instruções IAN 300405...
- Page 2 Klappen Sie vor dem Lesen die Seite mit den Abbildungen aus und machen Sie sich anschließend mit allen Funktionen des Gerätes vertraut. Before reading, unfold the page containing the illustrations and familiarise yourself with all functions of the device. Avant de lire le mode d‘emploi, ouvrez la page contenant les illustrations et familiarisez-vous ensuite avec toutes les fonctions de l‘appareil.
-
Page 4: Table Of Contents
Inhaltsverzeichnis Einleitung ........... . . 2 Bestimmungsgemäße Verwendung . -
Page 5: Einleitung
Einleitung Herzlichen Glückwunsch zum Kauf Ihres neuen Gerätes! Sie haben sich damit für ein modernes und hochwertiges Produkt ent- schieden. Die Bedienungsanleitung ist Bestandteil dieses Produktes. Sie enthält wichtige Hinweise für Sicherheit, Gebrauch und Entsorgung. Machen Sie sich vor der Benutzung des Produkts mit allen Bedien- und Sicherheitshin- weisen vertraut. -
Page 6: Lieferumfang
Lieferumfang Das Gerät wird standardmäßig mit folgenden Komponenten geliefert: ▯ Kaltzonen-Fritteuse: – Frittierkorb – Bedien-/Heizelement mit Timer – Edelstahl-Behälter – Gehäuse mit Deckel ▯ Bedienungsanleitung 1) Entnehmen Sie alle Teile des Gerätes und die Bedienungsanleitung aus dem Karton. 2) Entfernen Sie sämtliches Verpackungsmaterial und eventuelle Aufkleber vom Gerät. -
Page 7: Gerätebeschreibung / Zubehör
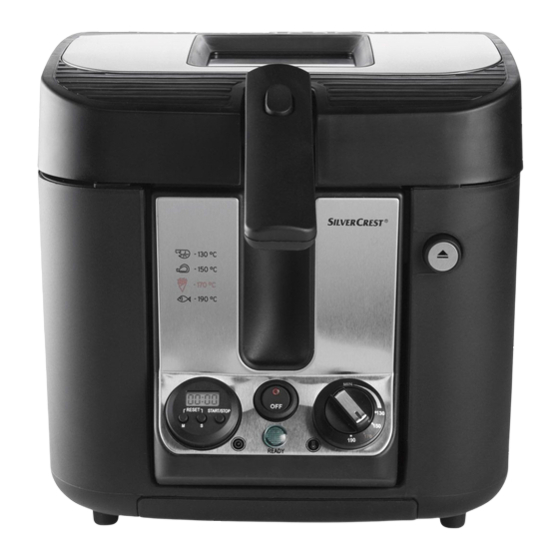
Gerätebeschreibung / Zubehör Sichtfenster Permanent-Metallfilter Frittierkorb Edelstahl-Behälter abnehmbares Bedien-/Heizelement Entriegelungstaste Deckel Kabelaufwicklung Temperaturregler Griffmulden, beidseitig Kontrollleuchte (grün) Ein-/Aus-Schalter inkl. Kontrollleuchte (rot) Timer Verriegelungstaste Griff Gerätedeckel Reset-Taste Technische Daten Netzspannung 230 V ∼ (Wechselstrom), 50 Hz Nennleistung 2800 W Fassungsvermögen Öl ca. -
Page 8: Sicherheitshinweise
Sicherheitshinweise STROMSCHLAGGEFAHR Achten Sie darauf, dass im Betrieb das Netzkabel niemals ► nass oder feucht wird. Führen Sie es so, dass es nicht einge- klemmt oder anderweitig beschädigt werden kann. Schließen Sie das Gerät an eine Netzsteckdose mit einer ► Netzspannung von 230 V ~ , 50 Hz an. - Page 9 WARNUNG! VERLETZUNGSGEFAHR! Falls das Gerät heruntergefallen oder beschädigt ist, dürfen ► Sie es nicht mehr in Betrieb nehmen. Lassen Sie das Gerät von qualifiziertem Fachpersonal überprüfen und gegebenen- falls reparieren. Während des Frittiervorgangs wird heißer Dampf freigesetzt, ► insbesondere, wenn Sie den Deckel öffnen. Halten Sie einen sicheren Abstand zum Dampf.
- Page 10 WARNUNG! BRANDGEFAHR! Benutzen Sie das Gerät nicht in der Nähe von heißen ► Oberflächen. Lassen Sie das Gerät während des Betriebs niemals ► unbeaufsichtigt. Achtung! Heiße Oberfläche! Benutzen Sie niemals Wasser zum Löschen der Fritteuse! Altes bzw. verschmutztes Fett oder Öl entzündet sich bei ►...
- Page 11 HINWEISE ZUM UMGANG MIT BATTERIEN Das Gerät verwendet eine Batterie. Für den Umgang mit Batterien beachten Sie bitte Folgendes: EXPLOSIONSGEFAHR! Werfen Sie keine Batterien ins Feuer. Laden Sie Batterien ► nicht wieder auf. Öffnen Sie die Batterien niemals, löten oder schweißen Sie nie ►...
-
Page 12: Vor Dem Ersten Gebrauch
Vor dem ersten Gebrauch 1) Bevor Sie die Fritteuse zum ersten Mal benutzen, reinigen Sie bitte die einzelnen Teile gründlich und trocknen Sie sie sorgfältig ab (siehe Kapitel „Reinigung und Pflege“). 2) Ziehen Sie den Timer aus der Fritteuse heraus. 3) Ziehen Sie den Isolierstreifen aus dem Batteriefach heraus. -
Page 13: Vorbereitungen
Vorbereitungen 1) Stellen Sie das Gerät auf eine waagerechte, ebene, stabile und hitzebeständige Oberfläche. HINWEIS ► Wenn Sie die Fritteuse unter die Dunstabzugshaube auf den Herd stellen wollen, achten Sie darauf, dass der Herd ausgeschaltet ist. 2) Wickeln Sie das Netzkabel komplett von der Kabelaufwicklung 3) Öffnen Sie den Gerätedeckel , indem Sie die Entriegelungstaste Deckel drücken. -
Page 14: Lebensmittel Frittieren
Lebensmittel frittieren 1) Schalten Sie die Fritteuse am Ein-/Aus-Schalter ein. Die im Ein-/Aus-Schal- integrierte Kontrollleuchte leuchtet auf. 2) Drehen Sie den Temperaturregler auf die gewünschte Temperatur. Das Öl oder Fett wird auf die gewünschte Temperatur erhitzt. Ist die einge- stellte Temperatur erreicht, leuchtet die grüne Kontrollleuchte auf. -
Page 15: Festes Frittierfett
8) Drücken Sie die Verriegelungstaste Griff . Nun lässt sich der Griff absenken. Der Frittierkorb wird in das heiße Öl oder Fett mit abgesenkt. HINWEIS ► Durch das Sichtfenster im Gerätedeckel können Sie den Frittiervor- gang überwachen. Festes Frittierfett Um zu verhindern, dass das Fett spritzt und das Gerät zu heiß wird, treffen Sie bitte folgende Vorsichtsmaßnahmen, wenn Sie festes Frittierfett benutzen: ■... -
Page 16: Count-Down-Funktion
Count-down-Funktion 1) Drücken Sie ggf. die Tasten „M“ und „S“ gleichzeitig (=RESET), um den Timer zurückzusetzen. 2) Drücken Sie die Tasten „M“ und „S“, um die gewünschte Zeit in Minuten und Sekunden einzustellen. Sie können bis zu (min/sec) einstellen. Drücken und halten Sie die Tasten, um die Zahlen schneller zu ändern. 3) Drücken Sie auf die Taste „START/STOP“, um das Ablaufen der Zeit zu starten. -
Page 17: Nach Dem Frittieren
Nach dem Frittieren 1) Wenn das Frittiergut fertig ist, ziehen Sie den Griff nach oben, bis die Verrie- gelungstaste Griff einrastet. 2) Lassen Sie den Frittierkorb zum Abtropfen in dieser Position. 3) Drücken Sie den Ein-/Aus-Schalter . Die Fritteuse ist nun ausgeschaltet. Ziehen Sie den Netzstecker aus der Netzsteckdose. -
Page 18: Reinigung Und Pflege
7) Reinigen Sie alle Teile der Fritteuse gründlich, wie im Kapitel „Reinigung und Pflege“ beschrieben. 8) Füllen Sie frisches Öl oder Fett in die Fritteuse, wie im Kapitel „Frittieren“ beschrieben. Reinigung und Pflege WARNUNG - STROMSCHLAGGEFAHR! ► Bevor Sie das Gerät reinigen, ziehen Sie immer den Netzstecker aus der Netzsteckdose. -
Page 19: Lagerung
6) Reinigen Sie das Bedien-/Heizelement mit einem feuchten Tuch. Bei Be- darf geben Sie ein mildes Spülmittel auf das Tuch und wischen mit einem nur mit klarem Wasser befeuchteten Tuch nach, so dass jegliche Spülmittelreste entfernt sind. Trocknen Sie das Bedien-/Heizelement gut ab. -
Page 20: Tipps
Tipps Pommes frites selbst gemacht ■ Kartoffeln, die zum Frittieren vorgesehen sind, sollten einwandfrei und nicht angekeimt sein. ■ Zum Frittieren sollten „mehligkochende“ oder „vorwiegend festkochende“ Kartoffelsorten verwendet werden. ■ Nach dem Schälen die Kartoffeln entsprechend der gewünschten Zuberei- tung zerkleinern (Streifen oder Scheiben). ■... -
Page 21: Wie Sie Unerwünschten Beigeschmack Loswerden
Wie Sie unerwünschten Beigeschmack loswerden Manche Nahrungsmittel, insbesondere Fisch, geben beim Frittieren Flüssigkeit ab. Diese Flüssigkeiten sammeln sich im Frittieröl oder -fett an und können den Geruch und Geschmack des nachfolgenden, im gleichen Öl oder Fett erhitzten, Frittierguts beeinträchtigen. Gehen Sie wie folgt vor, um wieder geschmacklich neutrales Öl oder Fett zu erhalten: ■... -
Page 22: Hitzeschutzfunktion
Hitzeschutzfunktion Bei Überhitzung schaltet die Hitzeschutzfunktion das Gerät aus. Dies kann vorkommen, wenn sich kein oder nicht ausreichend Öl oder Fett in der Fritteuse befindet oder wenn festes Frittierfett in der Fritteuse geschmolzen wird. Bei festem Fett kann das Bedien-/Heizelement die erzeugte Hitze nicht schnell genug abgeben. -
Page 23: Tabelle Frittierzeiten
Tabelle Frittierzeiten Die Tabelle gibt Beispiele an, welche Nahrungsmittel bei welcher Temperatur frittiert werden müssen, und wie viel Frittierzeit Sie dazu benötigen. Falls die Anweisungen auf der Verpackung des Frittierguts von dieser Tabelle abweichen, folgen Sie bitte den Anweisungen auf der Verpackung. Lebensmittel Temperatur (ca.) Zeit in Minuten... -
Page 24: Fehlerbehebung
Fehlerbehebung MÖGLICHE PROBLEM MÖGLICHE URSACHE LÖSUNGEN Das Gerät ist nicht mit einer Schließen Sie das Gerät an Netzsteckdose verbunden. eine Netzsteckdose an. Wenden Sie sich an den Das Gerät funktioniert Das Gerät ist beschädigt. Service. nicht. Betätigen Sie den Ein-/Aus- Der Ein-/Aus-Schalter oder Schalter... -
Page 25: Anhang
Anhang Gerät entsorgen Werfen Sie das Gerät keinesfalls in den normalen Hausmüll. Dieses Produkt unterliegt der europäischen Richtlinie 2012/19/EU. Entsorgen Sie das Gerät über einen zugelassenen Entsorgungsbetrieb oder über Ihre kommunale Entsorgungseinrichtung. Beachten Sie die aktuell geltenden Vorschriften. Setzen Sie sich im Zweifelsfall mit Ihrer Entsorgungseinrichtung in Verbindung. -
Page 26: Garantie Der Kompernaß Handels Gmbh
Garantie der Kompernaß Handels GmbH Sehr geehrte Kundin, sehr geehrter Kunde, Sie erhalten auf dieses Gerät 3 Jahre Garantie ab Kaufdatum. Im Falle von Mängeln dieses Produkts stehen Ihnen gegen den Verkäufer des Produkts gesetz- liche Rechte zu. Diese gesetzlichen Rechte werden durch unsere im Folgenden dargestellte Garantie nicht eingeschränkt. -
Page 27: Service
Tel.: 0820 201 222 (0,15 EUR/Min.) E-Mail: kompernass@lidl.at Service Schweiz Tel.: 0842 665566 (0,08 CHF/Min., Mobilfunk max. 0,40 CHF/Min.) E-Mail: kompernass@lidl.ch IAN 300405 Importeur Bitte beachten Sie, dass die folgende Anschrift keine Serviceanschrift ist. Kontak- tieren Sie zunächst die benannte Servicestelle. KOMPERNASS HANDELS GMBH... - Page 28 Index Introduction ..........26 Intended use .
- Page 29 Introduction Congratulations on the purchase of your new appliance! You have clearly decided in favour of a modern, high-quality product. These operating instructions are part of this product. They contain important information on safety, use and disposal. Before using the prod- uct, familiarise yourself with all operating and safety instructions.
- Page 30 Package contents This appliance is supplied with the following components as standard: ▯ Cool-Zone Deep Fat Fryer: – Frying basket – Control/heating element with timer – Stainless steel container – Housing with lid ▯ Operating instructions 1) Remove all parts of the appliance and the operating instructions from the box. 2) Remove all packaging materials and any adhesive labels from the appliance.
- Page 31 Description of the appliance/accessories Viewing window Permanent metal filter Frying basket Stainless steel container Removable control/heating element Lid release button Cable spool Temperature control Recessed grips on both sides Control lamp (green) On/off switch with control lamp (red) Timer Handle locking button Appliance lid Reset button Technical data...
- Page 32 Safety instructions RISK OF ELECTRIC SHOCK Ensure that the power cable never becomes wet or damp ► when the appliance is in use. Route the cable so that it cannot be trapped or damaged in any way. Connect the appliance to a mains power socket supplying a ►...
- Page 33 WARNING! RISK OF INJURY! Hot steam is generated during the frying process, especially ► when the lid is open. Keep a safe distance away from the steam. Ensure that all parts are completely dry before pouring oil ► or liquid fat into the deep fat fryer. Otherwise, hot oil or fat could splatter out.
- Page 34 WARNING! RISK OF FIRE! Do not use the appliance near hot surfaces. ► Never leave the appliance unattended while it is being used. ► Caution! Hot surface! NEVER use water to extinguish a fire in the deep fat fryer! Old or dirty fats and oils can spontaneously ignite if over- ►...
- Page 35 INFORMATION ON USING BATTERIES This appliance uses a battery. When handling batteries, please observe the following: RISK OF EXPLOSION! Do not throw batteries into a fire. Do not recharge batteries. ► Never open batteries and never solder or weld batteries. ►...
- Page 36 Before first use 1) Before you use the deep fat fryer for the first time please clean all individual com- ponents thoroughly and carefully dry them (see Chapter “Cleaning and Care”). 2) Pull the timer out of the deep fryer. 3) Remove the insulation strip from the battery compartment.
- Page 37 Preparation 1) Place the appliance on a horizontal, level, stable and heat-resistant surface. NOTE ► If you wish to place the deep fat fryer below the cooker extraction hood, ensure that the cooker is switched off. 2) Unwind all of the power cable from the cable spool 3) Open the appliance lid by pressing the lid release button .
- Page 38 Frying foods 1) Switch on the deep fat fryer using the on/off switch . The control lamp integrated in the on/off switch lights up. 2) Turn the temperature controller to the desired temperature. The cooking oil or the fat is now heated up to the required temperature. When the re- quired temperature has been reached, the green control lamp lights up.
- Page 39 8) Press the latch handle . The handle can now be lowered. The frying basket now lowers into the hot oil or fat. NOTE ► You can monitor the frying process through the viewing window in the appliance lid Solid cooking fats To prevent fat from spraying and the appliance from becoming too hot, please take the following precautions when using solid frying fat: ■...
- Page 40 Count-down function 1) If necessary, press the “M” and “S” buttons simultaneously (=RESET) to reset the timer 2) Press the buttons “M” and “S” to set the time in minutes and seconds. The timer goes up to (min/sec). Press and hold the buttons to scroll through the digits faster. 3) Press the “START/STOP”...
- Page 41 After deep-frying 1) When the food is ready, pull the handle upwards until the latch handle engages. 2) Leave the frying basket in this position to drip off. 3) Press the On/Off switch . The deep fat fryer is now switched off. Remove the power plug from the mains power socket.
- Page 42 7) Thoroughly clean all parts of the deep fat fryer as described in the Chapter “Cleaning and care”. 8) Refill the deep fat fryer with fresh oil or fat as described in the Chapter “Deep Frying”. Cleaning and care WARNING – RISK OF ELECTRIC SHOCK! ►...
- Page 43 6) Clean the control/heating element with a damp cloth. If necessary, add a little mild detergent to the cloth. Wipe this off afterwards using a damp cloth so that all detergent residue is removed. Dry the control/heating element thoroughly. NOTE –...
- Page 44 Tips Home-made chips ■ Potatoes intended for frying should be in good condition and not germinating. ■ Use potato varieties that are suitable for frying, such as “King Edward”, “Maris Piper”, “Cara”, etc. ■ After peeling, cut the potatoes according to the intended preparation (chips or slices).
- Page 45 How to hinder unwanted aftertastes Some foodstuffs, especially fish, release fluids when being fried. These fluids collect in the oil or fat and can influence the smell and taste of fried foods that are later cooked in the same oil or fat. Proceed as follows to obtain a neutral-tasting oil or fat: ■...
- Page 46 Heat protection function In a case of overheating, the heat protection function switches the appliance off. This can happen if there is no, or not sufficient, oil or fat in the deep fat fryer or when solid cooking fats are being melted in the appliance. When using solid cooking fats, the control and heating element cannot give off...
- Page 47 Table – frying times This table provides details of the temperatures at which specific foods must be fried and how much frying time is required for them. Should these details differ from those shown on the food packaging, please observe the instructions given on the packaging.
- Page 48 Troubleshooting POSSIBLE PROBLEM POSSIBLE CAUSE SOLUTIONS The appliance is not connected Connect the appliance to with a mains power socket. a mains power socket. The appliance is not The appliance is damaged. Contact Customer Services. working. The on/off switch has not Press the on/off...
- Page 49 Appendix Disposal of the appliance Never dispose of the appliance in the normal domestic waste. This product is subject to the provisions of European Directive 2012/19/EU. Dispose of the appliance via an approved disposal company or your municipal waste facility. Please observe the currently applicable regulations. Please contact your waste disposal centre if you are in any doubt.
- Page 50 Kompernass Handels GmbH warranty Dear Customer, This appliance has a 3-year warranty valid from the date of purchase. If this product has any faults, you, the buyer, have certain statutory rights. Your statutory rights are not restricted in any way by the warranty described below. Warranty conditions The validity period of the warranty starts from the date of purchase.
- Page 51 Tel.: 1890 930 034 (0,08 EUR/Min., (peak)) (0,06 EUR/Min., (off peak)) E-Mail: kompernass@lidl.ie IAN 300405 Importer Please note that the following address is not the service address. Please use the service address provided in the operating instructions. KOMPERNASS HANDELS GMBH...
- Page 52 Sommaire Introduction ..........50 Utilisation conforme .
-
Page 53: Introduction
Introduction Félicitations pour l’achat de votre nouvel appareil ! Vous avez opté pour un produit moderne, de grande qualité. Le présent mode d’emploi fait partie intégrante de l’appareil. Il contient des remarques importantes concernant la sécurité, l’utilisation et la mise au rebut. -
Page 54: Accessoires Fournis
Accessoires fournis L’appareil est équipé par défaut des composants suivants : ▯ Friteuse à zone froide: – Panier à friture – Élément de commande/chauffant avec minuteur – Cuve en inox – Corps avec couvercle ▯ Mode d’emploi 1) Sortez du carton les pièces de l’appareil et le mode d’emploi. 2) Retirez tous les matériaux d’emballage et les éventuels autocollants de l’appareil. -
Page 55: Description De L'appareil / Accessoires
Description de l’appareil / accessoires Hublot de contrôle Filtre métallique permanent Panier à friture Cuve en inox Élément de commande/chauffant amovible Bouton de déverrouillage du couvercle Enroulement du câble Régulateur de température (thermostat) Poignées encastrées latérales Voyant de contrôle (vert) Commutateur Marche/Arrêt avec voyant de contrôle (rouge) Minuteur Touche de verrouillage poignée... -
Page 56: Consignes De Sécurité
Consignes de sécurité RISQUE D'ÉLECTROCUTION Veillez à ce que le cordon d'alimentation ne soit jamais ► mouillé ou humide en cours d'opération. Disposez le cordon de manière à éviter qu'il ne soit endommagé ou coincé. Raccordez l'appareil sur une prise d'alimentation électrique ►... - Page 57 AVERTISSEMENT ! RISQUE D'ACCIDENT ! Si l’appareil est tombé ou est endommagé, vous ne devez pas ► le remettre en fonctionnement. Faites inspecter et réparer, le cas échéant, l’appareil par des techniciens spécialisés et qualifiés. La friture dégage de la vapeur brûlante, en particulier ►...
- Page 58 AVERTISSEMENT ! RISQUE D'INCENDIE ! N’utilisez pas de minuterie externe ou de dispositif de com- ► mande à distance pour faire fonctionner l’appareil. Ne faites jamais fondre la graisse solide (blocs de graisse) ► dans la friteuse. Les températures élevées peuvent en effet endommager l’élément chauffant ou provoquer un incendie ! Faites d’abord fondre la graisse dans une casserole ou un récipient similaire.
- Page 59 REMARQUES CONCERNANT L'UTILISATION DES PILES L'appareil fonctionne avec une pile. Veuillez noter que la manipulation de piles est soumise aux précautions suivantes : RISQUE D'EXPLOSION ! Ne pas jeter de piles dans le feu. Ne pas recharger les piles. ► N’ouvrez jamais les piles et n’essayez jamais de les braser ►...
-
Page 60: Avant La Première Utilisation
Avant la première utilisation 1) Avant d’utiliser la friteuse pour la première fois, nettoyez et séchez soigneu- sement les différentes pièces (voir chapitre «Nettoyage et entretien»). 2) Sortez le minuteur de la friteuse. 3) Retirez la bande isolatrice du compartiment à piles. 4) Remettez en place le minuteur dans l’évidement sur la friteuse. -
Page 61: Préparatifs
Préparatifs 1) Posez l’appareil sur une surface horizontale, plane, stable et résistante à la chaleur. REMARQUE ► Si vous placez la friteuse sous la hotte aspirante, sur la cuisinière, assurez-vous que cette dernière est arrêtée. 2) Déroulez l’ensemble du cordon d’alimentation de l’enroulement du câble 3) Ouvrez le couvercle de l’appareil en appuyant sur le bouton de déver- rouillage du couvercle... -
Page 62: Frire Des Aliments
Frire des aliments 1) Allumez la friteuse au niveau du commutateur Marche/Arrêt . Le voyant de contrôle intégré dans le commutateur Marche/Arrêt s’allume. 2) Réglez le régulateur de température à la température souhaitée. L’huile ou la graisse est amenée à la température souhaitée. Dès que la température définie est atteinte, le voyant de contrôle vert s’allume. -
Page 63: Graisse De Friture Solide
8) Appuyez sur la touche de verrouillage poignée . La poignée peut maintenant s’abaisser. Le panier à friture plonge alors dans l’huile ou la graisse brûlante. REMARQUE ► Vous pouvez surveiller la friture à travers le hublot de contrôle dans le couvercle de l’appareil Graisse de friture solide Pour éviter toute projection d’huile et que l’appareil ne chauffe excessivement,... -
Page 64: Fonction Décompte Décroissant
Fonction décompte décroissant 1) Appuyez si nécessaire en même temps sur les touches «M» et «S» (=RESET), pour réinitialiser le minuteur 2) Appuyez sur les touches «M» et «S», pour régler le temps souhaité en minutes et secondes. Vous pouvez régler jusqu’à (min/sec). -
Page 65: Après La Friture
Après la friture 1) Une fois la friture terminée, remontez la poignée jusqu’à ce que le bouton de déverrouillage de la poignée s’encliquète. 2) Laissez le panier à friture dans cette position pour l’égouttage. 3) Appuyez sur lecommutateur Marche/Arrêt . La friteuse est maintenant éteinte. -
Page 66: Nettoyage Et Entretien
7) Nettoyez soigneusement toutes les pièces de la friteuse, comme indiqué au chapitre «Nettoyage et entretien». 8) Versez de l’huile ou de la graisse fraîche dans la friteuse, comme indiqué au chapitre «Fritures». Nettoyage et entretien AVERTISSEMENT - RISQUE D'ÉLECTROCUTION ! ►... -
Page 67: Entreposage
6) Nettoyez l’élément de commande/chauffant à l’aide d’un chiffon humide. Si nécessaire, ajoutez un détergent doux sur le chiffon et essuyez avec un chiffon seulement humidifié à l’eau claire afin que les résidus de détergent soient supprimés. Essuyez bien l’élément de commande/chauffant REMARQUE –... -
Page 68: Conseils
Conseils Cuisson de frites maison ■ Les pommes de terres destinées à la friture doivent être parfaites et sans germes. ■ Utilisez de préférence pour la friture des pommes de terres à chair farineuse ou à chair ferme. ■ Une fois épluchées, les pommes de terres doivent être découpées en fonction de la préparation souhaitée (en bâtonnets ou en rondelles). -
Page 69: Comment Éliminer L'arrière-Goût Désagréable
Comment éliminer l’arrière-goût désagréable Certains aliments tels que le poisson dégagent du liquide lorsqu’ils sont frits. Ces liquides s’accumulent dans l’huile ou la graisse de friture et altèrent l’odeur et le goût de l’huile ou de la friture qui est ensuite chauffée dans la même graisse ou huile. Procédez comme suit pour éliminer l’arrière-goût de l’huile ou de la graisse : ■... -
Page 70: Fonction Anti-Surchauffe
Fonction anti-surchauffe La fonction anti-surchauffe éteint l’appareil en cas de surchauffe. Ceci peut arriver si la quantité d’huile ou de graisse dans la friteuse est insuffi- sante ou si la graisse de friture a fondu dans la friteuse. Avec de la graisse solide, l’élément de commande/chauffant ne peut pas fournir la chaleur avec une rapidité... -
Page 71: Tableau Des Durées De Friture
Tableau des durées de friture Le tableau donne des exemples d’aliments et de la température à laquelle ils doivent être frits, et quelle est la durée de friture recherchée. Si les instructions figurant sur l’emballage de l’aliment sont différentes de celles indiquées dans ce tableau, suivez les instructions données sur l’emballage. -
Page 72: Dépannage
Dépannage SOLUTIONS PROBLÈMES CAUSE POSSIBLE POSSIBLES L'appareil n'est pas branché Branchez l'appareil sur une sur une prise secteur. prise secteur. Adressez-vous au service L'appareil ne fonctionne pas. L'appareil est endommagé. après-vente. Le commutateur Marche/ Actionnez sur le commuta- Arrêt n'a pas été actionné. teur Marche/Arrêt Le voyant de contrôle 1. -
Page 73: Annexe
Annexe Mise au rebut L’appareil ne doit jamais être jeté dans la poubelle domestique normale. Cet appareil est soumis aux impératifs de la directive européenne 2012/19/EU. Remettez l’appareil destiné au recyclage à une entreprise spécialisée ou au centre de recyclage de votre commune. Respectez la réglementation en vigueur. En cas de doutes, contactez votre organisme de recyclage. -
Page 74: Garantie De Kompernass Handels Gmbh
Garantie de Kompernass Handels GmbH Chère cliente, cher client, Cet appareil est garanti 3 ans à partir de la date d’achat. Si ce produit venait à présenter des vices, vous disposez de droits légaux face au vendeur de ce produit. Vos droits légaux ne sont pas restreints par notre garantie présentée ci-dessous. -
Page 75: Service Après-Vente
Tel.: 0800 919270 E-Mail: kompernass@lidl.fr Service Belgique Tel.: 070 270 171 (0,15 EUR/Min.) E-Mail: kompernass@lidl.be IAN 300405 Importateur Veuillez tenir compte du fait que l’adresse suivante n’est pas une adresse de service après-vente. Veuillez d’abord contacter le service mentionné. KOMPERNASS HANDELS GMBH... - Page 76 Inhoud Inleiding ........... . . 74 Gebruik in overeenstemming met bestemming .
-
Page 77: Inleiding
Inleiding Gefeliciteerd met de aankoop van uw nieuwe apparaat! U hebt hiermee gekozen voor een hoogwaardig product. De ge- bruiksaanwijzing maakt deel uit van dit product. Deze bevat belangrijke aanwijzingen voor veiligheid, gebruik en afvoeren. Maak uzelf voorafgaand aan het gebruik van het product vertrouwd met alle bedienings- en veiligheidsvoor- schriften. -
Page 78: Inhoud Van Het Pakket
Inhoud van het pakket Het apparaat wordt standaard met volgende componenten geleverd: ▯ Koudezone friteuse: – Frituurmand – Bedienings-/verwarmingselement met timer – RVS-reservoir – Behuizing met deksel ▯ Gebruiksaanwijzing 1) Haal alle delen van het apparaat en de gebruiksaanwijzing uit de doos. 2) Verwijder alle verpakkingsmaterialen en eventuele etiketten van het apparaat. -
Page 79: Productbeschrijving / Accessoires
Productbeschrijving / accessoires Kijkvenster Permanent metaalfilter Frituurmand RVS-reservoir Afneembaar bedienings-/verwarmingselement Ontgrendelknop van het deksel Kabelspoel Temperatuurregelaar Greepopeningen, aan beide zijden Indicatielampje (groen) Aan-/uitknop incl. indicatielampje (rood) Timer Vergrendelingsknop handgreep Apparaatdeksel Resettoets Technische gegevens Netspanning 230 V ∼ (wisselstroom), 50 Hz Nominaal vermogen 2800 W Capaciteit olie... -
Page 80: Veiligheidsvoorschriften
Veiligheidsvoorschriften GEVAAR VOOR EEN ELEKTRISCHE SCHOK Let erop dat het netsnoer nooit nat of vochtig wordt wanneer ► het apparaat in bedrijf is. Leg het zo neer dat het niet beklemd raakt of anderszins beschadigd kan worden. Sluit het apparaat aan op een stopcontact met een netspanning ►... - Page 81 WAARSCHUWING! LETSELGEVAAR! Tijdens het frituren komt hete damp vrij, met name als u de ► deksel opent. Neem een veilige afstand tot de damp in acht. Controleer of alle onderdelen volledig droog zijn voordat u ► olie of vloeibaar vet in de friteuse doet. Hete olie en heet vet kunnen anders spatten.
- Page 82 WAARSCHUWING! BRANDGEVAAR! Gebruik geen externe tijdschakelklok of een separaat systeem ► voor afstandsbediening om het apparaat aan te sturen. Smelt nooit vast vet (blokken vet) in de friteuse. Door de ► hoge temperatuur kan het verwarmingselement beschadigd worden of er ontstaat een brand! Smelt het vet eerst in een pan o.i.d.
- Page 83 AANWIJZINGEN VOOR DE OMGANG MET BATTERIJEN Het apparaat werkt op één batterij. Neem bij de omgang met batterijen het volgende in acht: EXPLOSIEGEVAAR! Gooi geen batterijen in vuur. Laad batterijen niet opnieuw op. ► Open nooit batterijen en soldeer of las batterijen niet. ►...
-
Page 84: Vóór De Eerste Ingebruikname
Vóór de eerste ingebruikname 1) Maak, voordat u de friteuse voor de eerste keer gebruikt, de afzonderlijke onderdelen goed schoon en droog ze zorgvuldig af (zie het hoofdstuk „Reiniging en onderhoud“). 2) Haal de timer van de friteuse af. 3) Trek de isolatiestrook uit het batterijvak. 4) Schuif de timer weer in de opening op de friteuse. -
Page 85: Voorbereidingen
Voorbereidingen 1) Zet het apparaat op een horizontaal, vlak, stabiel en hittebestendig oppervlak. OPMERKING ► Als u de friteuse onder de afzuigkap op de kookplaat wilt zetten, controleer dan eerst of de kookplaat is uitgeschakeld. 2) Rol het snoer helemaal van de kabelspoel 3) Druk op de ontgrendelknop van het deksel om het apparaatdeksel openen. -
Page 86: Levensmiddelen Frituren
Levensmiddelen frituren 1) Zet de friteuse aan met de aan/uit-knop . Het indicatielampje dat geïnte- greerd is in de aan/uit-knop gaat branden. 2) Draai de temperatuurregelaar op de gewenste temperatuur. De olie of het vet wordt op de gewenste temperatuur verhit. Zodra de ingestelde temperatuur is bereikt, gaat het groene indicatielampje branden. -
Page 87: Vast Frituurvet
8) Druk op de vergrendelknop van de handgreep . Nu kunt u de handgreep laten zakken. De frituurmand zakt in de hete olie of het hete vet. OPMERKING ► Door het kijkvenster in het apparaatdeksel kunt u het frituren observeren. Vast frituurvet Om te voorkomen, dat het vet spat en het apparaat te heet wordt, neemt u de volgende voorzorgsmaatregelen, als u vast frituurvet gebruikt:... -
Page 88: Count-Down-Functie
Count-down-functie 1) Druk zo nodig gelijktijdig op de toetsen “M” en “S” (= RESET) om de timer te resetten. 2) Druk op de toetsen “M” en “S” om de gewenste tijd in minuten en seconden in te stellen. U kunt een tijd tot (min/sec) instellen. -
Page 89: Na Het Frituren
Na het frituren 1) Als het voedsel is gefrituurd, trekt u de handgreep omhoog tot de vergrendel- knop van de handgreep vastklikt. 2) Laat de frituurmand in deze stand om af te druipen. 3) Druk op de aan-/uitknop . De friteuse is nu uitgeschakeld. Trek de stekker uit het stopcontact. -
Page 90: Reiniging En Onderhoud
7) Maak alle onderdelen van de friteuse grondig schoon zoals beschreven in het hoofdstuk „Reiniging en onderhoud“. 8) Vul de friteuse met verse olie of vers vet zoals beschreven in het hoofdstuk „Frituren“. Reiniging en onderhoud WAARSCHUWING - GEVAAR VOOR EEN ELEKTRISCHE SCHOK! ►... -
Page 91: Opbergen
6) Reinig het bedienings-/verwarmingselement met een vochtige doek. Doe zo nodig wat mild afwasmiddel op de doek en neem het element daarna met een met schoon water bevochtigde doek af, zodat alle afwasmiddelresten worden verwijderd. Droog het bedienings-/verwarmingselement goed af. OPMERKING –... -
Page 92: Tips
Tips Zelf patates frites maken ■ Aardappels die voor patates frites bestemd zijn, dienen onbeschadigd te zijn en mogen nog niet uitlopen. ■ Gebruik voor het frituren „niet-kruimige” aardappelen of „vastkokers”. ■ Verdeel de aardappels na het schillen afhankelijk van de gewenste bereiding in stukken (in repen of schijfjes). -
Page 93: Hoe U Afkomt Van Ongewenste Bijsmaken
Hoe u afkomt van ongewenste bijsmaken Sommige levensmiddelen, vooral vis, verliezen bij het frituren vocht. Dit vocht blijft achter in de frituurolie of het frituurvet en kan dan van invloed zijn op de geur en de smaak van later in dezelfde olie of hetzelfde vet bereid voedsel. Ga als volgt te werk om de olie of het vet weer smaakloos en neutraal te maken: ■... -
Page 94: Oververhittingsbeveiliging
Oververhittingsbeveiliging Bij oververhitting schakelt de oververhittingsbeveiliging de friteuse uit. Dit kan gebeuren als er geen of niet genoeg olie of vet in de friteuse is, of als vast frituurvet in de friteuse wordt gesmolten. Bij vast frituurvet kan het bedienings-/verwarmingselement de opgewekte hitte niet snel genoeg afgeven. -
Page 95: Tabel Frituurtijden
Tabel Frituurtijden De tabel vermeldt voorbeelden welke levensmiddelen op welke temperatuur moeten worden gefrituurd en hoeveel frituurtijd daarvoor nodig is. Volg, als de aanwijzingen op de verpakking van een product hiervan afwijken, de aanwijzingen op de verpakking. Temperatuur Levensmiddelen Tijd in minuten (ca.) Frikadel (diepvries) 150°C... -
Page 96: Problemen Oplossen
Problemen oplossen MOGELIJKE MOGELIJKE PROBLEEM OORZAAK OPLOSSINGEN Het apparaat is niet verbonden Sluit het apparaat aan met een stopcontact. op een stopcontact. Wendt u zich tot de Het apparaat functioneert Het apparaat is beschadigd. klantenservice. niet. Druk op de aan/ De aan/uit-knop werd niet uit-knop... -
Page 97: Appendix
Appendix Apparaat afdanken Deponeer het toestel in geen geval bij het normale huisvuil. Dit product is onderworpen aan de Europese richtlijn 2012/19/EU. Voer het toestel af via een erkend afvalverwerkingsbedrijf of via uw gemeente- reiniging. Neem de bestaande voorschriften in acht. Neem in geval van twijfel contact op met uw gemeentereinigingsdienst. -
Page 98: Garantie Van Kompernaß Handels Gmbh
Garantie van Kompernaß Handels GmbH Geachte klant, U hebt op dit apparaat 3 jaar garantie vanaf de aankoopdatum. In geval van ge breken in dit product hebt u wettelijke rechten tegenover de verkoper van het product. Deze wettelijke rechten worden door onze hierna beschreven garantie niet beperkt. -
Page 99: Service
Tel.: 0900 0400223 (0,10 EUR/Min.) E-Mail: kompernass@lidl.nl Service België Tel.: 070 270 171 (0,15 EUR/Min.) E-Mail: kompernass@lidl.be IAN 300405 Importeur Let op: het volgende adres is geen serviceadres. Neem eerst contact op met het opgegeven serviceadres. KOMPERNASS HANDELS GMBH BURGSTRASSE 21... - Page 100 Obsah Úvod ............98 Použití...
-
Page 101: Úvod
Úvod Gratulujeme Vám k zakoupení nového přístroje! Vaším nákupem jste si vybrali moderní a kvalitní výrobek. Návod k obsluze je součástí tohoto výrobku. Obsahuje důležité pokyny a upozornění ohledně bezpečnosti, použití a likvidace. Před použitím výrobku si dobře přečtěte provozní a bezpečnostní pokyny. Tento výrobek používejte pouze předepsaným způsobem a v uvedených oblastech použití. -
Page 102: Rozsah Dodávky
Rozsah dodávky Přístroj se standarně dodává s následujícími komponenty: ▯ fritéza se studenou zónou: – fritovací koš – obslužný/ohřívací prvek s kuchyňským časovačem – nádoba z ušlechtilé oceli – těleso s víkem ▯ návod k obsluze 1) Všechny části přístroje a návod k obsluze vyjměte z kartonu. 2) Odstraňte z přístroje všechen obalový... -
Page 103: Popis Přístroje / Příslušenství
Popis přístroje / příslušenství průzor permanentní kovový filtr fritovací koš nádoba z ušlechtilé oceli snímatelný obslužný/ohřívací prvek uvolňovací tlačítko víka úložný prostor pro navinutí kabelu regulátor teploty oboustranné zapuštěné úchyty kontrolka (zelená) spínač ZAP/VYP vč. kontrolky (červená) kuchyňský časovač zajišťovací tlačítko rukojeti víko přístroje resetovací... -
Page 104: Bezpečnostní Pokyny
Bezpečnostní pokyny NEBEZPEČÍ ÚDERU ELEKTRICKÝM PROUDEM Dbejte na to, aby přívodní kabel během provozu nikdy ne- ► navlhnul. Veďte jej tak, aby se nikde nemohl zachytit nebo jinak poškodit. Přístroj zapojte do síťové zásuvky se síťovým napětím 230 V ~ / ►... - Page 105 VÝSTRAHA! NEBEZPEČÍ ZRANĚNÍ! Dříve, než do fritézy nalijete olej nebo tekutý tuk, se ujistěte, ► zda jsou všechny díly naprosto suché. V opačném případě horký olej nebo tuk stříká. Osušte pečlivě také všechny potraviny, než je vložíte do fritézy. ► V opačném případě...
- Page 106 POZOR - POŠKOZENÍ PŘÍSTROJE! Do nádoby z ušlechtilé oceli nenalévejte nikdy více tuku než ► po označení MAX a zároveň nikdy méně tuku než po označení MIN. Při každém zapnutí přístroje dbejte na to, aby byl ve fritéze dostatek tuku nebo oleje. Pokud se v přístroji nenachází...
-
Page 107: Před Prvním Použitím
Před prvním použitím 1) Před prvním použitím fritézy důkladně očistěte její jednotlivé části a pečlivě je osušte (viz kapitola "Čištění a údržba"). 2) Kuchyňský časovač vytáhněte z fritézy. 3) Vytáhněte izolační pásku z přihrádky na baterie. 4) Kuchyňský časovač zasuňte opět do vyhloubeniny na fritéze. UPOZORNĚNÍ... -
Page 108: Příprava
Příprava 1) Přístroj postavte na vodorovnou, rovnou, stabilní a tepelně odolnou plochu. UPOZORNĚNÍ ► Chcete-li fritézu umístit pod digestoř na sporák, dbejte na to, aby byl sporák vypnutý. 2) Odviňte síťový kabel kompletně z úložného prostoru pro navinutí kabelu 3) Otevřete víko přístroje tak, že stisknete uvolňovací... -
Page 109: Fritování Potravin
Fritování potravin 1) Fritézu zapněte přepínačem pro zapnutí/vypnutí . Kontrolka, integorvaná do přepínače pro zapnutí/vypnutí , se rozsvítí. 2) Regulátor teploty nastavte na požadovanou teplotu.Olej nebo tuk se zahřeje na požadovanou teplotu. Jakmile se dosáhne nastavená teplota, se rozvítí zelená kontrolka UPOZORNĚNÍ... -
Page 110: Pevný Fritovací Tuk
8) Stiskněte zajišťovací tlačítko rukojet i . Až nyní lze zatlačit rukojeť. Fritovací koš se ponoří do horkého oleje nebo tuku. UPOZORNĚNÍ ► Průzorem ve víku přístroje můžete sledovat průběh fritování. Pevný fritovací tuk Pro zabránění tuku nebo přílišnému přehřátí přístroje, proveďte následující bez- pečnostní... -
Page 111: Funkce Count-Up
UPOZORNĚNÍ ► Průběh času můžete kdykoliv přerušit stisknutím libovolného tlačítka. K dalšímu plynutí času stiskněte tlačítko „START/STOP“. 4) Jakmile nastavený čas uplynul, zazní několik zvukových signálů. Na displeji se zobrazí naposledy nastavený čas. UPOZORNĚNÍ ► Alarm lze předčasně zrušit stisknutím libovolného tlačítka. Stisknete-li tlačítko „START/STOP“, na displeji se zobrazí... -
Page 112: Výměna Fritovacího Tuku
5) Zdvihněte fritovací koš opatrně z fritézy. Je-li to nutné, oklepejte nadbytečný olej a tuk z fritézy. 6) Fritované potraviny dejte do mísy nebo síta (se savým kuchyňským papírem!). Pokud fritézu nepoužíváte pravidelně, doporučujeme, abyste olej nebo tekutý tuk po vychladnutí uchovávali v dobře uzavřených lahvích nebo jiných nádobách, nejlépe v ledničce nebo na jiném chladném místě. -
Page 113: Čištění A Údržba
Čištění a údržba VÝSTRAHA - NEBEZPEČÍ ÚRAZU ELEKTRICKÝM PROUDEM! ► Než začnete přístroj čistit, vytáhněte vždy síťovou zástrčku ze sítě. ► Nikdy neponořujte obslužný/ohřívací prvek , síťový kabel nebo plášť do vody, nikdy je neoplachujte pod tekoucí vodou! Vedlo by to k nenávratným poškozením přístroje. -
Page 114: Skladování
UPOZORNĚNÍ – Chcete-li vyčistit permanentní kovový filtr ve vnitřní části víka přístroje ponořte víko přístroje do teplé vody s jemným čisticím prostředkem. – Na chvíli je namočte a pohybujte jím v roztoku sem a tam. – Víko přístroje opláchněte čistou vodou. –... -
Page 115: Tipy
Tipy Hranolky svépomocí ■ Brambory, které jsou určeny k fritování, by měly být kvalitní a nenaklíčené. ■ K fritování by se měly používat odrůdy brambor, které mají po vaření mouč- natou nebo převážně pevnou strukturu. ■ Po oloupání nakrájejte brambory podle plánované přípravy (hranolky nebo plátky). -
Page 116: Jak Se Zbavíte Nežádoucích Pachutí
Jak se zbavíte nežádoucích pachutí Některé potraviny, zejména pak ryby, pouštějí při fritování tekutinu. Tyto tekutiny se shromažďují ve fritovacím oleji nebo tuku a mohou negativně ovlivnit vůni a chuť potravin, které se později fritují ve stejném oleji nebo tuku. Postupujte následovně, abyste si uchovali chuťově... -
Page 117: Ochrana Před Přehřátím
Ochrana před přehřátím Při přehřátí se přístroj vypne funkcí ochrany před přehřátím. K této situaci může dojít, pokud se ve fritéze nenachází dostatečné množství oleje nebo tuku, pokud tam není žádný olej nebo tuk nebo pokud se ve fritéze rozpouští pevný... -
Page 118: Tabulka Fritovacích Časů
Tabulka fritovacích časů V tabulce jsou uvedeny příklady, které potraviny se za jaké teploty mohou fritovat a jaká fritovací doba je k tomu potřebná. Pokud se údaje na obalu potraviny určené k fritování odchylují od údajů v této tabulce, řiďte se údaji uvedenými na obalu. Potraviny Teplota (cca.) Čas v minutách... -
Page 119: Odstranění Závad
Odstranění závad PROBLÉM MOŽNÉ PŘÍČINY MOŽNÁ ŘEŠENÍ Zástrčka přístroje nebyla zastr- Zapojte spotřebič do čená do síťové zásuvky. zásuvky. Přístroj je poškozen. Obraťte se na servis. Spotřebič nefunguje. Přepínač pro zapnutí/ Stiskněte přepínač pro nebo vypnutí nebyl aktivován. zapnutí/vypnutí 1. Vytáhněte zástrčku ze Kontrolka, integrovaná... -
Page 120: Likvidace Baterií / Akumulátorů
Likvidace baterií / akumulátorů Baterie / akumulátory nesmí přijít do domovního odpadu. Každý spotřebitel je ze zákona povinen baterie a akumulátory odevzdat na sběrném místě ve své obci / městské čtvrti nebo v obchodě. Tato povinnost slouží k tomu, aby mohly být baterie /akumulátory odevzdány k ekologické likvidaci. Baterie / akumulátory odevzdávejte pouze zcela vybité. -
Page 121: Servis
Na webových stránkách www.lidl-service.com si můžete stáhnout tyto a mnoho dalších příruček, videí o výrobku a software. Servis Servis Česko Tel.: 800143873 E-Mail: kompernass@lidl.cz IAN 300405 Dovozce Dbejte prosím na to, že následující adresa není adresou servisu. Kontaktujte nejprve uvedený servis. KOMPERNASS HANDELS GMBH BURGSTRASSE 21 DE - 44867 BOCHUM NĚMECKO... - Page 122 Indice Introducción ..........120 Finalidad de uso .
-
Page 123: Introducción
Introducción ¡Felicidades por la compra de su aparato nuevo! Ha optado por adquirir un producto moderno y de alta calidad. Las instrucciones de uso forman parte del producto. Contiene indica- ciones importantes acerca de la seguridad, uso y evacuación. Antes de usar el producto familiaricese con todas las indicaciones de manejo y de seguridad. -
Page 124: Volumen De Suministro
Volumen de suministro El aparato se suministra de serie con los componentes siguientes: ▯ Freidora con tecnología de zona fría: – Cesta – Panel de control/resistencia con temporizador – Recipiente de acero inoxidable – Carcasa con tapa ▯ Instrucciones de uso 1) Retire todas las piezas del aparato y las instrucciones de uso de la caja. -
Page 125: Descripción Del Aparato/Accesorios
Descripción del aparato/accesorios Ventana de control Filtro metálico permanente Cesta Recipiente de acero inoxidable Panel de control/resistencia extraíble Botón de desbloqueo de la tapa Enrollacables Regulador de temperatura Agarres laterales Piloto de control (verde) Interruptor de encendido/apagado con piloto de control (rojo) Temporizador Tecla de bloqueo del asa Tapa del aparato... -
Page 126: Indicaciones De Seguridad
Indicaciones de seguridad PELIGRO DE ELECTROCUCIÓN Preste atención a que el cable de red no se moje ni humedezca ► cuando está funcionando. Tiéndalo de modo que no pueda ser aplastado o dañado de forma alguna. Conecte el aparato a una base de enchufe con una tensión ►... - Page 127 ¡ADVERTENCIA! ¡PELIGRO DE LESIONES! En caso de que se caiga el aparato o esté dañado, no deberá ► ponerlo de nuevo en funcionamiento. Deje que compruebe el aparato personal especialista cualificado y en su caso que lo repare. Mientras se fríen los alimentos se libera vapor caliente, ►...
- Page 128 ¡ADVERTENCIA! ¡RIESGO DE INCENDIO! No utilice ningún tipo de reloj programador externo ni un ► sistema de control remoto aparte para accionar el aparato. Nunca derrita grasa sólida (pedazos de grasa) en la freidora. ► ¡Con la elevada temperatura la resistencia puede resultar dañada o producirse un incendio! Derrita la grasa previa- mente en una olla o similar.
- Page 129 INDICACIONES ACERCA DE LA MANIPULACIÓN DE LAS PILAS El aparato contiene una pila. Tenga en cuenta lo siguiente a la hora de manipular pilas: ¡PELIGRO DE EXPLOSIÓN! No arroje las pilas al fuego. No recargue las pilas. ► No abra, estañe ni suelde nunca las pilas. Existe peligro de ►...
-
Page 130: Antes Del Primer Uso
Antes del primer uso 1) Antes de utilizar la freidora por primera vez, por favor limpie a fondo cada pieza y séquela encarecidamente (véase el capítulo "Limpieza y mantenimento"). 2) Retire el temporizador de la freidora. 3) Retire las cintas aislantes del compartimento para pilas. 4) Vuelva a colocar el temporizador en el alojamiento de la freidora. -
Page 131: Preparativos
Preparativos 1) Coloque el aparato sobre una superficie horizontal, nivelada, estable y termoresistente. INDICACIÓN ► Si desea colocar la freidora bajo la campana extractora y sobre los fogones, asegúrese de que los fogones estén apagados. 2) Desenrolle el cable de red por completo del enrollacables 3) Abra la tapa del aparato con el botón de desbloqueo de la tapa Tras esto, se soltará... -
Page 132: Freír Alimentos
Freír alimentos 1) Encienda la freidora con el interruptor de encendido/apagado . El piloto de control integrado en el interruptor de encendido/apagado se ilumina. 2) Gire el regulador de temperatura a la temperatura deseada. El acei- te o bien grasa se calienta hasta alcanzar la temperatura elegida. En cuanto se alcanza la temperatura ajustada, se ilumina el piloto de control verde ADVERTENCIA Encontrará... -
Page 133: Grasa Sólida Para Freír
8) Pulse la tecla de bloqueo del asa . Tras esto, podrá bajarse el asa. La cesta se sumergirá en el aceite o grasa caliente. INDICACIÓN ► El proceso de freidura puede supervisarse a través de la ventana de control de la tapa del aparato Grasa sólida para freír Para evitar que la grasa salpique y el aparato se caliente demasiado, tome las... -
Page 134: Función De Cuenta Atrás
Función de cuenta atrás 1) En caso necesario, pulse los botones “M” y “S” al mismo tiempo (= puesta a cero) para poner a cero el temporizador 2) Pulse los botones “M”y “S” para ajustar el tiempo deseado en minutos y segundos. -
Page 135: Tras La Fritura
Tras la fritura 1) Cuando haya terminado de freír los alimentos, tire del asa hacia arriba hasta que la tecla de bloqueo del asa encastre. 2) Para escurrir el aceite/grasa, deje la cesta en esta posición. 3) Pulse el interruptor de encendido/apagado . -
Page 136: Limpieza Y Mantenimiento
7) Limpie minuciosamente todas las piezas de la freidora, como se describe en el capítulo "Limpieza y mantenimiento". 8) Rellene la freidora con grasa o aceite fresco, como se describe en el capítu- lo "Freír". Limpieza y mantenimiento ADVERTENCIA - ¡PELIGRO DE DESCARGA ELÉCTRICA! ►... -
Page 137: Almacenamiento
INDICACIÓN – Si desea limpiar el filtro metálico permanente situado en el interior de la tapa del aparato , sumerja la tapa del aparato en agua caliente con un poco de jabón lavavajillas suave. – Déjela en remojo durante un tiempo y muévala de un lado para otro. –... -
Page 138: Consejos
Consejos Patatas fritas caseras ■ Las patatas para freír deben estar en perfecto estado y no germinadas . ■ Para freír pueden utilizarse patatas de los tipos "harinosa" o "de cocer". ■ Después de pelar las patatas píquelas según la preparación deseada (en láminas o rodajas). -
Page 139: Cómo Eliminar La Transferencia De Sabor No Deseada
Cómo eliminar la transferencia de sabor no deseada Muchos alimentos, especialmente el pescado, sueltan jugo al freírlos. Estos líquidos se acumulan en el aceite o la grasa de freír y pueden influir en el olor y sabor del siguiente alimento cocinado en el mismo aceite o grasa. Siga estas indicaciones, para recuperar un aceite o grasa de sabor neutral: ■... -
Page 140: Función De Protección Térmica
Función de protección térmica En caso de sobrecalentamiento se encenderá la función de protección térmica del aparato. Esto puede pasar cuando no se ha introducido aceite o grasa en la freidora, o la cantidad no es suficiente, o cuando se funde grasa sólida en la freidora. Con la grasa sólida, el panel de control/resistencia no puede asimilar el calor generado con suficiente rapidez. -
Page 141: Tabla De Tiempos De Fritura
Tabla de tiempos de fritura La tabla ofrece ejemplos acerca de la temperatura con la que ha de freír los alimentos correspondientes y el tiempo de fritura necesario. Si las indicaciones en el envase del alimento que va a freír son diferentes a las que aparecen en la tabla, siga por favor las instrucciones del envase. -
Page 142: Eliminación De Fallos
Eliminación de fallos PROBLEMA POSIBLE CAUSA POSIBLES SOLUCIONES El aparato no está conectado Conecte la clavija de red con una base de enchufe de red. a una base de enchufe. Póngase en contacto con El aparato está dañado. el servicio de asistencia El aparato no funciona. -
Page 143: Anexo
Anexo Evacuación del aparato En ningún caso deberá tirar el aparato con la basura doméstica. Este producto está sujeto a la directiva europea 2012/19/EU. Evacue el aparato en un centro de evacuación autorizado a través de las insta- laciones de evacuación comunitarias. Preste atención a las normas en vigor. En caso de dudas póngase en contacto con su centro de evacuación. -
Page 144: Garantía De Kompernass Handels Gmbh
Garantía de Kompernass Handels GmbH Estimado cliente: Este aparato cuenta con una garantía de 3 años a partir de la fecha de compra. Si se detectan defectos en el producto, puede ejercer sus derechos legales frente al vendedor. Estos derechos legales no se ven limitados por la garantía descrita a continuación. -
Page 145: Asistencia Técnica
(0,08 EUR/Min. + 0,11 EUR/llamada (tarifa normal)) (0,05 EUR/Min. + 0,11 EUR/llamada (tarifa reducida)) E-Mail: kompernass@lidl.es IAN 300405 Importador Tenga en cuenta que la dirección siguiente no es una dirección de asistencia técnica. Póngase primero en contacto con el centro de asistencia técnica especificado. - Page 146 Índice Introdução ..........144 Utilização correta .
-
Page 147: Introdução
Introdução Parabéns pela compra do seu novo aparelho! Optou por um produto moderno de elevada qualidade. O manual de instruções é parte integrante deste produto. Este contém indica- ções importantes para a segurança, utilização e eliminação. Antes de utilizar o produto, familiarize-se com todas as indicações de operação e segurança. Utilize este produto somente como descrito e nas áreas de aplicação indicadas. -
Page 148: Conteúdo Da Embalagem
Conteúdo da embalagem Por norma, o aparelho é fornecido com os seguintes componentes: ▯ Fritadeira com zonas frias: – Cesto de fritar – Elemento de comando/aquecimento com temporizador – Recipiente em aço inoxidável – Caixa com tampa ▯ Manual de instruções 1) Retire todas as peças do aparelho e o manual de instruções da caixa. -
Page 149: Descrição Do Aparelho/Dos Acessórios
Descrição do aparelho/dos acessórios Janela de visualização Filtro metálico permanente Cesto de fritar Recipiente em aço inoxidável Elemento de comando/aquecimento amovível Botão de desbloqueio da tampa Dispositivo de enrolamento do cabo Regulador de temperatura Pegas encastradas, de ambos os lados Luz de controlo (verde) Interruptor Ligar/desligar, incl. -
Page 150: Indicações De Segurança
Indicações de segurança PERIGO DE CHOQUE ELÉTRICO Certifique-se de que, durante o funcionamento, o cabo de ► alimentação nunca fica molhado ou húmido. Disponha o cabo de modo a que não fique entalado ou danificado. Ligue o aparelho a uma tomada com uma tensão de alimen- ►... - Page 151 AVISO! PERIGO DE FERIMENTOS! Durante o processo de fritura liberta-se vapor quente, es- ► pecialmente ao abrir a tampa. Mantenha uma distância segura relativamente ao vapor. Certifique-se de que todas as peças estão completamente ► secas antes de colocar óleo ou gordura líquida na fritadeira. Caso contrário, o óleo ou a gordura quente pode salpicar.
- Page 152 AVISO! PERIGO DE INCÊNDIO! Não utilize um temporizador externo ou um sistema de ► controlo remoto para operar o aparelho. Nunca derreta gordura sólida (blocos de gordura) na ► fritadeira. A temperatura elevada pode danificar o elemento de aquecimento ou provocar um incêndio! Derreta a gordura previamente numa panela ou semelhante.
- Page 153 INDICAÇÕES RELATIVAS AO MANUSEAMENTO DAS PILHAS O aparelho necessita de uma pilha. Para um manuseamento correto das pilhas, respeite as seguintes indicações: PERIGO DE EXPLOSÃO! Não coloque as pilhas no fogo. Não recarregue as pilhas. ► Nunca abra nem tente soldar as pilhas. Perigo de explosão ►...
-
Page 154: Antes Da Primeira Utilização
Antes da primeira utilização 1) Antes de utilizar a fritadeira pela primeira vez, lave bem cada uma das peças e seque-as cuidadosamente (ver capítulo "Limpeza e conservação"). 2) Retire o temporizador para fora da fritadeira. 3) Remova a tira de isolamento do compartimento das pilhas. 4) Volte a inserir o temporizador no entalhe da fritadeira. - Page 155 4) Puxe a pega para cima, até esta encaixar audivelmente. Retire o cesto de fritar para fora da fritadeira. INDICAÇÕES ► Utilize apenas óleos ou gorduras que sejam explicitamente indicados para fritar e que estejam identificados como não espumosos. Esta informação encontra-se na embalagem ou na etiqueta.
-
Page 156: Fritar Alimentos
Fritar alimentos 1) Ligue a fritadeira com o interruptor ligar/desligar . A luz de controlo integrada no interruptor ligar/desligar acende-se. 2) Rode o regulador de temperatura para a temperatura desejada. O óleo ou a gordura é aquecido(a) à temperatura desejada. Logo que seja atingida a temperatura desejada, acende-se a luz de controlo NOTA Pode consultar a temperatura correta para fritar na embalagem do produto a... -
Page 157: Gordura Sólida De Fritura
8) Pressione o botão de desbloqueio da pega . Agora é possível baixar a pega. O cesto de fritar desce juntamente para dentro do óleo ou gordura quente. NOTA ► Através da janela de visualização na tampa do aparelho pode vigiar o processo de fritura. -
Page 158: Função De Count-Down
Função de Count-down 1) Pressione o botão “M” e o botão “S” em simultâneo (=RESET), para repor o temporizador 2) Para definir o tempo desejado em minutos e segundos, prima os botões “M” e “S”. Pode definir até (min./seg.). Para alterar os algarismos mais depressa, prima e mantenha premidos os botões. -
Page 159: Depois Da Fritura
Depois da fritura 1) Se os alimentos estiverem fritos, puxe a pega para cima, até que o botão de bloqueio da pega encaixe. 2) Mantenha o cesto de fritar nesta posição, para permitir que o óleo escorra. 3) Prima o interruptor de ligar/desligar . -
Page 160: Limpeza E Conservação
7) Limpe bem todas as peças da fritadeira, tal como descrito no capítulo "Limpeza e conservação". 8) Encha a fritadeira com óleo ou gordura, tal como descrito no capítulo "Fritar". Limpeza e conservação AVISO - PERIGO DE CHOQUE ELÉTRICO! ► Antes de limpar o aparelho, retire sempre a ficha de rede da tomada. -
Page 161: Armazenamento
6) Limpe o elemento de comando/aquecimento com um pano húmido. Se necessário, coloque um pouco de detergente no pano e passe com um pano ligeiramente humedecido com água limpa, de forma a remover todos os vestígios do detergente. Seque bem o elemento de comando/aquecimento NOTA –... -
Page 162: Sugestões
Sugestões Batatas fritas caseiras ■ As batatas para fritar devem encontrar-se em perfeitas condições e não devem conter germes. ■ Para fritar deverá utilizar batatas "farinhentas" ou "maioritariamente firmes". ■ Descascar as batatas e cortá-las de acordo com a preparação desejada (tiras ou rodelas). -
Page 163: Como Evitar O Sabor Indesejado
Como evitar o sabor indesejado Alguns alimentos, especialmente o peixe, soltam líquido ao fritar. Estes líquidos misturam-se no óleo ou na gordura de fritar e podem interferir no cheiro e no sabor dos alimentos fritos posteriormente no mesmo óleo ou gordura. Proceda da seguinte forma para obter novamente um óleo ou gordura neutro no sabor: ■... -
Page 164: Função Contra Sobreaquecimento
Função contra sobreaquecimento No caso de sobreaquecimento, esta função contra sobreaquecimento desliga o aparelho. Isto pode acontecer se não se encontrar óleo ou gordura suficiente na fritadeira ou se se derreter gordura sólida para fritar dentro da mesma. No caso de gordura sólida, o elemento de comando/aquecimento não consegue emitir o calor gerado de modo suficientemente rápido. -
Page 165: Tabela Dos Tempos De Fritura
Tabela dos tempos de fritura A tabela dá exemplos de alimentos e das respetivas temperaturas a que estes devem ser fritos, bem como do tempo de fritura de que necessitam. Se as indica- ções na embalagem do produto a fritar não coincidirem com as da tabela, siga as instruções da embalagem. -
Page 166: Resolução De Avarias
Resolução de avarias PROBLEMA CAUSAS POSSÍVEIS POSSÍVEIS SOLUÇÕES O aparelho não está ligado Ligue o aparelho a uma a uma tomada elétrica. tomada elétrica. Contacte a Assistência O aparelho está danificado. Técnica. O aparelho não funciona. O interruptor de LIGAR/ Prima o interruptor de DESLIGAR não foi... -
Page 167: Anexo
Anexo Eliminar o aparelho Nunca deposite o aparelho no lixo doméstico comum. Este pro- duto está sujeito ao disposto na Diretiva Europeia 2012/19/EU. Entregue o aparelho num Ponto Eletrão autorizado ou num Centro de Receção de REEE do seu município. Respeite os regulamentos atualmente em vigor. Em caso de dúvida, entre em contacto com o Centro de Receção de REEE. -
Page 168: Garantia Da Kompernass Handels Gmbh
Garantia da Kompernass Handels GmbH Estimada Cliente, Estimado Cliente, Este aparelho tem uma garantia de 3 anos a contar da data de compra. No caso deste produto ter defeitos, tem direitos legais contra o vendedor do produto. Estes direitos legais não são limitados pela nossa garantia que passamos a transcrever. Condições de garantia O prazo de garantia tem início na data da compra. -
Page 169: Assistência Técnica
Assistência Técnica Assistência Portugal Tel.: 70778 0005 (0,12 EUR/Min.) E-Mail: kompernass@lidl.pt IAN 300405 Importador Por favor, observe que a seguinte morada não é a morada do Serviço de Assis- tência Técnica. Primeiro entre em contacto com o Serviço de Assistência Técnica. - Page 170 DE - 44867 BOCHUM GERMANY www.kompernass.com Stand der Informationen · Last Information Update · Version des informations Stand van de informatie · Stav informací · Estado de las informaciones Estado das informações: 03 / 2018 · Ident.-No.: SKF2800B3-012018-1 IAN 300405...
Need help?
Do you have a question about the 300405 and is the answer not in the manual?
Questions and answers