
Related Manuals for ESDEC CLICKFIT EVO


Summary of Contents for ESDEC CLICKFIT EVO
- Page 1 MANUAL MOUNTING SYSTEM FOR METAL SHEET ROOFING landscape orientation portrait orientation Mounting system for solar panels on metal sheet roofing Rev. 15.06.21 © ESDEC BV 2021...
-
Page 2: Table Of Contents
CONTENTS page 1. Introduction 2. General installation conditions 3. Product description 4. Parts overview 4.1 Exploded view mounting system in landscape orientation 4.2 Exploded view mounting system in portrait orientation 4.3 Parts list mounting system in landscape orientation Parts list mounting system in portrait orientation 5. -
Page 3: Introduction
Carefully read the manual, so you are fully familiar with its contents. Carefully follow the instructions in the manual. Always perform actions in the right order. Keep the manual in a safe and dry place. If the manual is lost, a new copy can be downloaded from www.esdec.com. 2. General installation conditions... - Page 4 Removal and dismantling Dispose of the product in compliance with local laws and regulations. Warranty Warranty according to the terms of warranty and the terms and conditions of Esdec BV. These can be found on the website www.esdec.com. Liability The manufacturer shall not be held liable for any damage or injury caused by a failure to (strictly) comply with the safety regulations and instructions in this manual or due to carelessness during the installation of the product described in this document and any accessories.
-
Page 5: Product Description
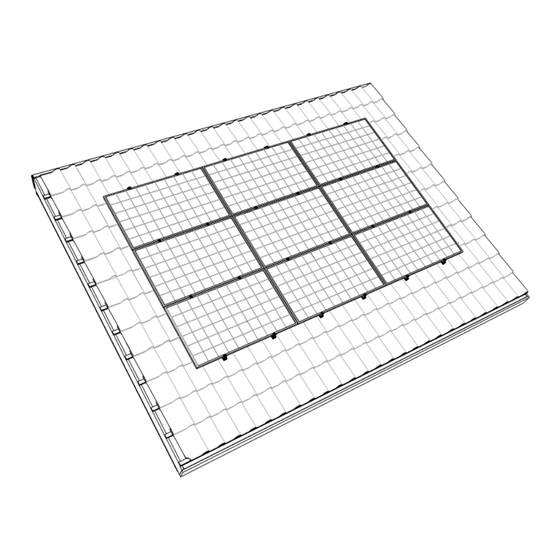
3. Product description The mounting system is made of mounting profiles and the required mounting materials to mount the solar panels in landscape or portrait orientation on the metal sheet roof. The mounting system for metal sheet roofing can be used for all metal sheet roofs, including the common corrugated or trapezoidal metal sheet roofs. -
Page 6: Exploded View Mounting System In Portrait Orientation
4.2 Exploded view mounting system in portrait orientation Rev. 15.06.21 MANUAL MOUNTING SYSTEM FOR METAL SHEET ROOFING... -
Page 7: Parts List Mounting System In Landscape Orientation
4.3 Parts list mounting system in portrait orientation 4. Self-tapping screw 6.0x25 mm SW10 HEX/T30 Product no.: 100-8085 4A. ClickFit EVO Magnatite Rivet Product no.: 100-8087 1. Solar panel 2. Mounting profile metal sheet roof ‘Optimizer 5. End clamp support grey ready’... -
Page 8: Mounting Preparations
5. Mounting preparations 5.1 Tools and accessories check The following is a list of the required tools / aids: Marker / crayon Brush Tape measure Battery drill (incl. T30 & diameter 6,5mm HSS) Ø6,5 T30 Rivet pliers with correct nose piece Correct nose piece The nose piece must have a raised ring to guarantee... -
Page 9: Determining And Measuring Position Of Solar Panels
5.3 Determining and measuring position of solar panels When determining the position of the solar panels on the sloped roof, it is very important to pay attention to the position of the sun during the day and the entire year. Place the panels on a roof surface that has a minimum amount of shade. Shade from a chimney, dormer, tree or adjacent building negatively impacts the yield of the solar panels. -
Page 10: Installation Mounting System In Landscape Orientation
6. Parts list mounting system in landscape orientation 6.1 Positioning the mounting profiles Note! In case of a corrugated metal sheet roof, the mounting profile metal sheet roof ‘Optimizer ready or Basic’ landscape should be equipped with an EPDM adapter profile on the bottom (see chapter 8.2 in the attachment). You can determine the position of the mounting profiles based on the location of the solar panels on the roof. -
Page 11: Attaching The Mounting Profiles With Screws
6.2 Attaching the mounting profiles with screws 1. Mark the centre of the shape top of the corrugated metal sheet roof and use a crayon or marker to demarcate the location of the mounting profiles in a clear line. Only the top row of mounting profiles should be mounted below the panel with the largest part of the mounting profile. -
Page 12: Attaching The Mounting Profiles With Blind Rivets
6.3 Attaching the mounting profiles with blind rivets 1. Mark the centre of the shape top of the corrugated metal sheet roof and use a crayon or marker to demarcate the location of the mounting profiles in a clear line. Only the top row of mounting profiles should be mounted below the panel with the largest part of the mounting profile. -
Page 13: Installation Of The Optimizer (Optional)
6.4 Installation of the optimizer (optional) Note! Do not attach cable clips and optimizers to the top row of mounting profiles, row 1. The cable clips and optimizers can only be connected to the rows that have the 200-mm side of the mounting profile at the top (above the universal module clamp). -
Page 14: Installation Of 1St Solar Panel On Mounting Profiles
6.5 Installation of 1st solar panel on mounting profiles 1. Click the universal module clamp onto the top two mounting profiles. 2. Slide the end clamp support onto the mounting profiles and slide the end clamp support over the universal module clamp. 3. -
Page 15: Installation Of Other Solar Panels On The Mounting Profiles
6.6 Installation of other solar panels on the mounting profiles 1. Slide the next solar panel between the mounting profiles and the universal module clamps. Afterwards, tighten the universal module clamps. Note! The torque for the screw connection is 4.5 Nm (max. 6.5 Nm). Repeat this step if there are more intermediate panels. -
Page 16: Final Assembly / Multiple Rows
6.7 Final assembly / multiple rows 1. In order to get a connected solar panel surface, slide the adjacent solar panels against the row of solar panels. 2. Repeat the steps from chapter 6.4 - 6.5. The solar panel field is now complete! Click! Rev. -
Page 17: Installation Mounting System In Portrait Orientation
7. Installation mounting system in portrait orientation 7.1 Positioning the mounting profiles You can determine the position of the mounting profiles based on the location of the solar panels on the roof. The mounting profiles should be positioned at distance A in the upwards direction of the metal sheet roof. Make sure the hole pattern of the mounting profile corresponds to the shape top centre of the metal sheet roof. -
Page 18: Attaching The Mounting Profiles With Screws
7.2 Attaching the mounting profiles with screws 1. Mark the centre of the shape top of the corrugated metal sheet roof and use a crayon or marker to demarcate the location of the mounting profiles in a clear line. 2. Place the mounting profiles along the line marked on the roof. Make sure the mounting profiles are perpendicular to the shape top of the metal sheet roof. -
Page 19: Attaching The Mounting Profiles With Blind Rivets
7.3 Attaching the mounting profiles with blind rivets 1. Mark the centre of the shape top of the corrugated metal sheet roof and use a crayon or marker to demarcate the location of the mounting profiles in a clear line. 2. -
Page 20: Installation Of The Optimizer (Optional)
7.4 Installation of the optimizer (optional) 1. Click the cable clip onto the mounting rail, below the panel. One cable clip is used per solar panel. Note! Make sure the cable clip is placed between the upwards open parts of the roof sheet. (See detail below, optimizer zone) 2. -
Page 21: Installation Of 1St Solar Panel On Mounting Profiles
7.5 Installation of 1st solar panel onto mounting profiles 1. Click the universal module clamp onto the top two left mounting profiles. Then slide them to the centre of the mounting profile. 2. Slide the end clamp support onto the mounting profiles and slide the end clamp support over the universal module clamp. 3. -
Page 22: Installation Of Other Solar Panels On The Mounting Profiles
7.6 Installation of other solar panels on the mounting profiles 1. Slide the next solar panel between the mounting profiles and the universal module clamps. Note! Make sure the module clamp is always between the screw locations. Screw the universal module clamps in place. Note! The torque for the screw connection is 4.5 Nm (max. -
Page 23: Final Assembly 1St Row Of Adjacent Solar Panels
7.7 Final assembly 1st row of adjacent solar panels 1. Slide the last solar panel in the row between the mounting profiles and the universal module clamps. Afterwards, tighten the universal module clamps. Note! The torque for the screw connection is 4.5 Nm (max. 6.5 Nm). 2. -
Page 24: Final Assembly / Multiple Rows Below Each Other
7.8 Final assembly / multiple rows below each other 1. In order to get a connected solar panel surface, slide the solar panels below against the row of solar panels. 2. Repeat the steps from chapter 7.4 - 7.5 and finalise the solar panels according to step 1 - 5 below. The solar panel field is now complete! Click! Rev. -
Page 25: Attachments
Following tables do show per orientation, module surface category and wind load category, the minimal required profiles per module and minimal required fasteners per profile. Both tables do only reflect on roof mid-zones conform Eurocode. Check also the Esdec calculator for your project plan (www.esdec.com) 8.1.1 Installation with SCREW (Item 1008085) 3. Amount of SCREWS per profile... - Page 26 8.1.2 Installation with RIVET (Item 1008087) 3. Amount of RIVETS per profile 1. Situation 2. Amount of PROFILES per material Steel Aluminium*** module Module Orientation Max Max min t* 0,5mm 1,0mm 1,5mm 0,5mm 1,0mm 1,5mm + profile item nr. surface windload max t* 1,0mm 1,5mm >1,5mm 1,0mm 1,5mm >1,5mm [N/m Landscape + 1008048 1165 1165 1165 Portrait + 1008049...
-
Page 27: Installation Of The Corrugated Adapter Profile For Landscape Installations
8.2 Installation of the corrugated adapter profile for landscape installations Note! In case of a corrugated metal sheet roof, the mounting profile metal sheet roof ‘Optimizer ready or Basic’ landscape should be equipped with an EPDM adapter profile on the bottom. The EPDM adapter profile has an indentation at the bottom, allowing it to properly fit the corrugated metal sheet roof.
Need help?
Do you have a question about the CLICKFIT EVO and is the answer not in the manual?
Questions and answers