RUKO F11 GIM Manual
Folding drone
Hide thumbs
Also See for F11 GIM:
- Quick start manual ,
- User's manual - safety manual (60 pages) ,
- User manual (48 pages)
Table of Contents
Advertisement
GIM
F/2.5 108° FOV
FUII HD Wi-Fi Cam
ULTRAPORTABLE AND FOLDABLE
In order to make sure that it meets the requirement of the electromagnetic environment of the
aviation radio station, ying within the scope of 10 kilometers on each side by taking the airport
runway center line as the middle line is HIGHLY FORBIDDEN or ying within the scope of 20
kilometers by taking both ends of the runway as the center is HIGHLY FORBIDDEN. Flying on
the route of the airline is also PROHIBITED. Stop using all kinds of ying models or unmanned
Quad-rotors in the AREA that prohibited by related authority or department of our country.
Advertisement
Table of Contents

Related Manuals for RUKO F11 GIM


Summary of Contents for RUKO F11 GIM
- Page 1 F/2.5 108° FOV FUII HD Wi-Fi Cam ULTRAPORTABLE AND FOLDABLE In order to make sure that it meets the requirement of the electromagnetic environment of the aviation radio station, ying within the scope of 10 kilometers on each side by taking the airport runway center line as the middle line is HIGHLY FORBIDDEN or ying within the scope of 20 kilometers by taking both ends of the runway as the center is HIGHLY FORBIDDEN.
-
Page 2: Table Of Contents
POINT OF INTEREST PRODUCT FUNCTIONS PROFILE 1. EMERGENCY STOP 2. GPS FOLLOW ME 3. HAND GESTURE 4. RETURN TO HOME 5. TRIM UNDER NO GPS MODE DOWNLOAD THE "RUKO DRONE" APP APP FUNCTIONS 15---18 CAMERA FUNCTIONS SPECIFICATIONS 20—21 PARTS LIST... -
Page 3: Preface
PREFACE Thank you for purchasing the Ruko-Series GPS aircraft. Please read all instructions and warnings carefully before operating. Please also keep this instruction manual for future reference and maintenance. IMPORTANT: 1. This product shoud be operated by the people who are over 14 years old. It is a precision device;... - Page 4 4. Avoid controlling it independently. New users may have certain di culties during the early stages of learning to operate this aircraft. Please try to avoid operating the aircraft alone. When available, always operate this aircraft under the guidance of a more experienced user.
-
Page 5: Warning
WARNING 1. There is important information contained in this package and instruction manual, please keep it for future reference. 2. You have the responsibility to make sure that this model of aircraft won’t cause injury to others’ body or cause any damage to property. 3. - Page 6 20. The aircraft should be kept far away from any other electric compliance or equipment as far as possible or kept far away from the place where having the magnetic object nearby as they may cause interference with each other. 21.
- Page 7 FLY SAFETY Fly in Open Strong GPS Maintain Line Maximum ight Areas Signal of Sight altitude height is about 120 meters. Avoid ying over or near obstacles, crowds, high voltage power lines, trees, airport or bodies of water. DO NOT y near strong electromagnetic sources such as power lines and base stations as it may a ect the onboard compass.
-
Page 8: Controller Functions
CONTROLLER FUNCTIONS 1. Throttle stick 2. Direction stick 3. Click once speed switch 4. Click once then keep pressing for 3 seconds to emergency stop 5. Click once power on; Click once then keep pressing for 3 seconds power o 6. -
Page 9: Drone Diagram
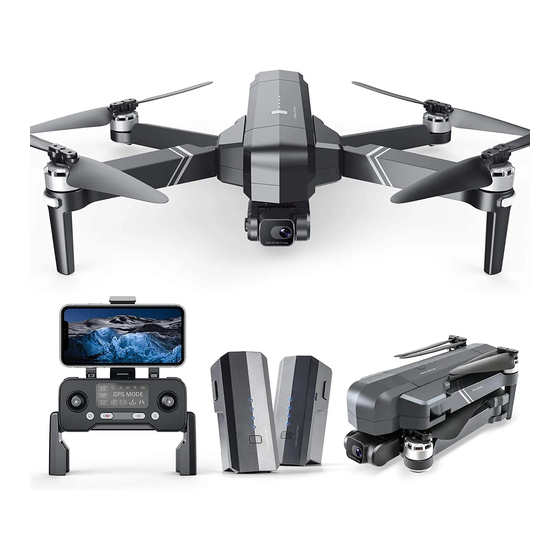
DRONE DIAGRAM 1. 2-Axis stable Gimbal 4K Wi camera 2. Propeller 3. Motor 4. LED indicator 5. Intelligent battery F/2.5 108° FOV FUII HD Wi-Fi Cam 1. ASSEMBLE THE PROPELLER Please note that the letter “A” or “B” is printed on each propeller, and make sure all the propellers are attached in the correct motor position. -
Page 10: Charging The Battery
3. CHARGE THE BATTERY Press the latch and remove the battery from the aircraft. Phone adapter: Charging time: Controller About 4.5 hours charging method (Not included) (Depending on (charging adapter) 4. LITHIUM BATTERY CHARGING INSTRUCTIONS 1. Either power on or power o , the drone can be charged. Connect the USB charger to an DC power supply(4.5V-5.5V,2A-3A), and then connect with the charging port of the drone, when in charging, the indicator on the drone will become Blue blinking;... -
Page 11: Flight
Pairing successful. Note: Please connect the phone after pairing RUKO-GIM-******* the controller with the drone to avoid connection error Connect your smart phone to the Wi-Fi of drone and check the drone's status on the app “RUKO DRONE”. - Page 12 "Compass calibration." F/2.5 108° FOV FUII HD Wi-Fi Cam with camera facing okay." Gyroscope okay. Motors are starting automatically, push the left joystick up to take off, or you can press button on the app to take off. NOTE: Please start the motor before take off.
- Page 13 Motors running running more than takeoff point app, land Press pushing Always keep the head lands of drone facing forward Dual Controller Mode —Power o the controller. —Keep pressing the , clicking the indicator simultaneously, the controller beeps twice indicating the right joystick changed, to the throttle stick, the LED indicator OFF.
-
Page 14: Waypoint Flight
WAYPOINT FLIGHT — Make sure the mobile internet is connected, select in the APP, catch the map data of the area when you intend to y in your mobile device, then connect your mobile device with your drone, you can view the map from in the APP. -
Page 15: Product Functions Profile
PRODUCT FUNCTION PROFILE 1. TAKEOFF/LANDING/EMERGENCY STOP About 5 feet Only stop motors mid- ight in emergency when doing so can reduce the risk of damage or injury. 2. FOLLOW ME When the Follow Me function activated, the drone will use the GPS in your smart phone to follow you wherever you go. -
Page 16: Hand Gesture
3. HAND GESTURE Click on the APP, count down 3 seconds to 0 with the within hand motion to take photos or record video.Please follow the tips. 4. RETURN TO HOME RTH The Return to Home ( RTH ) function brings the drone back to the Takeo Point. This function only can be achieved under GPS mode. -
Page 17: Trim Under No Gps Mode
-Connect the power of this model, and then access into "SETTING" in the smart phone, open the "WIFI" and nd the "RUKO-GIM-XXXX". When the link is successfully connected, please exit the "Setting" option. -Open "RUKO DRONE" software in the smart phone to access into the control interface. APP FUNCTIONS 1. - Page 18 Back to Main Menu Remote Battery GPS Signal Aircraft Battery Auto Takeo SD Card Status Photo/Video Switching GPS Return Home Shutter More Functions Media Gallery (One key to share) Altitude(meters) Distance (meters) Speed (meters/sec) Sound Recording Image follow GPS follow Music Lens angle Gestural...
- Page 19 2. APP ONE KEY SHARE FUNCTION Pic. 1 Photo Video 2017-12-28 Check all Share Save to the Delete phone album Pic. 2 Photo Video 2017-12-28 Pic. 3 照片 视频 AirDrop. Tap to turn on WLAN and Bluetooth to share with AirDrop. 2017-12-28 1.
- Page 20 3. HOW TO SEARCH FOR LOST DRONE . click to open the map surface for search ① the drone. Parameter Track Image Visiting Trace Visit 0 trace Flight time Flight distance Flights Max Distance 0.0 m 0.0 min 0.0 m Max Altitude 0.0 m All flight records...
- Page 21 5. HOW TO CHANGE APP UNITS . Click to enter SETTINGS ① . Click on SETTING to switch units ②...
-
Page 22: Camera Functions
Press again to save the video. DO NOT take photo during recording. NOTE: When using the "RUKO DRONE" app, the original photos and videos will be compressed and saved to smartphone. SC CARD (sold separately) The original images and videos are saved in the TF card. Press the SD card slightly to take it out, then insert the card into the card reader and insert into the USB input of a computer to read the data from SD card. -
Page 23: Specifications
SPECIFICATIONS ● Drone MODEL: F11 GIM Weight (Including Battery): 585 g/20.6 oz Flight Time: About 28 min Motor Model: 1806 Operating Temperature Range: 32° to 104° F ( 0° to 40° C) Satellite Systems: GPS/GLONASS Dimensions (LxWxH): Unfolded: 45X40.5X8 (cm) Folded: 17.6X10.5X8 (cm) - Page 24 ● APP / Live View Mobile App: RUKO DRONE Live View Working Frequency: 5150-5350 MHz, 5460-5720 MHz, 5725-5825 MHz Live View Quality: TRANSMISSION CONFIGURATION STORAGE METHOD RESOLUTION FRAME RATE Photo 3840X2160P Phone Video 1280X720P 30 fps Photo 3840X2160P SD card...
-
Page 25: Parts List
PARTS LIST (Included) Blade X4 USB cable X1 Only for charging Allen wrench X 1 F/2.5 108° FOV FUII HD Wi-Fi Cam ULTRAPORTABLE AND FOLDABLE Screw X12 In order to make sure that it meets the requirement of the electromagnetic environment of the aviation radio station, ying within the scope of 10 kilometers on each side by taking the airport runway center line as the middle line is HIGHLY FORBIDDEN or ying within the scope of 20 kilometers by taking both ends of the runway as the center is HIGHLY FORBIDDEN. -
Page 26: Common Problems And Solutions
Wi-Fi Disconnect your phone from any wireless neworks which it may be automatically connectting. Open the phone Wi-Fi, search name: RUKO-GIM-*******, connect to this Wi-Fi The phone is not connected to Wi-Fi App can't display The phone doesn't support 5 Ghz Wi-Fi image Wi-Fi (2.4 GHz and 5 GHz) - Page 27 Only batteries of the same or equivaient type can be used. Do not mix new and old batteries. Please dispose of the worn out batteries correctly as required by the Enviromental F11 GIM Protection Agency. Keep batteries away from fire or high temperature enviroment.
Need help?
Do you have a question about the F11 GIM and is the answer not in the manual?
Questions and answers