RUKO F11MINI User Manual
Hide thumbs
Also See for F11MINI:
- Quick manual (16 pages) ,
- User manual (60 pages) ,
- Quick manual (25 pages)
Table of Contents
Advertisement
Quick Links
Advertisement
Table of Contents

Related Manuals for RUKO F11MINI


Summary of Contents for RUKO F11MINI
- Page 1 for age User Manual v1 . 0...
-
Page 3: Table Of Contents
Contents 1 Using This Manual 1.1 Legend 1.2 Read Before the First Flight 1.3 Download the Ruko Mini APP 1.4 Video Tutorials 2 Product Profile 2.1 Product list 2.2 Product Overview 2.3 Product Features Overview 2.4 Preparing the Aircraft 2.5 Aircraft Diagram 2.6 Transmitter Diagram... - Page 4 6.5 Compass Calibration Before Flight 6.6 Calibrate the Gyroscope/Level 6.7 Starting/Stopping the Motors 6.8 Automatic Take-off / Automatic Landing 6.9 How to take off the Ruko F11MINI Drone 6.10 Aerial Photography Tips & Tricks 7 Appendix 7.1 Specifications 7.2 Accessories Support 7.3 Common Problems and Solutions...
-
Page 5: Using This Manual
Quick Start Guide and refer to this User Manual for more information. 1.3 Download the Ruko Mini APP Make sure to use Ruko Mini APP during flight. Scan the following QR code to download the latest version of the app. -
Page 6: Product Profile
User Manual 2 Product Profile 2.1 Product list Drone Transmitter Drone Battery Camera Cover Spare Propeller Fixed Cover Screwdriver Screw USB Charging Cable User Manual Safety and Disclaimer Guidelines Quick Start Guide Copyright ©2022 Ruko All Rights Reserved. -
Page 7: Product Overview
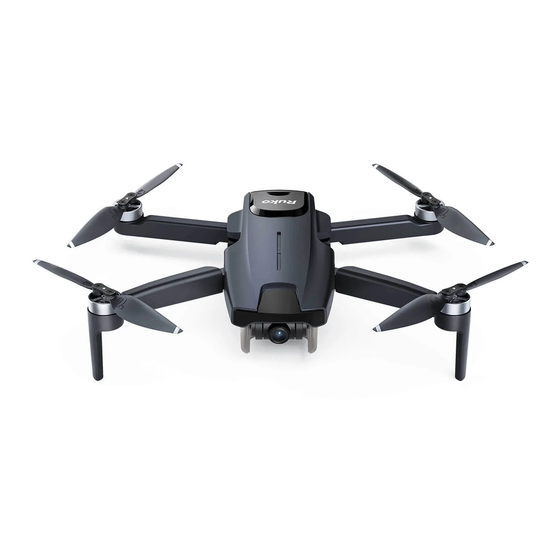
F 11M I N I User Manual 2.2 Product Overview Ruko F11MINI aircraft can hover and fly stably outdoors and has the function of returning home automatically. The camera uses an upgraded 5GHz Wi-Fi FPV real-time transmission function, equipped with a 120°FOV lens and a 90° adjustable camera, which can stably shoot 2.7K video and 4K ultra-clear images, providing you with a broad field of vision for... -
Page 8: Aircraft Diagram
The left control stick is the throttle lever, which can adjust the aircraft's altitude and nose direction. (Up/Down, Left Rotation/Right Rotation). The Japanese hand's control stick functions is different from the American control sticks. Copyright ©2022 Ruko All Rights Reserved. - Page 9 Press it once to switch to fast speed, press it again to switch to slow speed. Mobile Device Clamps Push outwards to open the two mobile device clamps of transmitter for easy manipulation of the control stick of transmitter. Copyright ©2022 Ruko All Rights Reserved.
-
Page 10: Aircraft
3.1 Two Gears Speed of the Aircraft The F11MINI has two speed ranges: 11.48 ft/s and 22.96 ft/s. The default speed is slow speed. Press the right joystick of the transmitter to switch to fast speed. Press it again to switch to slow speed, which provides diverse flight experience and meets various needs with speed. -
Page 11: Return To Home
F 11M I NI User Manual 3.3 Return to Home The F11MINI aircraft has an automatic return-to-home function in GPS mode, making the aircraft return to the take-off point. The Return to Home (RTH) function brings the aircraft back to the last recorded home point. - Page 12 In order to prevent unnecessary dangers due to insufficient battery power, when the aircraft battery power is low, the intelligent low battery return home function will be automatically triggered. According to the remaining power after returning, there are 2 situations after returning: Copyright ©2022 Ruko All Rights Reserved.
- Page 13 You can control the joysticks on the remote control to avoid obstacles. When the aircraft is less than 65 feet (20 meters ) away from the return point,the return can be canceled. Copyright ©2022 Ruko All Rights Reserved.
- Page 14 The aircraft automatically flies to the top of the home point, then starts to land, and ④ completes the home return. When out of control, the aircraft cannot avoid obstacles. When the GPS signal is weak, the aircraft cannot return to home automatically. Copyright ©2022 Ruko All Rights Reserved.
-
Page 15: Intelligent Flight Mode
F11MINI User Manual 3.4 Intelligent Flight Mode F11MINI has three intelligent flight modes: Route planning, follow mode and surround mode. According to the user's shooting needs, the operation can be completed by one click, which is simple and fast. Route Planning: Aircraft flies along the path marked on the app. - Page 16 Click the delete or route planning function icon to exit the route planning function. Follow Mode Ensure that the Ruko Mini APP has been downloaded and installed on the smartphone. ① Turn on the GPS positioning of the smartphone to connect to the aircraft WiFi.
-
Page 17: Propellers
flying speed. 3.5 Propellers The propellers on the adjacent motors of the F11MINI are forward and reverse propellers. The two propellers on the same motor are the same, and the propellers are marked with A and B respectively. -
Page 18: Intelligent Flight Battery
Before each flight, please check to make sure that the propellers are in good condition. 3.6 Intelligent Flight Battery The F11MINI intelligent flight battery has a capacity of 2100mAh, a rated voltage of 7.6 V, and with charge and discharge management functions. This battery uses high-energy and large -capacity batteries to increase the flight time of the aircraft. - Page 19 F11MINI User Manual Please read carefully and strictly abide by Ruko's Requirements in this Manual, Disclaimer and Safety Summary, and stickers on the battery surface before using the battery. The user shall bear the consequences caused by failure to use it as required.
- Page 20 If water enters the battery and the battery protection board fails,the battery cannot be used normally. Do not use the battery in rain or in a humid environment, as this may cause the battery to self-ignite or even explode. Copyright ©2022 Ruko All Rights Reserved.
-
Page 21: Camera Overview
Micro SD Card 50FPS 2048*1080P @ 25FPS 1. Micro SD card storage settings You can choose 2K @ 50 FPS (smooth) or 2.7K @ 25 FPS (default) when saving the video on the Micro SD card. Copyright ©2022 Ruko All Rights Reserved. -
Page 22: Transmitter
② When Micro SD card storage settings is 2K @ 50 FPS (smooth), you can save the video in the Ruko Mini APP with 720P @ 25 FPS(default) , or 2K @ 25 FPS (high resolution). Storing Photos and Videos F11MINI is equipped with a micro SD card slot for storage space expansion. -
Page 23: Using The Transmitter
Blinking during flight indicates that the transmitter is low power. ② Controlling the Camera Recording Button: Press once to switch to recordingmode or start/stop recording. Camera Button: Press once to switch to camera mode or take a photo. Camera Button Recording Button Copyright ©2022 Ruko All Rights Reserved. - Page 24 Push up and down the right joystick to pair the transmitter with aircraft. ③ Japanese hand's control (Mode 2) Left Joystick Right Joystick It will back to the default American control mode when turn off the transmitter and turn on again. Copyright ©2022 Ruko All Rights Reserved.
- Page 25 The greater the offset, the greater the tilt angle and the faster the flight speed. The forward direction of the aircraft is based on the direction of the nose. Copyright ©2022 Ruko All Rights Reserved.
-
Page 26: Communication Range Of Transmitter
Turn on transmitter. ② Click the left stick of transmitter up to 12 o'clock position and down to 6 o'clock position, and ③ after the aircraft emits a beep, it means the linking is successful. Copyright ©2022 Ruko All Rights Reserved. -
Page 27: Ruko Mini App
Please remember to turn off the power of the transmitter after each flight to avoid running out of power. 5 Ruko Mini App 5.1 Home After running Ruko Mini App, enter the homepage. F11MINI Co ntro l Video promotion I nstruc tio n Control Operate the aircraft through the APP page buttons to realize the functions of the aircraft. -
Page 28: Camera View
Beginner mode: In this mode, the aircraft’s farthest flight distance and altitude is 98ft, and the return altitude is 65ft, so that the aircraft can fly more safely within sight. Flight distance: Set the longest distance to fly. Flight altitude: Set the maximum flight altitude. Copyright ©2022 Ruko All Rights Reserved. - Page 29 F 11MINI User Manual Storage settings:Set the smooth mode or default mode. Real-time video transmission: The pixel of the video when it's saved in the Ruko Mini App. Image transmission parameter display: Click the button to display or close the pixels display of the video real-time image transmission.
- Page 30 4.9 feet (1.5m), and after taking off, tap it again to descend the aircraft, you can cancel the descent by push up the throttle stick. Back Tap to return to the home screen. Copyright ©2022 Ruko All Rights Reserved.
-
Page 31: Flight
①Allow Ruko Mini to get your location. Otherwise, the following functions cannot be realized. ② Allow Ruko Mini to connect to the device on the local network, otherwise you will not be able to see the aircraft image transmission screen. -
Page 32: Pre-Flight Checklist
If you need to replace parts, be sure to use original parts. The use of non-original accessories may cause danger to the safe use of the aircraft. For details on accessory support, please refer to the accessory support page in the appendix of the user manual. Copyright ©2022 Ruko All Rights Reserved. -
Page 33: Pairing Transmitter With Aircraft
Push up the left stick of transmitter to 12 o’clock and then pull it down to 6 o’clock to ④ pair the transmitter with the aircraft. After the aircraft emits a “beep” sound, the transmitter light changes from flashing to steady on, which means the pairing is successful. Copyright ©2022 Ruko All Rights Reserved. -
Page 34: Wifi Connection
WiFi, 2.4G+5G, can be applied. The aircraft WiFi can only support one mobile device. When one mobile device is connected to the aircraft WiFi, other mobile devices will not be able to connect to the WiFi. Copyright ©2022 Ruko All Rights Reserved. -
Page 35: Compass Calibration Before Flight
When calibrating the aircraft, please open the arm to avoid the influence of the magnetic field of the motor. If the user want to calibrate the compass again, press on the transmitter to enter the compass calibration process. Copyright ©2022 Ruko All Rights Reserved. -
Page 36: Calibrate The Gyroscope/Level
When the aircraft's flight state is tilted and unstable, please land the aircraft on a level ground for gyroscope/horizontal calibration. Horizontal correction cannot be performed when the fuselage is tilted more than 10 degrees. Copyright ©2022 Ruko All Rights Reserved. -
Page 37: Starting/Stopping The Motors
Method 2: When the flight is not taking off, push the joysticks into 5 & 7 o'clock position to start the motor. After the motor is turned off, please release the joystick immediately. Method 1 Method 2 Please choose a flat ground to land. Copyright ©2022 Ruko All Rights Reserved. -
Page 38: Automatic Take-Off / Automatic Landing
After the aircraft takes off, users can choose to use the automatic landing function: Confirm the safe landing conditions, click the One-key Takeoff button on transmitter or ① enter the APP, click, and long press the button to confirm to enter the automatic landing. Copyright ©2022 Ruko All Rights Reserved. - Page 39 When the aircraft is descending, push the throttle lever of the transmitter up and immediately ② open it to exit the automatic landing process. The aircraft landed on the ground and turned off the motors by itself. ③ Copyright ©2022 Ruko All Rights Reserved.
-
Page 40: How To Take Off The Ruko F11Mini Drone
Turn on the power of transmitter, push the left joystick up to 12 o'clock and pull it down ③ to 6 o'clock to pair transmitter with aircraft. Connect the mobile phone to aircraft's WiFi Perform pre-flight inspection. open the Ruko ④ Mini APP,and enter the camera interface. -
Page 41: Appendix
Transmitter All of the above accessories can be searched and purchased on Amazon, and you can enter the Ruko store to buy them yourself. Be sure to use original accessories. The use of non-original accessories may cause danger to the safe use of the aircraft. -
Page 42: Common Problems And Solutions
Please make on its own, abnormal sound Compass interference sure to fly away from the buildings, trees, power lines, and signal towers The propellers become Replace the propellers with new ones deformed and incomplete Copyright ©2022 Ruko All Rights Reserved. - Page 43 GPS signal is weak Please stay away from obstacles for more Under the tree, next to the than 32.81 feet(10 meters), and search for building, in an obstructed place GPS signals in an open area Copyright ©2022 Ruko All Rights Reserved.
- Page 44 However, it can be guaranteed that all aircraft are 100% brand new CONTACT US FOR MORE TECH SUPPORT rukodrone@gmail.com +1 ( 949 ) 394 - 4635 (Available from 6pm to 3am PDT) Printed in China. Copyright ©2022 Ruko All Rights Reserved.
- Page 46 rukotoy.com...
Need help?
Do you have a question about the F11MINI and is the answer not in the manual?
Questions and answers
What USB cord do I need that runs from my cell phone (Android) to the remote controller? Can I sync the app to the controller with Bluetooth or do I need to physical connection?
The RUKO F11MINI remote controller has a micro USB charging port. However, the app does not require a physical USB connection or Bluetooth to sync. Instead, the app connects via Wi-Fi. You must connect your Android phone to the aircraft's Wi-Fi network (named Ruko_F11_Mini_5G_**) through the phone’s Wi-Fi settings.
This answer is automatically generated