RUKO F11 GIM User Manual
Hide thumbs
Also See for F11 GIM:
- Quick start manual ,
- User's manual - safety manual (60 pages) ,
- Manual (27 pages)
Table of Contents
Advertisement
Quick Links
Advertisement
Table of Contents

Related Manuals for RUKO F11 GIM


Summary of Contents for RUKO F11 GIM
- Page 1 for age User Manual v1 . 0...
-
Page 3: Table Of Contents
Contents 1 Using This Manual 1.1 Legend 1.2 Read Before the First Flight 1.3 Download the RUKO DRONE App 1.4 Video Tutorials 2 Product Profile 2.1 Important 2.2 Product List 2.3 Preparing the Aircraft 2.4 Aircraft Diagram 2.5 Transmitter Diagram 3 Aircraft 3.1 Three Gears Speed of the Aircraft... - Page 4 6.1 Flight Environment Requirements 6.2 Pre-Flight Checklist 6.3 Calibration Before Flight 6.4 Starting/Stopping the Motors 6.5 Automatic Take-off / Automatic Landing 6.6 How to take off the Ruko F11GIM Drone 6.7 Aerial Photography Tips & Tricks 7 Appendix 7.1 Specifications 7.2 Accessories Support 7.3 Common Problems and Solutions...
-
Page 5: Using This Manual
Scan the QR code on the right to download the latest version of the app. Make sure to use RUKO DRONE App during flight. Scan the QR code on the right to download the latest version of the app. RUKO DRONE App supports Android 6.0 or higher, iOS 10.0.2 or higher, dual-band wifi... -
Page 6: Product Profile
Please also keep this instruction manual for future reference and maintenance. 2.1 Important The Ruko F11 GIM is NOT a toy and is not suitable for people under the age of 14. It requires correct assembly and debugging to avoid any accident before every flight. -
Page 7: Preparing The Aircraft
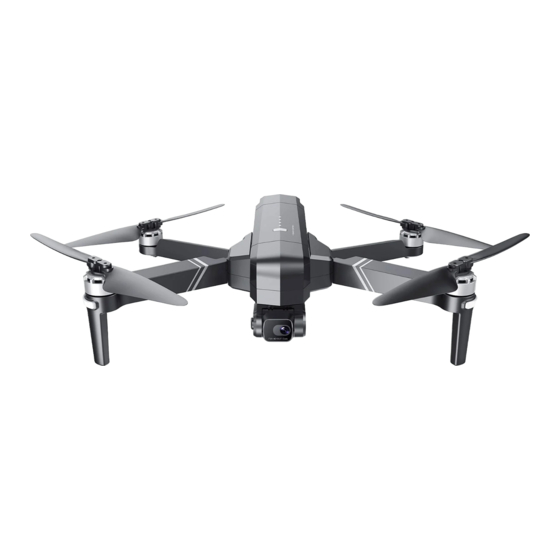
2.4 Aircraft Diagram Gimbal ① Propeller ② Motor ③ LED indicator Light ④ Intelligent battery ⑤ Power button ⑥ Copyright ©2021 Ruko All Rights Reserved. -
Page 8: Transmitter Diagram
49.21 feet(15 meters height). After pressing the emergency stop button, the aircraft will lose power and fall out of sky directly. It is recommended to use it only in an emergency to avoid loss. Copyright ©2021 Ruko All Rights Reserved. - Page 9 Shooting Low battery indicator Recording Tips: When the transmitter is in low battery , the charging indicator light on the transmitter will turn red and keep flashing, now you need to charge the transmitter. Copyright ©2021 Ruko All Rights Reserved.
-
Page 10: Aircraft
3.1 Three Gears Speed of the Aircraft The F11 GIM has three speed ranges: 14.76 ft/s, 29.53 ft/s, and 39.37 ft/s. The default speed is medium speed. Turn the speed wheel to the right to adjust the flight speed up to 39.37 ft/s, and turn the wheel to the left to slow the Aircraft down to 14.76 ft/s, which provides diverse... -
Page 11: Return To Home
Transmitter or tap the return home icon on the Ruko Drone App to activate RTH. When the Aircraft executes smart RTH within a radius of 98 feet (30 meters), and the Aircraft will return fromthe current altitude to the take-off point. (Pay attention to maintaining the flying height to avoid hitting people or obstacles) - Page 12 Must pay attention to the flight altitude when the battery is low. Avoid hitting obstacles due to the low flying altitude when returning home with the second-level low battery. The remaining power after returning is related to the return distance, wind speed, and wind direction. Copyright ©2021 Ruko All Rights Reserved.
-
Page 13: Intelligent Flight Mode
3.4 Intelligent Flight Mode F11 GIM has four intelligent flight modes: Route rules, follow mode, surround mode and gesture mode. According to the user's shooting needs, the operation can be completed by one click, which is simple and fast. - Page 14 Make sure the size of the frame isn't too large, so as to ensure the recognition is achievable. Follow Mode Ensure that the RUKO DRONE App has been downloaded and installed on the smartphone; ① Turn on the GPS positioning of the smartphone to connect to the Aircraft WiFi;...
- Page 15 Aircraft is not equipped with obstacle avoidance function. Please use it in open areas free of obstacles. Surround Mode Make sure the RUKO DRONE App has been downloaded and installed on the smartphone; ① Connect your smartphone to Aircraft WiFi;...
-
Page 16: Propellers 1
F11GIM User Manual 3.5 Propellers The propellers on the adjacent motors of the F11 GIM are forward and reverse propellers. The two propellers on the same motor are the same, and the propellers are marked with A and B respectively. The rotation directions of the propellers with the same mark are different. -
Page 17: Intelligent Flight Battery
F11G IM User Manual 3.6 Intelligent Flight Battery The F11 GIM intelligent flight battery has a capacity of 2500mAh, a rated voltage of 11.1 V, and with charge and discharge management functions. This battery uses high-energy and large -capacity batteries to increase the flight time of the Aircraft. - Page 18 In a low temperature environment, due to the battery output power limitation, the Aircraft's wind resistance and flight performance will be reduced. Please be careful. You need to be extra cautious when flying in low-temperature and high-altitude environments. Copyright ©2021 Ruko All Rights Reserved.
- Page 19 It is recommended to use a 5V/3A charger. If the Aircraft has not been used for a month, the battery must be removed to prevent the battery from being discharged for a long time. Copyright ©2021 Ruko All Rights Reserved.
-
Page 20: Camera Overview
On the hollow wooden floor Do not interfere with the gimbal by external forces or pick up the aircraft during calibration. ④ Otherwise, the gimbal will stop to work. Picking up the Aircraft Touching the camera (during self-inspection) Copyright ©2021 Ruko All Rights Reserved. - Page 21 If not, turn off the Aircraft, then move the camera up and down by hand. If still stuck, ⑧ please contact us for technical support. Storing Photos and Videos F11 GIM is equipped with a micro SD card slot for storage space expansion. Card speed: 10M/s; Copyright ©2021 Ruko All Rights Reserved.
-
Page 22: Transmitter
4 Transmitter 4.1 Transmitter Profile F11 GIM Transmitter uses the 2.4 GHz frequency band, and the Transmitter distance is up to 4000FT (unobstructed and interference-free environment). The foldable handle can stably place the mobile device, and the maximum adjustable width is 3.1 inches. - Page 23 Camera Angle: Rotate the right wheel to adjust the camera lens to downwards and upwards. Shutter Button: Press once to take a picture. Record Button: Press once to start recording, and press again to stop recording. Copyright ©2021 Ruko All Rights Reserved.
- Page 24 Note: Once restart, the controller will back to default mode - Mode 1. (In Mode 1, indicator will be blue; In Mode 2, it will be trun off) Direction Joystick Throttle Joystick Left Joystick Right stick Copyright ©2021 Ruko All Rights Reserved.
- Page 25 The joystick offset corresponds to the angle of the Aircraft left and right tilt. The greater the offset, the greater the tilt angle and the faster the flight speed. Copyright ©2021 Ruko All Rights Reserved.
-
Page 26: Communication Range Of Transmitter
Install the mobile phone into the Transmitter bracket, refer to the aircraft flight direction of the Attitude Indicator in the app, and the Attitude Indicator points straight ahead (perpendicular to the coordinates), indicating that the Transmitter is facing the Aircraft. Remote controller position Aircraft orientation Copyright ©2021 Ruko All Rights Reserved. -
Page 27: Linking The Transmitter
• Flick the left stick of Transmitter up and down, and after the Aircraft emits a beep, it means the linking is successful. • Connect your mobile phone to Aircraft’s WiFi "RUKO-GIM-******", tap the app to enter the control interface; the mobile phone screen displays information such as the Transmitter’s battery signal and camera screen. -
Page 28: Camera View
② When the mobile phone is not connected to the Aircraft’s WiFi, this icon is Transmitter After the mobile phone is connected to the Aircraft’s WiFi, this icon is the Transmitter real -time voltage Copyright ©2021 Ruko All Rights Reserved. - Page 29 D N/A: Flying distance H N/A: Flying height DS N/A: Flying speed VS N/A: Ascent/decrease speed Attitude Indicator Display information of the orientation of the aircraft, and position of the Transmitter . Remote controller position Aircraft orientation Copyright ©2021 Ruko All Rights Reserved.
- Page 30 Point and turn off the motors. Auto Takeoff / Landing Click to expand the control panel, long press to make the Aircraft take off or land automatically. Back Tap to return to the home screen. Parameter Copyright ©2021 Ruko All Rights Reserved.
- Page 31 Find Drone: When the drone has connected with app,and drone GPS signal is strong, the drone's location can be recorded in the app. PTZ Adjust Access to "PTZ adjust",click "Restore factory settings",the gimbal will back to factory setting. Copyright ©2021 Ruko All Rights Reserved.
-
Page 32: Flight
Before using the RUKO DRONE App, make sure that the phone has sufficient power. When you use the RUKO DRONE App on your mobile phone, please focus on controlling the Aircraft. Do not answer incoming calls, send and receive text messages or use other mobile phone functions during the flight. -
Page 33: Pre-Flight Checklist 3
Connect drone WiFi with your phone, make sure that you have connected the WIFI name. "RUKO-GIM-******" exactly after app access right and Internets permission with your phone. Make sure the camera is clean. If you need to replace parts, be sure to use original parts. The use of non-original accessories may cause danger to the safe use of the Aircraft. - Page 34 Aircraft and Transmitter connects successfully, all lights flashing white and blue then ④ turn to flashing white and pink. Please make sure turn on the Aircraft firstly and then the transmitter. Otherwise, they will not pair successfully. Copyright ©2021 Ruko All Rights Reserved.
- Page 35 F11GIM User Manual Connect the mobile phone to Aircraft's WiFi (name: RUKO-GIM-****** ), click on the app to ⑤ enter the control interface RUKO-GIM-****** RUKO-GIM-****** When the Android phone is connected to Aircraft WiFi (named RUKO-GIM-******), as the Aircraft WiFi has no network, wait for about 10-40 seconds on the phone Wifi setting page, the phone will pop up the network setting option to ask whether to continue to connect to Aircraft wifi, please set it continue to use Aircraft wifi, so as not to cause the...
- Page 36 Aircraft (refer to the first step of calibrating the compass). When calibrating the Aircraft, please open the arm to avoid the influence of the magnetic field of the motor. Copyright ©2021 Ruko All Rights Reserved.
- Page 37 When Aircraft resets the gyroscope/horizontal calibration, the camera will also swing up and down again for self-checking to ensure that there is enough space at the bottom of the camera. Copyright ©2021 Ruko All Rights Reserved.
-
Page 38: Starting/Stopping The Motors
Start the motor after confirming the safe take-off conditions. ① One-key Take-off button on the App to take off. ② The Aircraft will take off automatically and hover at a distance of 4 ft from the ③ ground. Copyright ©2021 Ruko All Rights Reserved. - Page 39 (page 7 ) for more details. Method 2:Press the land button on the app, the drone will land directly. Method 3:Keep pulling Throttle Joystick down until the drone lands and motors stop. Copyright ©2021 Ruko All Rights Reserved.
-
Page 40: How To Take Off The Ruko F11Gim Drone
② Turn on the power of Transmitter to pair with Aircraft automatically. ③ Connect the mobile phone to Aircraft's WiFi "RUKO-GIM-******", open the RUKO DRONE ④ App, and enter the camera interface. After the compass and gyroscope calibration is completed, the status indicator is always ⑤... -
Page 41: Appendix
F 11GIM User Manual 7 Appendix 7.1 Specifications Parameter Model: F11 GIM Weight (including battery): 585g/20.6oz Flight time: About 28 minutes (under a constant-speed flight in a no-wind environment) WiFi distance: 1900-3900ft (outdoor, unobstructed, independent) Motor model: 1806 Recovery: Enabled... - Page 42 Mobile device bracket: 2 inches to 3.2 inches smart phone (mobile phone width) Working temperature: 32 degrees Celsius to 104 degrees Celsius USB Cable Compatible Charger (not included): Output currency 5V/3A Rated power: ≤15W Copyright ©2021 Ruko All Rights Reserved.
-
Page 43: Accessories Support
Transmitter All of the above accessories can be searched and purchased on Amazon, and you can enter the Ruko store to buy them yourself. Be sure to use original accessories. The use of non-original accessories may cause danger to the safe use of the Aircraft. -
Page 44: Common Problems And Solutions
Turn on the drone on the place without the subtle vibrations into vibrations high-frequency vibrations Put the Aircraft on level ground after The compass is in calibrating compass calibration. The gimbal will start to work after 20 seconds Copyright ©2021 Ruko All Rights Reserved. - Page 45 GPS signal is weak Please stay away from obstacles for more Under the tree, next to the than 32.81 feet(10 meters), and search for building, in an obstructed place GPS signals in an open area Copyright ©2021 Ruko All Rights Reserved.
- Page 46 We tested all Aircraft before shipping. Therefore, it is inevitable that The product has slight marks shipping there will be slight traces. However, it can be guaranteed that all Aircraft are 100% brand new Copyright ©2021 Ruko All Rights Reserved.
- Page 48 rukotoy.com...
Need help?
Do you have a question about the F11 GIM and is the answer not in the manual?
Questions and answers