
Related Manuals for AAT CargoMaster C120 V


Summary of Contents for AAT CargoMaster C120 V
- Page 1 Ideen bewegen mehr www.cargomaster.org CargoMaster C120 V Vario handles Translation of the original user manual 2021-03 (3.1)
- Page 2 Customer service at its best With our professional service concept, „ Spare parts „ Showroom & exhibition devices we at AAT once again meet our high „ Repair processing „ Complaints quality standards by offering a compre- „ Technical information „...
- Page 3 On our homepage, you will also find all safety-related changes which have been made to the user manual. The current edition of the user manual is available at: https://www.aat-online.de/bda/c120 Manufacturer’s signature: Martin Kober...
-
Page 4: Table Of Contents
Table of Contents SYMBOLS AND SAFETY INSTRUCTIONS Explanation of the symbols on the device (applicable for USA/Canada) Explanation of the symbols on the device (applicable for the EU) Product description Device overview C120 V........11 Intended use . -
Page 5: Symbols And Safety Instructions
C120 safely. This also includes adequate eyesight. Training may only be carried out by the manufacturer, the AAT field service staff or by certified partners. In the event of reading disabilities, cover training content in more depth verbally. -
Page 6: Explanation Of The Symbols On The Device (Applicable For Usa/Canada)
The product complies with the relevant provisions of the EC Machinery Directive 2006/42/EC. Position: Type plate Serial number of the product (e.g. C120XXXXXXX) Manufacturer Position: Type plate Indicates the manufacturer of the product (AAT Alber Antriebstechnik GmbH) Barcode Position: Type plate Contains the AAT serial number Date of manufacture Position: Type plate Indicates the year the product was manufactured. - Page 7 TÜV Süd NRTL test mark Position: Drive unit, left side Refers to the fact that the product has been tested for state-of-the-art technology, as well as for electrical and mechanical safety by TÜV SÜD Product Service GmbH. The NRTL certification provides clear ev- idence that the product meets the requirements of the North American market.
- Page 8 Labelling plan, adhesive labels (applicable for USA/Canada) Drive housing Stanchion tube Front plate Battery pack...
-
Page 9: Explanation Of The Symbols On The Device (Applicable For The Eu)
The product complies with the relevant provisions of the EC Machinery Directive 2006/42/EC. Position: Type plate Serial number of the product (e.g. C120XXXXXXX) Manufacturer Position: Type plate Indicates the manufacturer of the product (AAT Alber Antriebstechnik GmbH) Barcode Position: Type plate Contains the AAT serial number Date of manufacture Position: Type plate Indicates the year the medical device was manufactured. - Page 10 Labelling plan, adhesive labels (applicable for the EU) Drive housing Stanchion tube Front plate Drive unit...
-
Page 11: Product Description
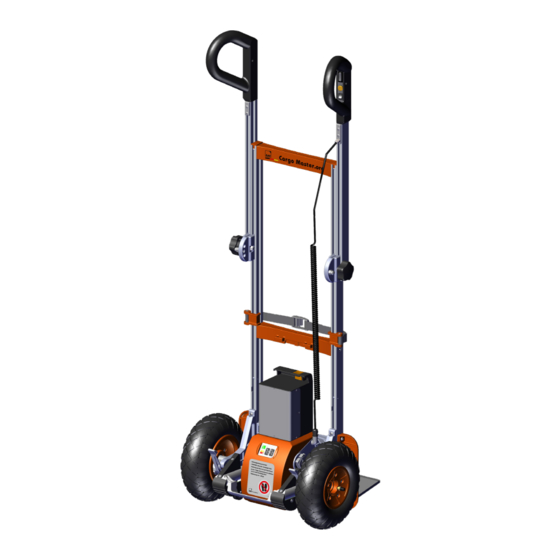
Product description 4.1 Device overview C120 V Information by the manufacturer: For a simplified assignment of the individual components, the num- bers listed here are cited in full the first time they appear in the follow- ing chapters. Handle Battery pack Operating handle Locking screw Wheel (standard pneumatic tyre) -
Page 12: Intended Use
The C120 was developed to be operated by a single person. However, the use of a stair climber requires a higher level of skill and experience than the use of a manual hand truck. This user manual applies to the CargoMaster C120 V. 4.3 Type plate incl. serial number... -
Page 13: Technical Data
4.4 Technical data C120 V Technology Height: min. 1066 mm - max. 1680 mm; width: 493 mm Dimensions Depth | Depth with folded toe plate: 528 mm | 298 mm Battery pack: 4.1 kg Own weight Handle/climbing unit: 22.5 kg (with battery pack) Lifting capacity 120 kg Climbing speed... -
Page 14: Dimensional Drawing C120 V
Maßstab +0,3 Status >120-315 ±0,5 In Freigabe Expl. >315-1000 ±0,8 Datum Name bearb. Kramer 29.01.2020 gepr. AAT Alber Antriebstechnik GmbH Ehestetter Weg 11 D-72458 Albstadt Tel.: 07431/1295-0 Fax: 07431/1295-36 Zust. Änderung Datum Name www.aat-online.de Ers. Toleranzen Werkstück- Normen im Zeichnungsfeld... -
Page 15: Scope Of Delivery
Lead gel battery pack with locking device CargoMaster C120 V incl. lashing strap 4.7 Accessories NOTE - Only use accessories from AAT Alber Antriebstechnik GmbH. Puncture proof tyres (instead of standard tyres) Charging cable for vehicle Additional lead gel battery pack for change Additional mega battery pack Standard handle, swivelling (optionally already included in the scope of delivery incl. -
Page 16: Starting Up
Tighten the locking screws Pull the handles out to the de- of the handles counter- clockwise. sired height. clockwise. (AAT recommends: up to shoulder height.) Adjust the inclination. Pull apart by shaking move- Tilt the handles and, then, Unscrew the locking screws ments. -
Page 17: Inserting The Battery Pack
5.2 Inserting the battery pack WARNING - Fix and lock battery pack so that it cannot become loose. RISK of burns - Only remove the battery when the C120 has been switched off. Installation Spiral cable Removal Place the battery pack The spiral cable is firmly at- Press the release button and the locating pins on the drive... -
Page 18: Turning On The Device
5.4 Turning on the device Switch on via the ON/OFF switch on the handle. 5.5 Continuously adjustable speed Minimum speed Maximum speed... -
Page 19: Neutral Position
5.6 Neutral position NOTE - Press the UP/DOWN switch only a few seconds after switching on. Moving climbing leg If the single-step mode Incorrect! neutral position active, the climbing leg is au- Move the climbing legs to tomatically stopped in neutral neutral position by keeping position (refer to section 5.8). -
Page 20: Checking The Safety Brakes
5.7 Checking the safety brakes DANGER - If the safety brakes only take effect on one side or no effect at all: Do not use the C120. There is a risk of falling! Contact the manufacturer, the AAT field service or a certified partner. -
Page 21: Single-Step Mode
5.8 Single-step mode DANGER - If the single-step mode has been deactivated (continuous climbing mode), a higher level of experience is required to operate the C120. Refer to sections 6.4 and 6.5. Manufacturer's recom- mendation: Only deactivate the sin- gle step mode, if the op- erator is able to handle the C120 safely. -
Page 22: Checking Battery Capacity
5.9 Checking battery capacity Yellow = battery is only partial- Battery indicator Red = battery depleted ly charged Green = battery fully charged Charge battery. Charge battery. An acoustic warning sounds every 12 seconds. The capacity of the batteries will only last for max. 20 - 30 steps! OPERATION DANGER - Do not touch the rotating/moving climbing leg. -
Page 23: Picking Up The Cargo
6.1 Picking up the cargo Moving climbing leg to Recommendation by the Turn the C120 on. To do so, press the ON/OFF neutral position manufacturer: switch. Move the climbing legs to neu- If the single-step mode is ac- tral position by keeping the tive, the climbing leg is auto- UP/DOWN switch pressed. -
Page 24: Moving On Level Ground / Overcoming Obstacles
6.2 Moving on level ground / overcoming obstacles DANGER - Do not support your foot on the gear housing. There is a risk of crushing! CAUTION - Retract the climbing leg. Otherwise, the climbing leg may be damaged! CAUTION - Only overcome obstacles backwards. Otherwise, the safety brakes may be dam- aged! CAUTION - Deactivate the safety brakes! The safety brakes may wear and/or be damaged when moving on level ground! -
Page 25: Moving On Slopes
6.3 Moving on slopes Adjust the handles to a suita- Tilt the C120. Move climbing leg to neutral ble height or a suitable angle position (refer to section 5.6). (refer to section 5.1). Moving down a slope Approach the slope moving To slow down, tilt the C120 forward. -
Page 26: Climbing Stairs - Upwards
6.4 Climbing stairs - upwards Move climbing leg to neutral Activate the safety brake on Tilt the C120 and keep it bal- position (refer to section 5.6). both sides, respectively. To do anced so, push the brake lever up- wards with the foot. Approach step until... -
Page 27: Climbing Stairs - Downwards
6.5 Climbing stairs - downwards DANGER - As soon as the climbing leg starts taking the load, you will feel the handles pulling. Tilt the C120 closer to the ground to counteract the pull. Move climbing leg to neutral Activate the safety brake on Tilt the C120 and keep it bal- position (refer to section 5.6) both sides, respectively. -
Page 28: Laying Down On Stairs / Emergency Stop Function
6.6 Laying down on stairs / emergency stop function WARNING - The C120 must be lying on the wheels because otherwise the safety brakes do not take effect! Emergency stop function in hazardous situations Lay down the C120 Release the UP/DOWN switch. The C120 stops automati- The safety brakes prevent it from slipping away! cally. -
Page 29: Transportation
INSTRUCTIONS FOR MAINTENANCE AND CARE BY THE USER WARNING - Repairs may only be carried out by the manufacturer, by the AAT field service, or by an authorised personnel! WARNING - In the event of any abnormality with regard to the operating behaviour: shut down... -
Page 30: Battery And Charger
7.1 Battery and charger CAUTION - Protect battery and charger from humidity. Do not touch the battery nor the charger with wet hands. There is a risk of electric shock! The battery and the charger may be damaged! CAUTION - Protect the charger and the voltage transformer from oil, grease, aggressive clean- ing agents, thinners, and from damage. - Page 31 Note by the manufacturer: The charger automatically changes over to trickle charge mode once the battery pack is fully charged. The purpose of the trickle charge mode is to maintain the batteries fully charged by compensating the self-discharge. The LED is lit green during the trickle charge mode. Charging batteries in car Turn the C120 off.
- Page 32 Changing the set of batteries NOTE - Observe correct polarity. Black = negative; red = positive. Turn the C120 off. Press the release button and Loosen the screws of the bat- To do so, press the ON/OFF pull battery pack off. tery cover (8 ea.).
- Page 33 Tighten the screws. Check function: LED is lit red = battery is being Connect the charger. charged. Put the battery pack on. LED is lit green = battery fully The battery pack locks in charged. place automatically.
-
Page 34: Checking Brake Linings / Climbing Feet Linings And Air Pressure
NOTE - The minimum thickness of the brake linings (in the centre) is 1 mm. If the lining thick- ness is less than 1 mm or if the linings are damaged: contact the manufacturer, the AAT field service or a certified partner. -
Page 35: Replacing Fuses
WEEE Directive differs in the respective countries and/or does not apply outside of the EC. Alternatively, you can also return these products to AAT or the competent specialized dealers, where they are collected for correct disposal. -
Page 36: Long-Term Storage
7.6 Long-term storage If the C120 is not used for a longer period of time (e.g. several months), observe the following instruc- tions: » No moisture shall reach the inner parts of the device. » Store C120 in a dry place with low relative humidity. If necessary, protect with foils. »... - Page 37 Turn the C120 on again If the LED is flashing: contact the manufacturer, the AAT field service, or a certified partner. Fault conditions The LED is flashing Fault condition 1 times Overload 2 times Undervoltage, battery pack empty 3 times...
-
Page 38: Warranty And Liability
Warranty and liability Warranty AAT Alber Antriebstechnik GmbH grants a warranty of one year for the C120, including all its accesso- ries (with the exception of the lead batteries). The warranty begins at the date of purchase and covers failure of material and errors in manufacturing. -
Page 39: Ec Declaration Of Conformity
EC Declaration of Conformity AAT Alber Antriebstechnik GmbH · Postfach 10 05 60 · D-72426 Albstadt · Tel.: 0 74 31.12 95-0 · Fax: 12 95-35 · www.aat-online.de · info@aat-online.de Translation of the original EC Declaration of Conformity according to... - Page 40 AAT Alber Antriebstechnik GmbH Postfach 10 05 60 72426 Albstadt · Germany Phone: +49 7431 1295-0 Fax: +49 7431 1295-35 info@aat-online.de · www.aat-online.de Serial number:...
Need help?
Do you have a question about the CargoMaster C120 V and is the answer not in the manual?
Questions and answers