Table of Contents
Advertisement
Quick Links
Advertisement
Table of Contents

Related Manuals for AAT Vario-max


Summary of Contents for AAT Vario-max
- Page 1 Vario-max Stair climbing system Translation of the original user’s manual...
-
Page 2: Ce Declaration Of Conformity
Vario-max CE declaration of conformity AAT Alber Antriebstechnik herewith declares that the products of the stair climbing system Vario-max have been designed and manufactured accor- ding to the current regulations of the guidelines 200/747/EG and 2006/42/EG of the European Union. -
Page 3: Table Of Contents
Adequate use ....Features of the Vario-max ... . . Technical data .... - Page 4 Climbing upstairs ....6.12 Climbing downstairs ....Laying the Vario-max on the stairs ... 6.13 6.14 Transport .
-
Page 5: General Information
Read the number here. How to use this user's manual The user’s manual is part of the delivery package and instruct you step by step about the safe and adequate use of the Vario-max. Operating the rio-max takes a certain skill. -
Page 6: Description Of The Product
In the interest of your safety you may not use the stair climbing devi- Vario-max on escalators or moving belts! Only authorized operators may use the Vario-max Therefore never leave the Vario-max unattended. Vario-max in rain, slippery and wet conditions, Please do not use the snow or ice due to the following potential safety hazards, e.g. -
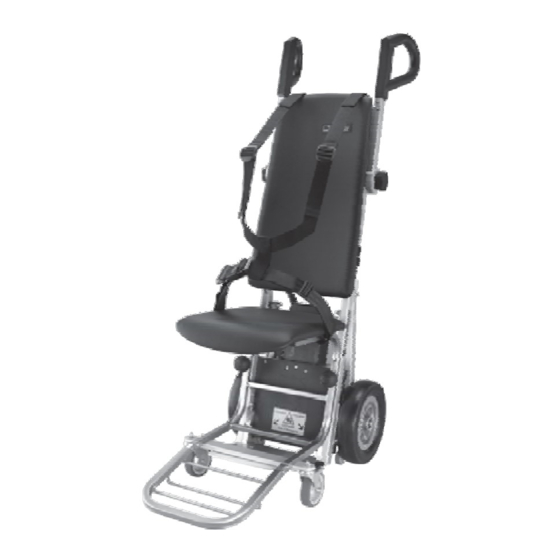
Page 7: Features Of The Vario-Max
Vario-max Features of the Vario-max Model to transport loads (power unit) 1 = Handles 2 = Up/Down switch 3 = Speed control 4 = On/Off switch 5 = clamp plus locking screw 6 = Helix cable 7 = safty belt... -
Page 8: Technical Data
Vario-max Technical data Height = 1060 - 1400mm Width, model for loads = 450 mm Width with seat = 450 mm Measurements Depth, model for loads = 550 mm Depth with seat = 815 mm Power unit = 22,5 kg, seat = 8,2 kg, battery pack = 4,3 kg,... -
Page 9: Dimensioned Sketch
Vario-max Dimensioned sketch... -
Page 10: Standard Scope Of Delivery
Vario-max Standard scope of delivery 1 = Power unit 2 = C-part with integrated seat 3 = Back rest 4 = Seat belt system including hip belt 5 = Battery pack 6 = Charger plus the user's manual... -
Page 11: Optional Accessories
Vario-max Optional accessories 1 = Increase of climbing height 2 = Extra battery pack 3 = Charging cable for the car 4 = Extended handles Accessories to transport loads 5 = Support for round containers 6 = Hook for crates... -
Page 12: Assembly
Vario-max Assembly The Vario-max's serial model is the one to transport persons. All you have to do is to plug in the helix cable at the device (see chapter 3.3) and to mount the battery pack, as described in chapter 3.4. In addition, you need to adjust the grips to the appropriate height (see chapter 3.6). -
Page 13: Disassembly
Vario-max Disassembly To transport loads with the Vario-max again, you need to disassemble and assemble the device in reverse order, (see chapter 3.1.) Connector with helix cable Put the connector of the helix cable Œ into the socket on the power unit’s housing . -
Page 14: Adjust The Handles
Vario-max Adjust the handles 3.6.1 Adjust the height of the handle Pull out the handle to the appropriate height – at most shoulder height—and lock them with the locking bolts Œ (see chapter 6.8). Please always check whether the handles are securely locked. -
Page 15: Safety Instructions
Other devices may also interfere with the Vario-max. Also make sure that you do not operate the Vario-max in close vicini- ty to medical devices with a high potential of danger and/or life pre- serving functions as well as diagnostic devices. -
Page 16: Lifting Capacity
Please make sure that you charge the bat- Vario-max. tery pack after each use of the If the Vario-max is not in operation, please turn off the device. Repairs may only be done by the manufacturer. Please use exclusive- ly original AAT parts. -
Page 17: Operation
Helix cable connector is plugged into the hou- Check whether the connector of the helix cable sing of the power unit and locked each time before you use the Vario-max . Battery pack Ž Please make sure that the sealed lead acid batteries... -
Page 18: Instructions For Operation
Instructions for operation Before we get to the actual instructions for operation, we would like to intro- duce the Vario-max's most important components to you: Handle for operation In the standard version controls such as the On/Off switch Œ, speed control ... -
Page 19: Single Step Control
Vario-max Single step control . The single step switch is located on the climbing frame If you activate the On/Off switch in that mode, the device will climb only one step at a time. The climbing system stops in the correct position, even if you press the On/Off switch continuously. -
Page 20: Safety Brakes
(but without a load or person!) to the edge of the top step. If the Vario-max cannot be pushed over the top step, the required safe operation is granted. -
Page 21: Transportation Of A Person With The Vario-Max
Always use both hands when using the device. Only one person may be transported with the Vario-max. If you transport a person you must buckle him or her up with the seat belt system and the hip belt. -
Page 22: Transportation Of Loads With The Vario-Max
In the interest of your safety please always operate the from behind, never sideways. Operation on level ground Before you operate the Vario-max on level ground, you must retract the clim- bers all the way. Vario-max You overcome a threshold by pulling the... -
Page 23: Tilting The Stair Climbing System
Vario-max Tilting the stair climbing system To drive on slopes or to climb stairs you must tilt the Vario-max, which can be done easily by means of the climbers. Vario-max Turn on the by pressing the On/Off switch. Press the Up/Down switch, direction "Down", until the climbers lift the main wheels at least 1-2 cm off the floor. -
Page 24: Climbing Upstairs
Vario-max 6.11 Climbing upstairs You may only operate the Vario-max transporting a person or a load, if you have been properly trained. Please only practise climbing stairs with the Vario-max without a load or a person, at the lowest speed, and in single step mode! Please check the safety brakes before operation (see chapter 6.4) - Page 25 Vario-max The climbing process takes place in two intervals. Press the Up/Down switch, direction "up", to begin the climbing pro- . cess by moving the climbers downward Always keep the device under tension during the entire climbing pro- cess, i.e. always pull it slightly backward toward you.
- Page 26 Vario-max The first interval is finished when the main wheels touch down on the next ’ higher step and resume the load of the climbers. “. The second interval begins by pulling in the climbers It is finished when the climbers reach their topmost position.
-
Page 27: Climbing Downstairs
Vario-max 6.12 Climbing downstairs You may only operate the Vario-max transporting a person or a load, if you have been properly trained. Please only practise climbing stairs with the Vario-max without a load or a person, at the lowest speed, and in single step mode! Please check the safety brakes before operation (see chapter 6.4) - Page 28 Vario-max Press the Up/Down switch, direction "down", and the descending process begins. Ž The drive retracts the climbers downward and touch down on the next lo- step. , When the climbers reach the next lower step they resume the load of the main wheels, while those plus the climbing frame are lifted off the higher ...
-
Page 29: Laying The Vario-Max On The Stairs
Vario-max The main wheels rest now on the next step (see picture) and resume the load from the climbers, which are retracted further. If you activated the single step mode, the climbers are pulled in entirely and then the descending process ends at this point. -
Page 30: Transport
If so, charge the batteries. Are the fuse damaged? Vario-max cannot be turned on If so, exchange the fuses. If there is still a problem turning on the Vario-max, please contact your dealer. Batteries don't charge Please contact your dealer... -
Page 31: Accessories
If you do not use the both battery packs should be con- nected to the charger to increase their durability (see chapter 8.3). Please exclusively use the AAT Alber Antriebstechnik GmbH charger to charge your battery pack. 7.1.1 Exchange battery pack... -
Page 32: Care, Maintenance And Recycling
In the interest of your safety repairs of any kind may only be done by the manufacturer AAT Alber Antriebstechnik GmbH or the AAT repre- sentative. The device itself (as opposed to the batteries) does not need any particular maintenance except for an occasional cleaning (see chapter 8.8). -
Page 33: Battery Pack
Before using the charging cable, please read and follow all instruc- tions and warning notes included with the charging cable. Exclusively use the AAT Alber Antriebstechnik GmbH charging ca- ble! Check the charging cable regularly and protect it from oil, grease, ag- gressive cleaning agents, thinners and/or damage by sharp edges, etc. - Page 34 Charging your batteries is taking good care of them. Always charge your battery pack with the AAT charger delivered with Vario-max. your This particular charger automatically turns off when the batteries are fully charged keeping them from being overcharged.
-
Page 35: Fuses
You may not mend or by-pass defect fuses. Always replace them with identical ones of the same amperage. AAT Alber Antriebstechnik GmbH can offer you replacements of the fuses. Before you exchange the fuses, please remove the charger from the... -
Page 36: Check Brake Lining
1 mm. In case the lining is thinner than 1 mm, the li- ning must be exchanged on both sides. Please contact the manufacturer AAT Alber Antriebstechnik GmbH or the AAT representative. Vario-max Please check the safety brakes before each use of the (see also chapter 4.3 and... -
Page 37: Recycling
AAT Alber Antriebstechnik GmbH. A new law concerning electric and electronic devices (ElektroG) has been passed on March 24, 2005 regulating the taking back and recycling of old electric and electronic devices. -
Page 38: Warranty And Liability
Vario-max Warranty and liability Warranty AAT Alber Antriebstechnik GmbH grants a warranty of two years for all its Vario-max products of type including all its accessory parts (with the excep- tion of the sealed lead acid batteries). The warranty begins at the date of pur- chase and covers failure of material and errors in manufacturing. - Page 39 Vario-max Notes:...
- Page 40 Vario-max AAT Alber Antriebstechnik GmbH Postfach 10 05 60 · D-72426 Albstadt Tel. +49.74 31.12 95-0 · Fax +49.74 31.12 95-35 info@aat-online.de · www.aat-online.de...
Need help?
Do you have a question about the Vario-max and is the answer not in the manual?
Questions and answers