
Related Manuals for WPI EVOM3


Summary of Contents for WPI EVOM3
- Page 1 WORLD PRECISION INSTRUMENTS INSTRUCTION MANUAL EVOM3 Epithelial Volt/Ohm Meter Serial No._____________________ www.wpiinc.com 121520...
-
Page 3: Table Of Contents
Resistance ........................... 1 Voltage ............................1 TEER Calculations ........................2 ABOUT THIS MANUAL ........................3 INTRODUCTION ..........................3 EVOM3 Features ........................4 EVOM3 Benefits......................... 4 STX2-PLUS Features ......................... 5 STX2-PLUS Benefits ........................5 Notes and Warnings ......................... 5 Tips and Advice .......................... 6 PARTS LIST ............................ - Page 4 MAINTENANCE ..........................26 Cleaning/Maintaining the STX2-PLUS Electrodes............26 Disinfecting the STX2-PLUS Electrodes ................26 Sterilizing the STX2-PLUS Electrode ...................27 Rechloriding the Electrodes ....................27 Storing the Electrodes ......................28 Testing the STX2-PLUS Electrodes ..................28 ACCESSORIES..........................29 TROUBLESHOOTING ........................31 SPECIFICATIONS ..........................35 APPENDIX A: KCL TESTING MIXTURES ..................36 APPENDIX B: FILE FORMATS ......................36 Resistance (*.CSV) ........................36 Voltage (*.csv) ..........................36...
-
Page 5: Quick Start
Press Return to navigate back to the main menu. Insert a USB thumb drive into the USB port on the side of the EVOM3 and begin measuring by pressing the foot switch or touching the Store button on the screen to store and advance to the next weel. -
Page 6: Teer Calculations
Press Return to navigate back to the main menu. Insert a USB thumb drive into the USB port on the side of the EVOM3 and begin measuring by pressing the foot switch or touching the Store button on the screen. -
Page 7: About This Manual
The auto ranging resistance feature allows for fast resistance measurements, and an overrange display feature eliminates false readings. The EVOM3 now has adjustable current levels in three fixed ranges with two lower ranges for sensitive membranes and high resistance ranges up to 100K Ω. -
Page 8: Evom3 Features
The EVOM3 produces a low AC current that avoids electrode metal deposits and adverse effects on tissues which can otherwise be caused by higher DC currents. The EVOM3 uses low current and voltages and is designed for non-destructive testing for epithelial monolayer confluence in cell cultures. -
Page 9: Stx2-Plus Features
Use of the charger: The EVOM3's Li-ion battery will last 8 hours on its own. The charging time is 5.5 hours with the unit powered off. The EVOM3 charger should not be plugged in all the time. The chager may be used to power the EVOM3 for normal and long-term use. -
Page 10: Tips And Advice
EVOM3 to read a lower resistance. Instead of the current going through the membrane, the electricity is going around the membrane. Electricity will take the path of least resistance and the EVOM3 will measure that as a lower resistance. -
Page 11: Parts List
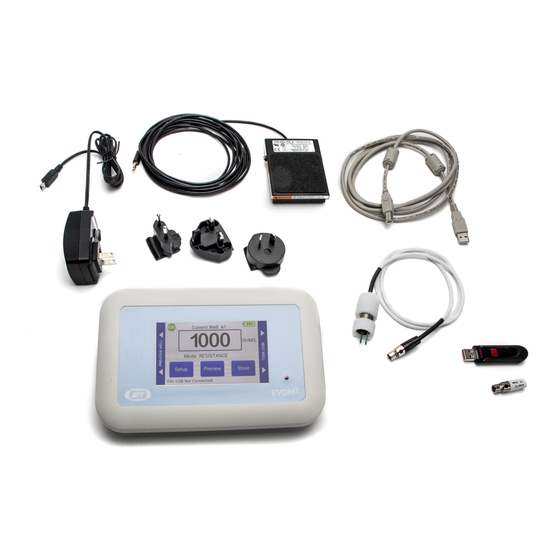
In the STX2-PLUS manual is a KCl molarity test. This test will demostrate electode functionality. Charging the EVOM3 The EVOM3 battery may also be charged with a Mini-B USB cable P/N 803026 (not supplied). Parts List After unpacking, verify that there is no visible damage to the sensor. Verify that all... -
Page 12: Unpacking
Concealed damage should be reported at once to the carrier and an inspection requested. Please read the section entitled “Claims and Returns” on page 47 of this manual. Please contact WPI Customer Service if any parts are missing at (941) 371-1003 or customerservice@wpiinc.com. -
Page 13: Instrument Description
EVOM3 INSTRUMENT DESCRIPTION EVOM3 Meter Fig. 3—USB port, Electrode connection Fig. 4—Foot switch, Future expansion, reset, power connection, power switch STX2-PLUS Electrodes Fig. 5—STX2-PLUS electrode World Precision Instruments... -
Page 14: Theory Of Operation
Slide the cable on the table toward the plate and electrode to prevent tipping. Theory of Operation The EVOM3 system uses a four electrode sensor, two for current sourcing and two for voltage measurement. The EVOM3 passes a known constant current through the membrane on two electrodes and measures the voltage needed to pass that current on the other two electrodes and computes resistance using Ohms law. -
Page 15: Setup Page
EVOM3 Setup Page Press Setup on the main screen to open the Setup page. Fig. 7—Setup page Select Plate – Select the number of wells and the sampling pattern. Mode Units – Choose the Units for sampling. (Options include Millivolts, Volts, Ohms and K Ohms.) -
Page 16: Mode Units
Press Return to save the setup. When you press Preview from the main screen you will see the plate preview files like the samples below. Fig. 9—(Left) 6-well plate preview Fig. 10—(Right) 12-well plate preview Fig. 11—(Left) 24-well plate preview Fig. -
Page 17: Blank Handling Page
EVOM3 Choose your units. Options include Millivolts, Volts, Ohms and K Ohms. If you choose ohms, then you must also select an Ohms Range. Fixed Current Variable Current 10 K 10 µA Auto 2 µA to 10 µA 50 K 4 µA... -
Page 18: Probe Null
Press Date Format. Choose your preferred format and press Return. Fig. 18—(Left) Set the date and press Return Fig. 19—(Right) Choose the date format and press Return Press Set Time. Set the appropriate time and press Return. Press Time Format. Choose 12 hour or 24 hour and press Return. Fig. -
Page 19: Storing Data
Select the Auto Index radio button to enable the Store Prefix and Auto Index buttons. Press Auto Index if you want the EVOM3 to automatically number the new data files sequentially. Auto indexing changes the name to a numeric sequence formatted with a prefix and a sequential number (prefixN). -
Page 20: Viewing Data In Microsoft Excel Or Other Spreadsheet Program
Viewing Data in Microsoft Excel or Other Spreadsheet Program Remove the USB thumb drive from the EVOM3 and plug it into a free USB slot in your computer. Open the drive and look for files named PlateX.CSV. If your computer has Microsoft Excel or another spreadsheet program the file ®... -
Page 21: Usb Testing
USB thumb drive can be used, otherwise an error is displayed. Fig. 27—(Left) The USB thumb drive passed the test and is suitable for use with the EVOM3. Fig. 28—(Right) The USB thumb drive is not suitable for use with the EVOM3. -
Page 22: System Messages
SYSTEM MESSAGES Here are some warning messages you may see. Last Cell Warning Fig. 29—After the last cell measurement is taken, this warning appears. This is the indication that the last well in the plate has been reached and the file needs to be stored. - Page 23 EVOM3 When the battery power level falls to 1%, a warning message appears. Save your data file. The data is saved to a backup file named PWRFAILDATA.TXT. Fig. 31—When the battery level falls to 1%, you are asked to save your data file.
-
Page 24: Reloading A Backup File After Power Failure
Fig. 36—(Left) Power level is restored when the unit is plugged into a power source. Cycle power on the EVOM3 by turning it off and on again. This will automatically load the backup file which was saved when the power failed. The backup file is deleted from the USB drive when you press OK. -
Page 25: Operations
Press the OK in the upper left of the octagonal icon on the main display page to short the electrodes. Verify that the EVOM3 reads 0 ±1 Ω. To return to normal EVOM3 operation, unplug the test resistor and press the button (uppper left). -
Page 26: Making Resistance Measurements
Making Resistance Measurements Power on the EVOM3 using the power switch on the rear panel. If a filename other than the default (plate1) is required, choose whether you will use a prefix and auto-indexing or a unique file name: •... - Page 27 • Press Return to navigate back to the main menu. Insert a USB drive into the USB port on the side of the EVOM3 and begin measuring by pressing the foot switch or touching the Store button on the screen.
-
Page 28: Making Voltage Measurements
Making Voltage Measurements Power on the EVOM3 using the power switch on the rear panel. If a filename other than the default (plate1) is required: • Press and hold the Store button on the main screen for 2 seconds or press Store Screen on the Setting screen to configure your stored data files. - Page 29 • Press Return to navigate back to the main menu. Insert a USB drive into the USB port on the side of the EVOM3 and begin measuring by pressing the foot switch or touching the Store button on the screen.
-
Page 30: Maintenance
MAINTENANCE Electrodes must be properly cleaned, sterilized and stored. CAUTION: Do not flame electrodes. Doing so will cause them to melt. Cleaning/Maintaining the STX2-PLUS Electrodes IMPORTANT! With the use of DMEM, the electrode surface will become coated with protein or other foreign materials. This build-up, or contamination, will degrade the performance of the system. -
Page 31: Sterilizing The Stx2-Plus Electrode
Rechloriding the Electrodes The STX2-Plus electrode must be dipped into chlorine bleach (5% sodium hypochlorite - WPI# TEER-CL) on occasion to maintain the amount of Ag to AgCl balance. Otherwise, the electrode will become unstable. NOTE: Chloriding was not necessary for the STX2, buit is required for the STX2- PLUS it is. -
Page 32: Storing The Electrodes
A 10–15 minute immersion of the tips is recommended before each daily use. (These treatments may be reduced to once per week as experience guides). DMEM deposits cause resistance measurements to become unstable and the coating appears as a dark crust on the electrode surfaces. See "Appendix A: KCL Testing Mixtures" on page 36. -
Page 33: Accessories
5 mm tall, 3 mm wide and 1 mm in thickness. Each probe has an inner (voltage) and an outer (current) electrode. STX3 is an alternative electrode to the STX2 that can be used with the EVOM3 for shallow inserts (5–9 mm). It differs from the STX2 in that the vertical distance between the probes of the STX3 can be adjusted for up to an additional 10 mm of separation. - Page 34 NOTE: The STX100C96 and STX100M require the 99672 EVOM2 electrode adaptor for use with the EVOM3. Endohms are is an optional electrode chambers for the EVOM3 that may be used when working with well cups that are individually removable. It can also be used for studying the tight junction changes induced by chemicals and other factors.
-
Page 35: Troubleshooting
EVOM3 TROUBLESHOOTING EVOM3 Meter: Most of the time, system problems are related to the electrode, not the meter itself. STX2 Electrodes: Some issues you may encounter include: • UNSTABLE OR HIGH READING: If the electrode fails, the most common symptom is an unstable or unusually high reading. - Page 36 Issue Possible Cause Solution Electrodes are Clean the electrodes. See "Cleaning/Maintaining the heavily charged STX2-PLUS Electrodes" on page 26. or dirty Electrode too Move the system to a different area away from sources close to strong of electromagnetic fields. Electromagnetic field sources electromagnetic could include computers, MRI equipment, magnetic stir- radiation device...
- Page 37 EVOM3 Issue Possible Cause Solution Cell culture or If the cell culture has been given sufficient time to achieve media problem confluence, and the reading is stable but significantly lower than expected, then the problem is probably related to the cell culture. Electrode failure will not generally cause a lower than expected yet stable reading.
- Page 38 (“ “) if the display is out of range. Go to Setup, Mode Units and increase the resistance range. See page 11. NOTE: The EVOM3 will read only about 5% above 100K Ω. NOTE: If you have a problem/issue with that falls outside the definitions of this troubleshooting section, contact the WPI Technical Support team at 941.371.1003 or...
-
Page 39: Specifications
Power Consumption ......................~250 mA Certifications ............................ CE Firmware ........................Upgradeable* *NOTE: A USB to Mini-B cable (WPI #803026) is required along with PC bootloader software and the image are required to upgrade the firmware. **Not user serviceable. Contact WPI for repair or replacement. -
Page 40: Appendix A: Kcl Testing Mixtures
25 mL of 20 mM KCl 25 mL 50 mL 10 mM KCl APPENDIX B: FILE FORMATS Resistance (*.CSV) Date 03/12/2020 13:11:56 Well Plate 24 EVOM3 Version 1.0 MODE OHMS offset 999.8 Units: OHMS Direction 1 Resistance Scale 50k Ohms 19015... -
Page 41: Running The External Data Connection Output Program (Pc, Mac, Linux)
External Data Output program. To use these programs: Connect the EVOM3 to the USB port of the PC. The active remote connection port for the EVOM3 service port is in the back of the unit as a USB-B connector [ marked in red]. - Page 42 Extract the files to a WPI directory or a directory of your choice. Connect the EVOM3 to the USB port of the PC. The active remote connection port for the EVOM3 service port is in the back of the unit as a USB-B connector [ marked in red].
-
Page 43: Sample Csv Recording
EVOM3 At a command line or from python type this command : python WPI_ EVOMCNX_3.E.py and press enter. If you are not running Python from the directory where WPI_EVOMCNX_3.E.py was extracted, you will have to change directory to that location. -
Page 44: Appendix D: 24 Mm Diameter (6-Well) Inserts
Note that the resistance readings from 24 mm diameter tissue culture inserts (6- well plates) obtained by using WPI’s STX series of electrodes will be 1.8 to 2.2 times higher than that obtained using the ENDOHM-24G, because the STX electrode cannot deliver a uniform current density over the relatively large membrane through the small gap between the membrane and the bottom of the well. - Page 45 EndOhm chamber, STX2-PLUS or the STX100 electrodes instead of standard STX2 or STX3 electrodes. In some cases where the insert height is shorter than 9 mm the STX3 must be used. The 99672 EVOM3 adaptor must be used for the STX3, STX2, STX100 electrodes.
-
Page 46: Appendix F: Resistance Calculations
Resistance Value of the “Blank” Insert When using an EVOM3 with an STX2-PLUS to measure a blank insert, the resistance value is typically between 60 to 180 Ω, depending on the specific brand of the insert, and lower in EndOhms. This is not background resistance due to the resistance of the blank filter. -
Page 47: Unit Area Resistance
NOTE: Resistance readings for 24 mm or larger diameter inserts obtained by using the EVOM3 with the STX electrodes should not be converted to unit area resistance. The EndOhm is recommended for these larger inserts. The unit area resistance is obtained by multiplying the meter readings by the effective surface area of the filter membrane. -
Page 48: Teer Calculations
• 96 well plate (4.3 mm inserts) 0.145 cm APPENDIX G: FREQUENTLY ASKED QUESTIONS Will the EVOM3 work with the EndOhms? Answer: Yes, but an 99916 adaptor is required (or a new cable). When do researchers want to use the blank function? Answer: The blank function allows researchers to subtract out resistance measurement that is not caused by the membrane. -
Page 49: Declaration Of Conformity
175 Sarasota Center Boulevard Sarasota, FL 34240-9258 USA As the manufacture/distributor of the apparatus listed, declare under sole responsibility that the product(s): WPI PN: EVOM3 To which this declaration relates is/are in conformity with the following standards or other normative documents: Safety:... - Page 50 World Precision Instruments...
-
Page 51: Warranty
WPI shall not be liable for any damage to data or property that may be caused directly or indirectly by use of this product. - Page 52 175 Sarasota Center Blvd., Sarasota FL 34240-9258 Tel: 941-371-1003 • Fax: 941-377-5428 • E-mail: sales@wpiinc.com 1 Hunting Gate, Hitchin, Hertfordshire SG4 0TJ Tel: 44 (0)1462 424700 • Fax: 44 (0)1462 424701 • E-mail: wpiuk@wpi-europe.com Germany Pfingstweide 16, D-61169 Friedberg (Hessen), Germany Tel: +49 (0)6031 67708-0 •...
Need help?
Do you have a question about the EVOM3 and is the answer not in the manual?
Questions and answers