Table of Contents
Advertisement
Quick Links
Advertisement
Table of Contents

Subscribe to Our Youtube Channel
Related Manuals for Kongsberg M3 Sonar FLS


Summary of Contents for Kongsberg M3 Sonar FLS
- Page 1 Installation Manual M3 Sonar ® Forward-Looking Multibeam sonar...
- Page 3 Release 1.0 This manual provides you with the basic information required to install the Kongsberg M3 Sonar FLS Forward Looking Multibeam sonar. The information is intended for personnel with basic mechanical skills. For information about the practical use of the product, refer to the Kongsberg M3 Sonar FLS Reference manual.
- Page 4 No part of this document may be copied or reproduced in any form or by any means, and the information contained within it is not to be communicated to a third party, without the prior written consent of Kongsberg Mesotech Limited.
-
Page 5: Table Of Contents
Support information ......................19 PREPARATIONS ................. 20 Installation summary......................21 Tools and equipment required for M3 Sonar FLS installation ..........22 INSTALLING THE SONAR PROCESSOR ........23 INSTALLING THE SONAR HEAD ..........26 Attaching the Sonar Head to a bracket ................. 27 Mounting the Sonar Head ..................... - Page 6 SETTING TO WORK ..............51 Setting to work summary ...................... 52 Making sure that the M3 Sonar FLS is ready for operational use ........53 Verifying that the operating power is correct .............. 53 Verifying that all hardware is properly installed ............54 Making sure that all M3 Sonar FLS system cables are properly connected ....
- Page 7 Installation Manual Lifting units and transportation boxes .................. 83 Inspection of units and transportation boxes after arrival............. 84 Specifications for storage prior to installation or use............85 Unpacking standard parts and units ..................86 Repacking the Sonar Head....................88 922-20297011/1.0...
- Page 8 M3 Sonar FLS 922-20297011/1.0...
-
Page 9: About This Manual
The M3 Sonar FLS Software is included with the M3 Sonar FLS system and updates are available free of charge and can be downloaded from: http://www.kongsberg.com/mesotechsoftware. Software version This M3 Sonar FLS Installation Manual complies with M3 Sonar FLS software version 1.0. Registered trademarks Observe the registered trademarks that apply. ®... -
Page 10: M3 Sonar Fls
M3 Sonar FLS Installation Manual M3 Sonar FLS Topics System description, page 9 System diagram, page 10 System units, page 11 Scope of supply, page 14 General safety rules, page 17 Installation requirements, page 18 Support information, page 19 922-20297011/1.0... -
Page 11: System Description
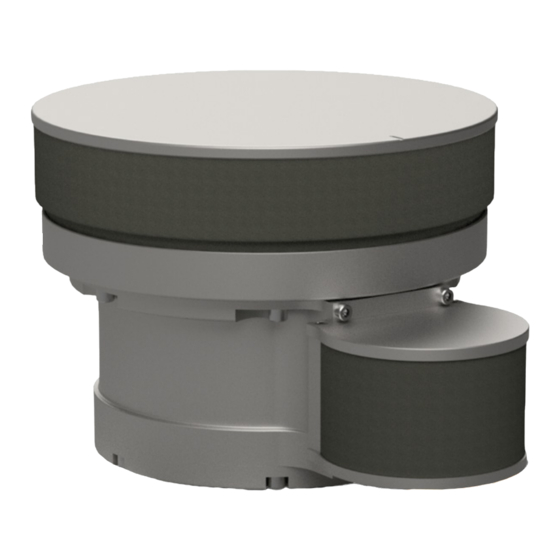
FLS detects small objects out to 200 metres at 200 kHz (subject to environmental conditions) and has a 200° field of view, allowing you to see the full underwater picture in real-time. The M3 Sonar FLS is designed for mounting on an ROV, but can also be installed on a full-size AUV. -
Page 12: System Diagram
M3 Sonar FLS Installation Manual System diagram The system diagram identifies the main components of a basic M3 Sonar FLS system. Only the main connections between the units are shown. Detailed interface capabilities and power cables are not shown. Sonar Processor... -
Page 13: System Units
M3 Sonar FLS System units Topics Sonar Processor, page 12 Power supply, page 12 Sonar Head, page 13 922-20297011/1.0... -
Page 14: Sonar Processor
M3 Sonar FLS. It is a vital part of the M3 Sonar FLS Forward Looking Multibeam sonar. The Sonar Processor runs the M3 Sonar FLS software that... -
Page 15: Sonar Head
Prolonged exposure to ultra-violet rays and excessive heat may damage the surface of the polyurethane transducer face. Always store the M3 Sonar FLS in the provided equipment case when not in use. If the M3 Sonar FLS is mounted on an ROV, cover the transducer when not in use. -
Page 16: Scope Of Supply
Additional optional items, page 16 Basic items provided with a standard delivery To assemble a complete M3 Sonar FLS system, you will need a set of system units. The main units required are provided with the standard delivery. Other required units may be purchased from Kongsberg Mesotech or obtained locally. -
Page 17: Additional Required Items
The Sonar Head is designed to attach to a mounting bracket. You will need a mounting bracket that attaches to the M3 Sonar FLS. The type of mounting bracket you need depends on how you intend to deploy the sonar. -
Page 18: Additional Optional Items
Additional items are available for the M3 Sonar FLS. Some are optional for M3 Sonar FLS operation. These items may for example simplify the installation, or increase the functionality. You can order them with the other basic M3 Sonar FLS items. You can also purchase these items from your dealer, agent or local supplier. -
Page 19: General Safety Rules
M3 Sonar FLS General safety rules The following safety precautions must be followed at all times during installation and maintenance work: WARNING The voltages used to power this equipment are potentially lethal. You must never work alone on high-voltage equipment! •... -
Page 20: Installation Requirements
Employ the following recommendations to ensure the best EMC performance: • Use only Kongsberg-specified cables and check that any ferrite suppression filters fitted on the cables are installed as per the installation drawings. Suppression ferrites are important for minimizing electromagnetic interference. -
Page 21: Support Information
– At least 2 meters (6.6 feet) from the path of radar beams. A typical radar beam spreads 20 degrees above and below the plane containing the radiating element. • Protect the M3 Sonar FLS with a suitably rated fuse or circuit breaker. The power supply should be adequately filtered to minimize equipment exposure to high-voltage transients that may occur during engine start or when other high-power equipment is used on board of the vessel. -
Page 22: Preparations
M3 Sonar FLS Installation Manual Preparations Topics Installation summary, page 21 Tools and equipment required for M3 Sonar FLS installation, page 22 922-20297011/1.0... -
Page 23: Installation Summary
Preparations Installation summary Installation of the M3 Sonar FLS system requires a number of specific procedures and software settings. We recommend two people do the installation together. Context An overall installation procedure is provided. Note In order to obtain maximum safety and optimal performance, it is very important that the installation procedures in this manual are complied to. -
Page 24: Tools And Equipment Required For M3 Sonar Fls Installation
Specific tools and consumables you will need for the M3 Sonar FLS installation are included in the supplied accessory kit. The following tools and items are required for the M3 Sonar FLS installation and are not included in the standard delivery. You must purchase these items locally. -
Page 25: Installing The Sonar Processor
Installing the Sonar Processor Installing the Sonar Processor The Sonar Processor is the computer that controls the M3 Sonar FLS system. It is a vital part of the M3 Sonar FLS Forward Looking Multibeam sonar. Prerequisites A suitable location for the computer must be defined prior to installation. This computer is intended to be installed inside in an area suitable for extended human habitation. - Page 26 For installation of a commercial computer, refer to the manual supplied by the manufacturer. Note Make sure that the chosen computer meets the M3 Sonar FLS requirements. The design and construction must allow for marine use, and the computer must be able to withstand the movements and vibrations normally experienced on a vessel.
- Page 27 When you connect the cables, make sure that they are all properly secured, and able to withstand the vibration and movements of the vessel. Result The M3 Sonar FLS Sonar Processor is set up in a suitable location with the power supply and mouse connected. 922-20297011/1.0...
-
Page 28: Installing The Sonar Head
M3 Sonar FLS Installation Manual Installing the Sonar Head Topics Attaching the Sonar Head to a bracket, page 27 Mounting the Sonar Head, page 29 922-20297011/1.0... -
Page 29: Attaching The Sonar Head To A Bracket
• For high-shock environments, use fasteners with A286 Super Alloy. • You will need a mounting bracket that attaches to the M3 Sonar FLS. The type of mounting bracket you need depends on how you intend to deploy the sonar. - Page 30 Prolonged exposure to ultra-violet rays and excessive heat may damage the surface of the polyurethane transducer face. Always store the M3 Sonar FLS in the provided equipment case when not in use. If the M3 Sonar FLS is mounted on an ROV, cover the transducer when not in use.
-
Page 31: Mounting The Sonar Head
Prerequisites • To install the M3 Sonar FLS, you must have basic mechanical skills. We recommend two people do the installation together. • We assume that you are equipped with a standard set of tools. This tool set must comprise the normal tools for mechanical tasks. - Page 32 Prolonged exposure to ultra-violet rays and excessive heat may damage the surface of the polyurethane transducer face. Always store the M3 Sonar FLS in the provided equipment case when not in use. If the M3 Sonar FLS is mounted on an ROV, cover the transducer when not in use.
- Page 33 Measure the distance between the Sonar Head and your GPS or other position sensor. You will need to measure the distance in terms of the M3 Sonar FLS coordinate system, as shown in the image. • The coordinate system’s Master Reference point is always assumed to be your GPS or position sensor reference point.
-
Page 34: Cable Layout And Interconnections
Topics Read this first, page 33 Cable plan, page 34 List of M3 Sonar FLS cables, page 35 Focal multiplexer compatibility table, page 36 Installing the M3 Sonar FLS cables, page 37 Cable drawings and specifications, page 44 Basic cable requirements, page 47... -
Page 35: Read This First
Kongsberg Mesotech Limited accepts no responsibility for damage to the system, or reduced operational performance, when this is caused by improper wiring. Note Before you install or maintain the M3 Sonar FLS cables, make sure that the AC mains circuit breaker for the system is switched off. 922-20297011/1.0... -
Page 36: Cable Plan
M3 Sonar FLS Installation Manual Cable plan The cables are part of the delivery with the main units. This diagram shows two deployment examples. Basic system interconnection (for setting up a bench test, for example) Remotely Operated Vehicle (ROV) system interconnection... -
Page 37: List Of M3 Sonar Fls Cables
When deployed on an ROV, the ROV Junction Box normally supplies power to the Sonar Head (12 to 36 VDC). List of M3 Sonar FLS cables A set of cables is required to connect the M3 Sonar FLS units to each other, and to the relevant power source(s). Cable... -
Page 38: Focal Multiplexer Compatibility Table
M3 Sonar FLS Installation Manual Focal multiplexer compatibility table If you are installing the M3 Sonar FLS on a Remotely Operated Vehicle (ROV), make sure that your Focal fiber-optic multiplexer is supported. In general, any multiplexer will work over four wires if gigabit Ethernet negotiation has been disabled. -
Page 39: Installing The M3 Sonar Fls Cables
Cable layout and interconnections Installing the M3 Sonar FLS cables Topics Replacing the o-ring in the sonar cable connector, page 37 Replacing the retaining ring in a dummy plug, page 42 Replacing the o-ring in the sonar cable connector A cable with a 10-pin cable connector connects to the Sonar Head. When installing the M3 Sonar FLS, you must check if the o-ring is properly installed. - Page 40 M3 Sonar FLS Installation Manual The following tools and consumables are not included and must be purchased locally. • Dove-tail O-ring Installation Tool (DOIT) • O-ring pick tool • O-ring grease • Swabs • Isopropyl Alcohol 922-20297011/1.0...
- Page 41 Cable layout and interconnections Procedure Remove the o-ring from the Cable Connector Plug. Use the Parker o-ring picks to extract the o-rings from the Cable Connector Plugs and Flanged Connector Receptacle. Clean the o-ring surface with Q-Tips and Isopropyl Alcohol. Ensure all dirt, hair, and debris is removed from the o-ring surface.
- Page 42 M3 Sonar FLS Installation Manual Grease the replacement o-ring with a small amount of o-ring grease. Fit the o-ring onto the DOIT and slide it to the end. 922-20297011/1.0...
- Page 43 Cable layout and interconnections Using the DOIT, fit the o-ring back onto the Cable Connector Plug or Flanged Connector Receptacle. Install the o-ring in the Cable Connector Plug by aligning the key and pressing into the connector. Rotating the DOIT when pulling it out can help ensure the o-ring stays in place. 922-20297011/1.0...
-
Page 44: Replacing The Retaining Ring In A Dummy Plug
FLS, check if the retaining ring is damaged or missing — especially if you have been using your M3 Sonar FLS in the field. The retaining ring is a small steel part that can break over a prolonged period through corrosion. - Page 45 Cable layout and interconnections Insert the retaining-ring plier tips into the two holes in your replacement retaining ring. Push the tips in as far as possible into the retaining-ring holes before squeezing the plier handles. Using minimal pressure, spread the retaining ring slightly apart and slide it over the end of the dummy plug.
-
Page 46: Cable Drawings And Specifications
M3 Sonar FLS Installation Manual Cable drawings and specifications Topics Ethernet cable, page 45 Sonar Head - SEA CON MINK-10-CCPL:Power, Ethernet, 1PPS, and Sync, page 46 922-20297011/1.0... -
Page 47: Ethernet Cable
Cable layout and interconnections Ethernet cable Most high speed connections are made using Ethernet cables. The M3 Sonar FLS must use T568B termination for RJ45 connections on both ends of the cable. Local Ethernet connection Connection on external network device... -
Page 48: Sonar Head - Sea Con Mink-10-Ccpl:power, Ethernet, 1Pps, And Sync
M3 Sonar FLS Installation Manual Sonar Head - SEA CON MINK-10-CCPL: Power, Ethernet, 1PPS, and Sync This rugged cable is intended for underwater use and includes both power and Ethernet telemetry connections for the Sonar Head. The underwater connector is a dry-mate style and must be mated or unmated at the surface. -
Page 49: Basic Cable Requirements
Cable layout and interconnections Basic cable requirements It is very important that all systems cables are installed correctly. All cables must be properly supported and protected, and all relevant precautions must be made to prevent unwanted noise. Topics Ethernet cable installation, page 48 Radio frequency interference, page 49 Physical protection of cables, page 49 Grounding of system cables, page 50... -
Page 50: Ethernet Cable Installation
M3 Sonar FLS Installation Manual Ethernet cable installation All cable connections may have to be made in accordance with the guidelines laid down by the local electrical code. Alien crosstalk Alien crosstalk is where the signal from one cable interferes with the signal being carried by another. -
Page 51: Radio Frequency Interference
Cable layout and interconnections Ground loops Ground loop noise is caused when the equipment is grounded at two or more points that have different potentials. This inconsistency creates a current path causing electromagnetic interference (EMI). This interference appears as rings in the sonar view (usually at a constant range). -
Page 52: Grounding Of System Cables
M3 Sonar FLS Installation Manual Grounding of system cables All metallic cable coverings (armour, metallic sheathing and other protection) must be electrically connected to the vessel's hull at both ends except in the case of final sub-circuits where they should be connected at the supply end only. -
Page 53: Setting To Work
Topics Setting to work summary, page 52 Making sure that the M3 Sonar FLS is ready for operational use, page 53 Turning on the M3 Sonar FLS, page 57 Configuring the M3 Sonar FLS system for normal operation, page 59... -
Page 54: Setting To Work Summary
Setting to work summary Once all the hardware units have been installed, and all the cables have been connected, the M3 Sonar FLS can be turned on for the first time, and set to work. Prerequisites • All M3 Sonar FLS hardware units have been installed according to the relevant instructions. -
Page 55: Making Sure That The M3 Sonar Fls Is Ready For Operational Use
Making sure that all M3 Sonar FLS system cables are properly connected, page 55 Verifying that the operating power is correct The M3 Sonar FLS operates on AC power from the vessel’s mains supply. Before you apply AC power to any M3 Sonar FLS unit, you must verify that the voltage is correct. -
Page 56: Verifying That All Hardware Is Properly Installed
Before powering up the system, a visual inspection of all hardware units is necessary to ensure the units have been installed, mounted, and secured correctly. Prerequisites • All M3 Sonar FLS hardware units have been installed according to the relevant instructions. • All system cables have been installed. -
Page 57: Making Sure That All M3 Sonar Fls System Cables Are Properly Connected
Making sure that all M3 Sonar FLS system cables are properly connected The M3 Sonar FLS relies on communication between each system unit, and between the M3 Sonar FLS and external devices. It is very important that all cables are correctly installed, that the proper cable types have been used, and that all cables are connected correctly. - Page 58 Move on to the next pair of cores and repeat the continuity test until the entire cable has been checked. Further requirements You are now ready to power up the M3 Sonar FLS for the first time. Related topics Cable plan, page 34...
-
Page 59: Turning On The M3 Sonar Fls
Turning on the M3 Sonar FLS In order to use the M3 Sonar FLS system, you must turn it on. You must first turn on the display and the Sonar Processor. After this you can start the M3 Sonar FLS system software. - Page 60 M3 Sonar FLS Installation Manual The sonar will start pinging automatically once the connection is complete. Observe that the text “Active” appears in the lower-right corner of the status bar. 922-20297011/1.0...
-
Page 61: Configuring The M3 Sonar Fls System For Normal Operation
Configuring the M3 Sonar FLS system for normal operation Topics Setting the Sonar Processor to High Performance, page 60 Installing the M3 Sonar FLS software, page 61 Defining the IP address on the Sonar Processor network adapter, page 62 922-20297011/1.0... -
Page 62: Setting The Sonar Processor To High Performance
M3 Sonar FLS Installation Manual Setting the Sonar Processor to High Performance To avoid slowdowns or disruptions while running the sonar, ensure your Sonar Processor is using all of its processing power and does not go to sleep. Prerequisites This procedure is made for the Microsoft ®... -
Page 63: Installing The M3 Sonar Fls Software
Setting to work Installing the M3 Sonar FLS software If your system is provided with a Sonar Processor, the M3 Sonar FLS software has already been installed. If you intend to use your own computer, you must install the software yourself. -
Page 64: Defining The Ip Address On The Sonar Processor Network Adapter
As long as you do not change the Sonar Processor to another computer, or replace the network adapter in your Sonar Processor, you will only need to do this once. Procedure On the Sonar Processor, close the M3 Sonar FLS software. Open the dialog box. -
Page 65: Testing The Operating Functionality Of The M3 Sonar Fls System
In addition, any errors will be displayed Information Widget in the windows. Output Messages Head Status Prerequisites The M3 Sonar FLS software must be running. Make sure there is sufficient disk space available to complete the survey. 922-20297011/1.0... - Page 66 M3 Sonar FLS Installation Manual Procedure → Click to start the Sonar Head. Setup Connect Make sure that a sonar image appears in the sonar view window. Click the “i” icon in the top-left corner of the sonar view to open the...
-
Page 67: Testing The Sonar Head Telemetry
Sonar FLS software is working correctly. Prerequisites • For this test you will need the Sonar Head connected to the Sonar Processor and powered • The M3 Sonar FLS software must be running. ® • This procedure is made for the Microsoft 64-bit Windows 10 operating system. - Page 68 The ping rate is normally taken from the sonar application or range setting. If the estimated available bandwidth is less than the bandwidth required by the sonar application/range, the M3 Sonar FLS software reduces the ping rate to compensate. Note The update rate is the number of times the sonar view is updated per second.
- Page 69 If the Network utilization is less than 80%, disconnect the sonar, close all other programs, then reconnect the sonar. In general, make sure that your network environment supports the required link speed. In the M3 Sonar FLS software, look for any messages in the Output Messages window.
-
Page 70: Turning Off The M3 Sonar Fls
Turning off the M3 Sonar FLS The M3 Sonar FLS is not provided with an on/off switch. Context When you do not use the M3 Sonar FLS, turn off the entire system. Procedure → If you are running the sonar, click in the M3 Sonar FLS software. -
Page 71: Drawing File
Sonar Head outline dimensions, page 70 About the drawings in the drawing file Relevant drawings related to the installation and/or maintenance of the M3 Sonar FLS are provided for information purposes only. The drawings are not to scale. Unless otherwise specified, all measurements are in inches. -
Page 72: Sonar Head Outline Dimensions
M3 Sonar FLS Installation Manual Sonar Head outline dimensions 922-20297011/1.0... - Page 73 Drawing file 922-20297011/1.0...
-
Page 74: Technical Specifications
M3 Sonar FLS Installation Manual Technical specifications Topics Introduction to technical specifications, page 73 Interface specifications, page 74 Performance specifications, page 77 Mechanical specifications, page 78 Power requirements, page 79 Environmental requirements, page 79 Minimum computer requirements, page 80 922-20297011/1.0... -
Page 75: Introduction To Technical Specifications
Technical specifications Introduction to technical specifications These technical specifications summarize the main functional and operational characteristics of the M3 Sonar FLS Forward Looking Multibeam sonar. They also provide information related to power requirements, physical properties and environmental conditions. Note At Kongsberg Mesotech, we are continuously working to improve the quality and performance of our products. -
Page 76: Interface Specifications
M3 Sonar FLS Installation Manual Interface specifications The M3 Sonar FLS system will interface with peripheral systems and sensors using standard and/or proprietary datagram formats. Supported datagram formats for position information The M3 Sonar FLS supports the following datagram formats for position information. - Page 77 This is a third-party proprietary datagram format for heading, speed, and motion. It was created by iXSea (http://www.ixblue.com) for use with their Octans gyrocompass. Supported datagram formats for motion information The M3 Sonar FLS system supports the following datagram formats from a motion sensor: • Teledyne TSS1 Teledyne TSS1 is a proprietary datagram format for heave, roll and pitch compensation.
- Page 78 M3 Sonar FLS Installation Manual • NMEA DBT The NMEA DBT datagram provides the current depth under the transducer. In new designs, this datagram format is frequently used to replace the DBK and DBS formats. • NMEA DPT The NMEA DPT datagram provides the water depth relative to the transducer, and the offset of the measuring transducer.
-
Page 79: Performance Specifications
• Computer Time Sync If ZDA is configured, the M3 Sonar FLS software will use the time in the ZDA message to synchronize the computer clock automatically in the background. However, you may need to run the M3 Sonar FLS software as an administrator (right-click on the icon... -
Page 80: Mechanical Specifications
Angular Resolution • : up to 20 Hz Update rate Mechanical specifications These mechanical specifications summarize the physical properties of the M3 Sonar FLS system. Note For more detailed information about the physical dimensions, see the Drawing file. Sonar Processor The Sonar Processor uses a high-quality commercial-off-the-shelf laptop computer workstation. -
Page 81: Power Requirements
This computer is intended to be installed inside in an area suitable for extended human habitation. Contact your Kongsberg Mesotech representative for information about the current model that is delivered with your M3 Sonar FLS system. Sonar Head : -2° to + 38 °C Operating temperature : -40 to +55 °C... -
Page 82: Minimum Computer Requirements
PassMark Software is a Windows computer performance benchmarking utility. Computers with a CPU score of 8000 or higher have been tested with the M3 Sonar FLS. Lower-scoring computers may not perform well, resulting in a slow GUI response, slower ping rates, or dropped pings. -
Page 83: Equipment Handling
Equipment handling Equipment handling Topics Transporting Kongsberg Mesotech equipment, page 82 Lifting units and transportation boxes, page 83 Inspection of units and transportation boxes after arrival, page 84 Specifications for storage prior to installation or use, page 85 Unpacking standard parts and units, page 86 Repacking the Sonar Head, page 88 922-20297011/1.0... -
Page 84: Transporting Kongsberg Mesotech Equipment
M3 Sonar FLS Installation Manual Transporting Kongsberg Mesotech equipment Unless otherwise stated in the accompanying documentation, electronic, electromechanical and mechanical units supplied by Kongsberg Mesotech can be only transported using methods approved for delicate and fragile equipment. Prerequisites Transportation methods approved for delicate equipment includes transportation by road, rail, air or sea. -
Page 85: Lifting Units And Transportation Boxes
Equipment handling Note Due to the nature of Kongsberg Mesotech’s products, and the extensive use of delicate electronic parts, all units and boxes must be regarded and handled as fragile equipment. Lifting units and transportation boxes Some of the boxes used to hold equipment units may be heavy. Use caution when lifting. -
Page 86: Inspection Of Units And Transportation Boxes After Arrival
Handle all units and boxes with care. Note Due to the nature of Kongsberg Mesotech’s products, and the extensive use of delicate electronic parts, all units and boxes must be regarded and handled as fragile equipment. Inspection of units and transportation boxes... -
Page 87: Specifications For Storage Prior To Installation Or Use
Equipment handling Specifications for storage prior to installation or use When a system, a unit or a spare part has been delivered to the customer, it may be subject to long time storage prior to installation and use. General specifications During this storage period, certain specifications must be met. -
Page 88: Unpacking Standard Parts And Units
M3 Sonar FLS Installation Manual 13 If the unit contained in a box holds normal batteries, these may have been disconnected/isolated before the unit was packed. These must only be reconnected before the installation starts. Units containing batteries are marked. - Page 89 Describe the damage, and collect photographic evidence if possible. Return the inspection report to Kongsberg Mesotech as soon as possible. Place the box on a stable work bench or on the floor with the top of the box facing upwards.
-
Page 90: Repacking The Sonar Head
Store the Sonar Head in a cool, dry location away from ozone sources (such as electric motors or welders). If the M3 Sonar FLS is mounted on an ROV, cover the transducer when not in use. - Page 91 Pack the cable and accessory kit (B) into the foam insert that sits beside the Sonar Head. Note If you ordered a USB flash drive from Kongsberg Mesotech, it goes here too. Pack the Quick Start Guide (C) on top of all other items before closing the lid.
- Page 92 M3 Sonar FLS Installation Manual Index 1000Base-T physical protection......... 49 Ethernet cable ..........45 radio frequency interference......49 cable terminations requirements ..........50 cables connection requirements ........50 about grounding requirements........50 comments ............. 7 list of system interconnection cables ....35 constructive criticism........
- Page 93 ......... 42 set to work ..........52 test the sonar and sensors ......... 65 test the Sonar Head ........63 transport Kongsberg Mesotech equipment ..... 82 EMC guidelines turn off ............68 installation ..........18 turn on ............57 environmental unpack standard parts and units......
- Page 94 M3 Sonar FLS Installation Manual Sonar Head ..........13 Sonar Processor ..........12 IP address turn............68 network adapter ..........62 office IP Address support ............19 network adapter ..........62 turn............57 operational power verify ............53 Kongsberg Mesotech operational software support ............
- Page 95 Index turning off........... 68 basic items ..........14 turning on ........... 57 optional items not provided with the delivery ..16 unpacking standard parts and units ...... 86 required items not provided with the delivery ..15 verifying that all cables are properly connected..55 sensors verifying that all hardware is properly installed..
- Page 96 M3 Sonar FLS Installation Manual switch software ............7 off ............68 visual inspection on ............57 transportation boxes ........84 synchronization units............84 specification ..........76 system description ............ 9 diagram............10 wiring standard tools for installation ......22 diagram............
- Page 98 ©2020 Kongsberg Mesotech...
Need help?
Do you have a question about the M3 Sonar FLS and is the answer not in the manual?
Questions and answers