Table of Contents
Advertisement
Quick Links
Omation 2100 Envelopener
Safety Precautions:
•
Read and understand all aspects of the
Operator Instructions before operating this
equipment.
•
Keep hands, hair, loose jewelry, neckties,
and clothing clear of the feed area during
operation of this unit.
•
Lifting and or moving of this equipment
requires two persons.
•
Unit must be placed securely on
table/surface that is properly rated for
accumulated load weight.
•
Use of this equipment is limited to its
intended function, that of opening mail.
•
Before cleaning, make sure all power is
disconnected.
•
Do not spray cleaning liquids directly on
this equipment.
•
Turn off the machine during periods of
non-use.
•
Always turn the power off before removing
the Nip Arm or Chip Bin.
Cut/No Cut Function:
The Omation 2100 is capable of counting
individual pieces of mail with or without milling
open the envelope. This function can be selected
by turning the Cut/No Cut Knob to the desired
selection position.
Note: Adjusting the cutter to the maximum depth
of cut can defeat the "No Cut" Option.
Counter Function:
The Counter counts individual pieces of mail
processed in either the "No Cut" or "Cut" mode.
Even if power is lost to the machine or the machine
is turned OFF, the Omation 2100 will maintain the
count total. Once the Counter is reset, the previous
count is lost. The condition of the mail and the
cleanliness of the machine can effect the accuracy
of the count.
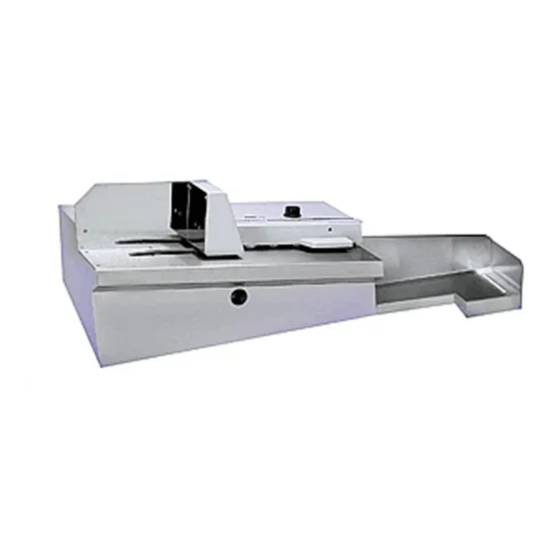
Operating the Omation 2100:
Note: Reference illustration on reverse side
1.
Make sure power cord is connected to the
Omation 2100 and the plug is securely
connected to the power receptacle.
2.
Select either "No Cut" or "Cut" Position on
the Cut/No Cut Selector Knob (1) located on
the top of the Omation 2100.
3.
Reset Counter, if desired, by pressing the
Counter Reset Button (2) located next to the
LED Count Indicator Readout Window (9).
4.
Load a handful of mail (approximately 50
pieces) onto the Envelope Feed Hopper (3)
located on the left side of the machine. Be
sure to justify the side of the mail to be cut
against the back of the Feed Hopper.
5.
To begin operation, turn the On/Off Power
Switch (4) to the On position. When facing
the front of the machine, the Power Switch is
located on the right end of the machine.
6.
Once the Envelope Feed Hopper is empty,
empty the Envelope Catch Tray (5).
7.
The Chip Bin Full Indicator Light (11)
located next to the Count Indicator Readout
Window, indicates that the Chip Bin is full
and needs to be emptied. Removal and
replacement of the Chip Bin resets the
indicator.
8.
To continue processing, repeat the above
steps.
Cutter Adjustment:
The Omation 2100 will arrive with the cutter preset
from the factory. However, the cutter can be
adjusted to accommodate different mail thicknesses
by turning the Cutter Adjustment Screw. The
Cutter Adjustment Screw may be accessed through
the small hole (7) in the front of the Nip Arm (8)
Turn "OFF" power to the 2100. Insert a
customer-supplied 5/32" long-arm hex wrench
through the small hole and engage the Cutter
Adjustment Screw. Turning the Cutter Adjustment
Screw clockwise will increase the depth of cut,
turning the screw counter-clockwise will decrease
the depth of cut.
Operator Instructions
Nip Arm Removal/Installation:
The Nip Arm (8) may be removed to facilitate
cleaning of the Omation 2100. To remove the Nip
Arm, turn the machine OFF. Grasp the right end
of the Nip Arm, pulling upward and remove.
Reverse this procedure to re-install the Nip Arm.
The Omation 2100 will not operate until the Nip
Arm is properly installed.
Cleaning the Omation 2100:
Cleaning of the Omation 2100 should be
performed daily after use.
1.
Unplug the power Cord
2.
Remove the Nip Arm
3.
Remove and empty the Chip Bin (10) The
Chip Bin is located under the cutting deck. It
can be accessed by pressing the black pop-out
button, located in the center of the bin and
rotating it in either direction, while pulling
toward the operator. The bin can be
completely removed for easy disposal of
milled chips. To replace the Chip Bin, slide
the bin forward into the machine until
completely in place. Press the button in, to
lock the bin in place. The machine will not
run unless the bin is properly seated and
locked into place.
Note: Be sure to clean the cavity in which the
Chip Bin resides. Build up of chips behind the
Chip Bin can cause the Chip Bin to improperly
seat and prevent the machine from operating.
4.
Vacuum loose paper chips from the machine.
5.
Use cloth moistened with liquid cleaner such
TM
as Windex
or Formula 409
the exterior of the machine.
Note: Do not apply liquid cleaner directly to the
Omation 2100.
6.
Re-install Chip Bin and Nip Arm.
See reverse side for product illustration
TM
to wipe down
Advertisement
Table of Contents

Related Manuals for Opex Envelopener Omation 2100


Summary of Contents for Opex Envelopener Omation 2100
- Page 1 Omation 2100 Envelopener Operator Instructions Safety Precautions: Operating the Omation 2100: Nip Arm Removal/Installation: Note: Reference illustration on reverse side • Read and understand all aspects of the The Nip Arm (8) may be removed to facilitate Make sure power cord is connected to the Operator Instructions before operating this cleaning of the Omation 2100.
- Page 2 Omation 2100 Envelopener Envelope LED Count Cut/No Cut Counter Feed Indicator Readout Selector Knob Reset Button Hopper Window CAUTION PINCH POINT Chip Bin Full Indicator Light (11) Power On/Off Switch (4) Envelope Catch Tray (5) Cutter Adjustment Screw Access Chip Bin Nip Arm CAUTION Hole (7)
Need help?
Do you have a question about the Envelopener Omation 2100 and is the answer not in the manual?
Questions and answers