
Subscribe to Our Youtube Channel
Related Manuals for Feelworld PVR732


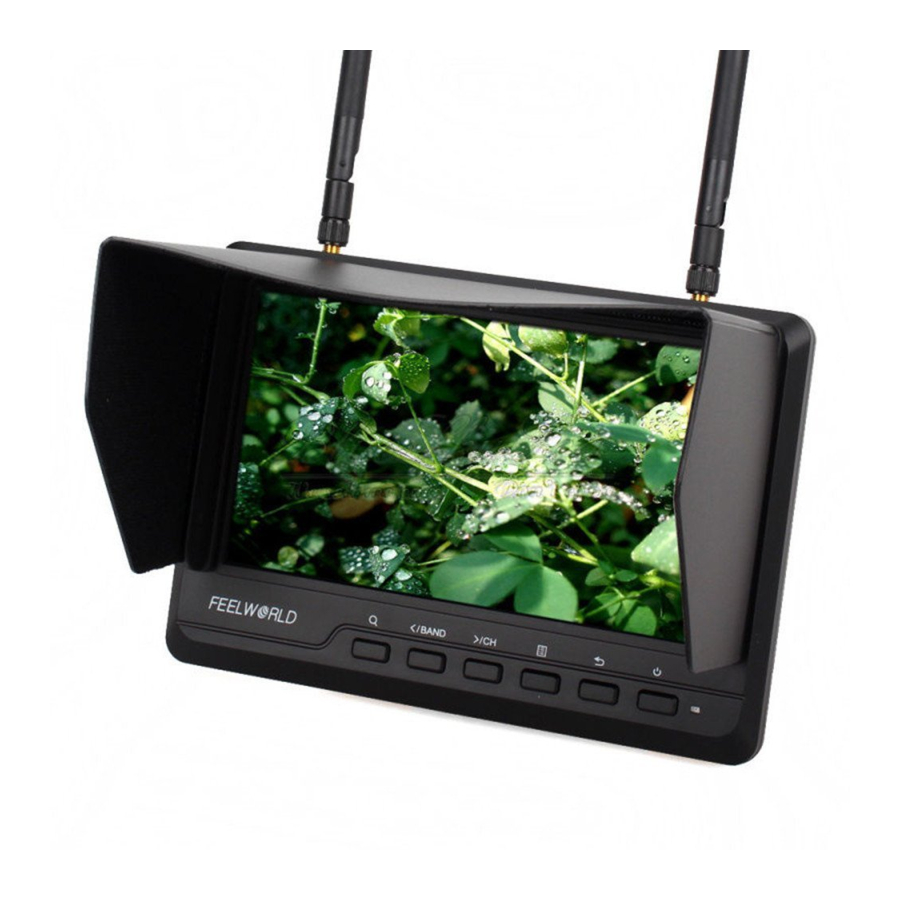
Summary of Contents for Feelworld PVR732
- Page 1 40 Channel Auto Searching Wireless FPV Monitor with Dual Receiver LCD Monitor (Build-in DVR) User Manual...
- Page 2 Product description: Wireless FPV monitor with dual receiver (build-in DVR) LCD monitor is a new multi-function product; adopt advanced integrated circuits and high-quality new HD LCD monitor. It integrates a high-sensitivity dual 5.8GHZ AV wireless receivers, Aerial receiver, Video recorders, high-definition monitor, not only can conduct on-site wireless receiver, video, but also can seamless video, real-time image snapping and video playback.
- Page 3 wipe with a clean soft cloth to keep the brightness of the surface. 6. Without adjustable component in the unit, please do not take apart or repair the unit by yourself, to avoid damage the product. Product feature ● Dual antenna receiver, high-sensitivity, strong anti-interference ●...
-
Page 4: Table Of Contents
● With VIDEO signal output function, can be used as video Playback DVR host, connecting multiple monitors. ● Check Field ● Picture Screen Marker and Center Marker CONTENTS 1. Product description ------------------------------------- 4 2. DVR (Video) instruction -------------------------------- 7 3. Wireless transmission receiver operation ---- 19 4. -
Page 5: Product Description
1. Product description 1.1 Front panel instruction 1. Video Indicator 2. Power Indicator ★ 3~8 DVR operation button 3. SC.SHOT: Real-time images snapping 4. REC/OK: Recording start, stop/function confirm 5. MODE: Mode button to enter/ exit the playback mode 6. MENU: Menu key to enter / exit the DVR (Video) menu Mode 7. - Page 6 : Multi button for UP /Channel Selection /Search / Volume up. Press this button for channel selection, long pressing for channel auto searching. In OSD for “UP” button, Volume up : Multi button for DOWN /Channel Selection /Volume down. Press this button for channel selection from “A/B/E/F/R”.
- Page 7 1.2 Rear battery plate instruction 1. VIDEO OUT: Composite video signal output 2. HDMI: HD HDMI signal input 3. VIDEO IN: Composite video signal input 4. USB data ungraded port 5. AUDIO IN: Audio signal input 6. Power switch “ ”Indicates that the power is turned, ○...
-
Page 8: Dvr (Video) Instruction
1.3 TF Card Slot 2. DVR (Video) Operation instruction: When the monitor's "VIDEO-IN" and "AUDIO-IN" has access to the appropriate signals or "RF" wireless receiver transmitter has been reliably received video signal transmitted over and check the TF card has been reliably into the slot (monitor without the HDMI input, there is no video function). - Page 9 DVR (Video) button instruction 1. SC.SHOT: Real-time images snapping 2. REC/OK: Recording start, stop/function confirm 3. MODE: Mode button to enter/ exit the playback mode 4. MENU: Menu key to enter / exit the DVR (Video) menu mode 5. UP: UP button, up one option 6.
- Page 10 Video playback : When the video for some time, you need to playback video effects observed, press "MODE" button at the top left appears because the video store is packaged stored by time period, can use "UP / DOWN" keys to go forward or backward to select playback file package, select and press the "REC / OK"...
- Page 11 2.5 DVR Menu Operation Video setting Press "MENU" button to enter the video settings menu Resolution D1(720×576), VGA(640×480)QVGA(320×240), The higher resolution, the sharper, the larger of the file size. Loop recording SD card is full, it will overwrite the oldest files cycle, and the system uses a unique algorithm, SD card DVR longer life than ordinary...
- Page 12 Motion Detection After opened, the moving object is detected, it will automatically record. Date Stamp Date and time can be superimposed onto the video, you can not stack.
- Page 13 Recording Video You can choose to record video directly to a file or not record. Image quality The higher the image quality, image clearer, the file will be bigger. Motion detection sensitivity It can be adjusted according to the actual situation.
- Page 14 Advanced Settings Continuous twice press the "MENU" button to enter the MENU in the advanced Settings option Formatting First use, in order to optimize the file system, VCR will Require customers to format again. Formatted files will be lost. After entering format mode, press "REC/OK" button to confirm, the menu prompts Press the REC/OK “button again, choose cancel or confirm whether the memory card is formatted...
- Page 15 Date/time "REC / OK" button to confirm selection and adjustment, "UP / DOWN" keys to change the date or time, "MENU" to exit Auto power off (This unit without this function) Beep Sound (This unit without this function) Language setting Press the "REC / OK"...
- Page 16 Light source frequency(This unit is not used) Refresh rate and the time taken to set the grid frequency synchronization TV mode Output formats PAL / NTSC for option depends on country to set...
- Page 17 Note: If after set the TV output formats, image cannot be synchronized, or even can't bring up the DVR menu, is the DVR output formats are not synchronized to the monitor format due, if this occurs, you can call up the monitor menu, enter the menu of "function"...
- Page 18 Delete, delete the unwanted content. Delete single...
- Page 19 Delete All Protection, to save the contents of the lock protection to prevent misuse deleted and lost...
-
Page 20: Wireless Transmission Receiver Operation
Wireless transmission receiver operation Take the form a complete set of the antenna assemble on the unit’s antenna input ports, the assembly should secure, locked on the buckle. 3.1 Channel selection Wireless transmitter channel and receiver channel must be strictly consistent; otherwise it will not receive a transmitter signal. - Page 21 (Frequency range of each region are different, please check the unit’s paste instructions). Note! During select channels must be supporting the transmitter 3.2 Auto Searching: Confirm that the transmitter has entered a normal working condition and then turn on the monitor, press “MENU” and select “RF”...
-
Page 22: Operation Instruction
3.3 Manual Searching and setting: Confirm that the transmitter has entered a normal working condition and then turn on the monitor, press “MENU” and select “RF” signal input. “BAND: X CH: X” will display on the top left corner of the screen, press “ ”... - Page 23 4.1 Button instructions: 1、 : Multi button for UP/CHANNEL/SEARCH/Volume up: Press this button for channel selection, long pressing for channel auto searching, In OSD for “UP” button, Volume up. :Multi button for DOWN/Channel selection/Volume 、 down: Press this button for channel selection from “A/B/E/F/R”, In OSD for “DOWN”...
- Page 24 Operation Press button 4 (SOURCE / EXIT) to select HDMI, video, RF, DVR input signals Select HDMI, HD multimedia digital signal from the HDMI input port; Select the video, ordinary video signal from the video input port; Select RF, 5.8 G RF input signal directly, image display more clearly.
- Page 25 Color Brightness: To adjust the image's brightness. ※ ※ Contrast: To adjust the brightest and darkest ratio of the image, please note the sense of picture when adjust, proportion too large or small, will make the picture lose the color of showy. ※Hue: On NTSC Video mode, the image color tint difference is adjustable by tint.
- Page 26 ※ Language: Languages for OSD as below: English 简体中文 Français Italiano Deutsch Español 日本語 Pycc Portugues 한국의 ※ H Position:To adjust the OSD position in horizontal. ※ V Position:To adjust the OSD position in vertical. ※ OSD Timeout:To adjust the clock. ※...
- Page 27 Function ※Reset:Back to original setting. System:To adjust color video format ※ ※ Display Ratio:To change the display ratio 16:9/4:3. ※ Screen Markers:To adjust screen marker(off,96%, 93%,90%,85%,80%) ※ Centre Markers: To set centre mark (cross mark) display ※ Camera : Use the Canon 5 d II or similar camera, the monitor video has real-time images.
-
Page 28: Sun Shade Installation And Remove
Sound ※ Volume: To adjust the volume. ※ Focus: As an auxiliary functions (in HDMI mode ) when used as the camera viewfinder. ※ Ver.1.0:Software version number 5. Sun shade installation and remove 5.1 Installation: Positive parallel alignment of the sun shade and monitor, the projection of the sun shade hanging claw at the monitor sun shade slot (see the monitor front view marked 17), pay attention to the position should be aligned around inserted... - Page 29 ●Sun shade installation view ① The sun shade’s hanging claw and the monitor’s sun shade slot should be aligned around inserted balanced to slide down. ② By equilibrium of sliding down to match up the sun shade and monitor. ③ Please follow steps, otherwise will damage the cover, please do not press the L/R panel of the sun shade, if not, unable open the cover.
-
Page 30: Power Supply
② ③ ①In accordance with the instructions below steps, close the sun shade in sequence ② Drag up sun shade balanced to separates the sun shade from the monitor. ③ Remove the sun shade 6. Power Supply There are two versions for power supply: 6.1 Supply by city electricity with power adapter When the monitor connect the electricity by DC power adapter, red light is illuminated, means is charging, after fully charged, then... - Page 31 need to use the other power adapter, please use the qualified power supply in DC9-18V, ≧1.5A Built-in Battery Power Supply This model is built-in Li-ion battery capacity: 7.4V-2200mA/h (2Hours),after fully-charged, it lasts to work 2 hours. 6.3 Li-ion Battery ●The working temperature of Li-ion battery is -20~60℃, please don’t use battery in the place with temperature too low or to high.
-
Page 32: Parameters
● Please charge power stored in the battery to prevent self-discharge of excessive lead to excessive discharge damage if you don’t use the battery for long time Parameters Panel size 7.0 inch Panel type IPS LCD Resolution 1024×600 Pixels Backlight Dot pitch 0.05(H) x 0.15 (V) mm Display ratio... - Page 33 5.8 G broadband FM audio and video synchronization receiving (other frequencies optional) RF receiving frequency 40 channel auto searching (different frequency range for different region, see specific of the machine’s paste instructions) RF wireless receiving sensitivity typical value -90dBm ±100 ppm Frequency stability Unit size 188.4L ×134H ×29.2D (mm)
-
Page 34: Trouble Shooting
8. Trouble shooting 8.1 Only black and white or monochrome picture ①Please check saturation, brightness & contrast adjustment. ②Please check monitor’s "color" from the menu "monochrome" is in black and white or monochrome image or other condition. ③ Check whether it is caused by the discrepancy for the DVR playback of video system and monitor system. - Page 35 ③Recording under the "VIDEO" input state, but "AUDIO" is not AUDIO input signal at the same time. 8.5 Open the RF, no signal detected ①Transmitter is working properly or not. ②If transmitter frequency matches with the receiver frequency band ③If customer change the receiving antenna, please note that must be matched with the transmitter, otherwise may cause receiving sensitivity is low, even can't receive signals ■...
Need help?
Do you have a question about the PVR732 and is the answer not in the manual?
Questions and answers