Advertisement
Quick Links
Advertisement

Related Manuals for Feelworld FPV821


Summary of Contents for Feelworld FPV821
- Page 1 Dual Channel Receiver / Auto Search Wireless FPV Monitor with PIP User Manual...
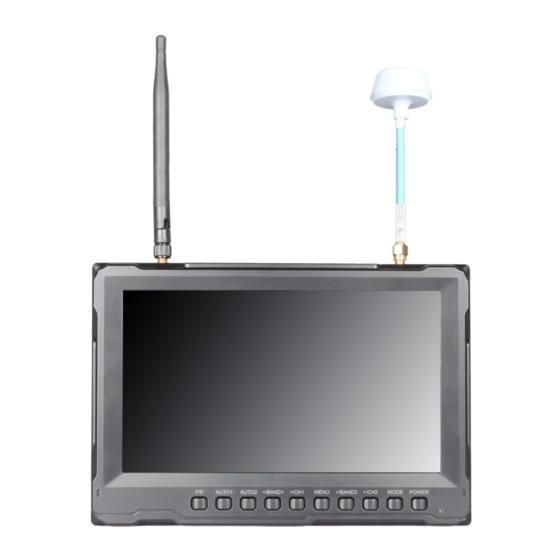
- Page 2 Product Overview Dual channel automatic frequency search at the same time wireless aerial LCD monitor is a new multi-function product, and adopts advanced integrated circuits and High-quality new HD LCD monitor. It integrates a high-sensitivity dual 5.8GHZ AV wireless receivers with auto searching, aerial receiver, high-definition and PIP function monitor.
- Page 3 Product Feature: RF1/RF2 ● Dual Channel receiver to receive at the same time, high-sensitivity, strong anti-interference. ● Combine wireless 5.8G receivers with the monitor, it is compact, and suitable for a variety of purposes. ● 5.8G wireless receiver, 32-channel selection, effectively to avoid the signal interference.
-
Page 4: Table Of Contents
CONTENTS 1. Product Description ----------------------------------- 4 2. Power Supply ---------------------------------------------7 3. Wireless Transmission Receiver Operation --- 8 4. Operation Instruction --------------------------------- 12 5. Parameters ----------------------------------------------- 21 6. Trouble Shooting -------------------------------------- 22... -
Page 5: Product Description
1. Product Description 1.1 Front Panel Features 1. Power Indicator 2. Power: Power On/Off button, long press this button for 5s to 8s to turn On/Off the power. 3. Mode: Input signal selection button. ∧ / CH2: Directly press RF2 button is for CH 1~8 selection. - Page 6 6. >/CH1: Press this button directly for channel RF1 CH 1~8 selection . When enter into menu, namely enter into secondary menu, it is for items selection and settings adjustment. 7. </BAND1: Press this button directly for channel RF1 BAND A/B/C/D selection. When enter into menu, namely enter into secondary menu, it is for items selection and settings adjustment.
- Page 7 1.2 2 Rear r Panel F Feature : Headp phone jac ck output port. 2. RX X2 OUT: RF2 A/V V signal o output por 3. RX X1 OUT: RF1 A/V V signal o output por 4. H DMI IN: M Multimed ia high-d efinition d...
-
Page 8: Power Supply
. Power Supply There are two versions for power supply: 2.1 Supplied by city electricity with power adapter When the monitor connects the electricity by DC power adapter, light is red, means it is charging, after fully charged, the charging indicators will be off. -
Page 9: Wireless Transmission Receiver Operation
● Period of time to do a deep charge and discharge the battery under the protection circuit control to correct the consumption statistics, but it will not improve your battery's actual capacity ● Please place battery in a cool place to weaken the aestivation speed of battery, if you don’t use the battery for a long time. - Page 10 signal. (Frequency range of each region are different, please check the unit’s paste instructions). This unit can automatically search for 32 receiver channels. When multi transmitters and receivers work together at the same time, please choose different transmission channels, to avoid co-channel interference.
- Page 11 3.2 Auto Searching: Confirm that the transmitter has entered a normal working condition. Confirm that build in battery monitor has been fully charges or has connected via DC power supply, long press “POWER” for 5s~8s, the monitor will enter the working state. Then press “MODE”...
- Page 12 3.3 Manual channel search and Settings. Confirm that the transmitter has entered a normal working condition.Turn on power of the monitor to the working state. Press “MODE” and select “RF1”, “RF1 BAND:X CH:X” will display on the upper left corner of the screen, then press “</BAND1” to switch RF1 channel BAND A/B/C/D, and press “>/CH1”...
-
Page 13: Operation Instruction
4. Operation Instruction 4.1 Button instruction MODE Input Signal RF1/RF2/HDMI selection button ∧ / CH2 RF2 CH1~8 channel switch; In OSD is for “UP” button selection. ∨ /BAND2 Press this button directly for channel RF2 BAND A/B/C/D selection; In OSD is for “DOWN” button selection. - Page 14 2 Menu In nstructio Press "ME ENU" to e enter the menu, us se the " ∨ ∨ /CH2” o r " ∧ /BAN ND2 " tton to se elect “ ", after sel ect it the ess ">/C H1 " butt on to con nfirm, nam mely corr...
- Page 15 ※ Brigh htness: 0 0~100. To ad djust the image's b brightnes ※ Satur ration: 0 ~100. To ad djust colo or concen ntration ※ Tint: 0~100. On N NTSC vide eo mode , the ima ge color t tint differ ence is adjus sted by ti...
- Page 16 Me enu of Pa age Two ※ Pictu ure Mode e: Standa ard, Soft, , Vivid, U User. Selec ct “user” to adjust t the imag ge of “Co ontrast, B rightness Satu ration” ac ccording to the pra actical sit tuation.
- Page 17 ※ Volu me: 0~1 100. To ad djust the volume ※ Balan nce : -1 10 ~ + The ba alance ad djustmen nt of left a a nd right c c hannels s...
- Page 18 (Tota al 3 page enu of Pa age One ※ Video o System m: PAL, N NTSC. Aeria al video fo ormats se election. ※ Scree en Marke ers: off, 9 96%, 93% %, 90%, 8 85%, 80% Scree en marke ers range e selectio ※...
- Page 19 Menu o of Page T ※ Imag e Flip: V V, H, V/H, Off. Imag ge Flip fun nction. ※ Lang uage: 简 English 简体中文, nguage m menu sele ection. ※ OSD Horizont tal Posit tion: 0~1 100. To ad djust the image di splay in H...
- Page 20 ※ Menu u Transp arency: 0~10. To ad djust the level of t transpare ent. ※ OSD Timeout t 5s, 10s, , 15s, 60s To ad djust the clock. Menu of Page Th >/CH1 ※ Rese et: Press button to o select and con nfirm.
- Page 21 ※ RF1 B Band: A, , B, C, D A, B, C, D band s selection. ※ RF1 C Channel : CH1~C 1 CH1~C CH8 sele ction. ※ RF1 A Auto Sea arch: RF1c channel a auto sear rching. ※ RF2 B Band:A A, B, C, D A, B, C,...
-
Page 22: Parameters
5. Parameters Panel Size 8. 0 inch Panel Type TFT LCD Resolution 800 X 480 Backlight Dot Pitch 0.0736(W) x 0.2070 (H)mm Aspect Ratio 16:9 Brightness 450cd/㎡ Contrast 500:1 Response Time =10ms; T =15ms Viewing Angle 75°/75°(L/R) 50°/70°(U/D) Input Signal RF1, RF2, HDMI Output Signal Audio/Video (RF1/RF2) -
Page 23: Trouble Shooting
Installation Method 1. 1/4-20 threads mounting holes in the monitor, easy to install on the tripod. Build-in Battery Li-ion 7.4V/2200mA/h Working Temperature -20℃~50℃ Storage Temperature -30℃~65℃ Trouble shooting 6.1 Only black and white or monochrome picture please check saturation, brightness & contrast adjustment. ①... - Page 24 ③ Make sure to use the standard adapter to connect the monitor. If power supply by battery, please check if the battery is fully charged. 6.3 Images are not synchronized The RF signal is too weak. ① ② Find “ ”...
Need help?
Do you have a question about the FPV821 and is the answer not in the manual?
Questions and answers