Advertisement
Advertisement
Table of Contents

Related Manuals for Feelworld FPV1032


Summary of Contents for Feelworld FPV1032
-
Page 1: User Manual
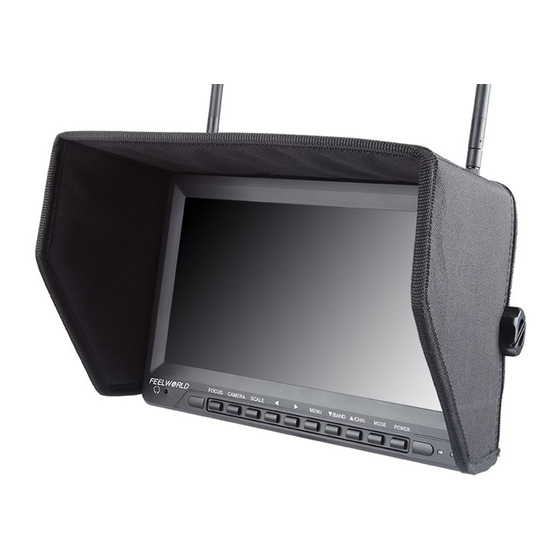
User Manual 32 Channel Auto Searching Wireless Diversity Receiver FPV LCD Monitor... - Page 2 Product description: Wireless FPV monitor with dual receiver LCD monitor is a new multi-function product, adopt advanced integrated circuits and High-quality new HD LCD monitor. It integrates a high-sensitivity dual 5.8GHZ AV wireless receivers with auto searching, Aerial receiver, high-definition monitor. The Monitor casing compact, easy to operate, can be used for FPV ground station, Security monitoring, baby monitors, photography viewfinder, construction site video surveillance, advertising and other venues.
-
Page 3: Product Feature
Product feature: ● Dual antenna receiver, high-sensitivity, strong anti-interference ● Set wireless receiver, a monitor for the integration of Multi-functional combination machine, compact, suitable for a variety of purposes ● 5.8G wireless receiver, 32-channel selection, effectively to avoid the signal interference ●... -
Page 4: Table Of Contents
CONTENTS 1. Product description --------------------------- 4 2. Wireless transmit receiver operation -- 7 3. Operation instruction ------------------------- 9 4. Power Supply ------------------------------------- 14 Parameters --------------------------------------- 17 Trouble shooting ------------------------------ 18... -
Page 5: Product Description
1. Product description: 1.1 Front panel instruction: 1. Power Indicator 2. POWER:Standby button 3. MODE: Input signal selection button : Multi button for UP/CHANNEL/SEARCH: Press this button for channel selection LONG pressing for channel auto searching in OSD for “UP” button :Multi button for DOWN/Channel selection... - Page 6 Press this button for channel selection from “A/B/E/F” in OSD for “DOWN” button 6. MENU:Menu key, as exit button when on BAND selection 7. ▶: Volume up, press this key to increase the volume control, menu item selection for settings adjustment 8.◀:Volume down and center mark button, press this key for center mark on/off.
- Page 7 1.2 Rear battery plate instruction: 1、 VIDEO OUT: Composite video signal output 2、 HDMI: HD HDMI signal input 3、 VIDEO IN: Composite video signal input 4、 USB data ungraded port 5、 AUDIO IN: Audio signal input 6、 Power switch “ ”Indicates that the power is turned, “O”...
-
Page 8: Wireless Transmit Receiver Operation
2 .Wireless transmission receive operation Take the form a complete set of the antenna assemble on the unit’s antenna input ports, the assembly should secure, locked on the buckle. 2.1 Channel selection Wireless transmitter channel and receiver channel must be strictly consistent;... - Page 9 Note! During select channels must be supporting the transmitter 2.2 Auto Searching: Confirm that the transmitter has entered a normal working condition and then turn on the monitor, press “MODE” and select “RF” signal input. Long pressing “ ” ,“Auto Searching” will display on the top left corner of the screen means the machine start to auto searching when the screen on the upper left corner shows the BAND:X CH:X, images, said that finished searching.
-
Page 10: Operation Instruction
“ ” to select 1~8 channel. If the time transmitter has worked, receiver and transmitter frequency in agreement, the receiver will receive the signal sent from the transmitter and displayed on the monitor Note: The effect of receiving the distance has a great relationship with the reception power of the transmitter and the receiver venues. - Page 11 MENU Menu key, as exit button when on BAND selection Volume up, press this key to increase the volume ▶ control, menu item selection for settings adjustment Volume down and center mark button, press this ◀ key for center mark on/off. If would like to make the volume down, press “▶”...
- Page 12 Color Brightness: To adjust the image's brightness. ※ ※ Contrast: To adjust the brightest and darkest ratio of the image, please note the sense of picture when adjust, proportion too large or small, will make the picture lose the color of showy. : On NTSC Video mode, the image color tint difference ※...
- Page 13 ※ Language: Languages for OSD as below: English、简体中文、François、Italia no、Deutsch Español、日本語、 한국의、 Pycc、Portuguesa ※ H Position: To adjust the OSD position in horizontal ※ V Position: To adjust the OSD position in vertical ※ OSD Timeout: To adjust the clock ※ Transparent: To adjust the level of transparent...
- Page 14 Function ※ Reset: Back to original setting. System: To adjust color video format ※ ※ Display Ratio: To change the display ratio 16:9/4:3 ※ Screen Markers: To adjust screen marker (off, 96%, 93%, 90%, 85%, 80%) ※ Centre Markers: To set centre mark (cross mark) display ※...
-
Page 15: Power Supply
Sound ※ Volume: To adjust the volume. ※ Focus: As an auxiliary functions (in HDMI mode) when used as the camera viewfinder. ※ Ver.1.1: Software version number . Power Supply There are three versions for power supply: 4.1 Supply by city electricity with power adapter When the monitor connect the electricity by DC power adapter, red light is illuminated, means is charging, after fully charged, then switch to green light. - Page 16 4.2 Built-in Battery Power Supply This model is built-in Li-ion battery capacity: 7.4V-2200mA/h (2Hours),after fully-charged, it lasts to work 2 hours. 4.3 External Battery Plate to install battery When no electricity, in order to longer the battery working hour, the user can install the external battery plate (optional) with battery to supply the monitor power.
- Page 17 F970 battery slot for battery of Sony DV Sony F970 F960 F950 T930 F770 T750 F730 F570 F550 F530 QM91D QM91 QM90D QM90 QM71D QM71 QM70D QM70 QM51D QM51 FM71 FM70 series LP-E6 battery slot for battery of Canon DV Canon LP-E65 D28 battery slot for battery of Panasonic DV Panasonic D55 D54S D54SE D40 D35 D33 D32 D28 D25 D22...
-
Page 18: Parameters
● Over- charge and over- discharge, it will cause permanent damage to the positive pole and negative pole of batteries. No need over discharge then rechargeable every time. ● Period of time to do a deep charge and discharge the battery under the protection circuit control to correct the consumption statistics, but it will not improve your battery's actual capacity ●... -
Page 19: Trouble Shooting
480i /480p /576i /576p HDMI support format 720p /1080i /1080p (50/60Hz) Headphone output stereo 3.5mm Input voltage DC: 9~18V Power consumption ≦ 5W 5.8 G broadband FM audio and video RF receiving frequency synchronization receiving (other frequencies optional) 32 channel (Auto Searching) RF wireless receiving typical value -90dBm sensitivity... - Page 20 enter into the monitor "Function" menu for "Format" option to select the corresponding standard. 6.2 NO picture after put on the power Check signal cable contact are in good condition, a monitor is ① Synchronized with the input signal, and can press the "SOURCE/EXIT"...
- Page 21 -auto searching or selection channel by hand operation ④ ■ Remark: If there are still other problems, please contact with our related deals. there are changes without prior notice. ★...
Need help?
Do you have a question about the FPV1032 and is the answer not in the manual?
Questions and answers