Table of Contents
Advertisement
Owner's Manual
Model:
IHS-10
Do not return product to the store. Contact the manufacturer for
425 Clair Rd. W, Guelph, Ontario, Canada N1L 1R1
t. (+1) 519.763.1032 • tf. (+1) 800.265.7246 (US and Canada only)
product related issues
.
t. (+31) 73 747 0144 (Europe only) • f. (+1) 519.763.5069
e-mail: info@viqua.com
www.viqua.com
425 Clair Rd. W, Guelph, Ontario, Canada N1L 1R1
425 Clair Rd. W, Guelph, Ontario, Canadá N1L 1R1
t. (+1) 519.763.1032 • tf. (+1) 800.265.7246 (US et Canada seulement)
t. (+1) 519.763.1032 • tf. (+1) 800.265.7246 (solo EE. UU. y Canadá)
t. (+31) 73 747 0144 (Europe seulement) • f. (+1) 519.763.5069
t. (+31) 73 747 0144 (solo Europa) • f. (+1) 519.763.5069
Courriel : info@viqua.com
correo electrónico: info@viqua.com
425 Clair Rd. W, Guelph, Ontario, Canada N1L 1R1
www.viqua.com
www.viqua.com
t. (+1) 519.763.1032 • tf. (+1) 800.265.7246 (US and Canada only)
t. (+31) 73 747 0144 (Europe only) • f. (+1) 519.763.5069
e-mail: info@viqua.com
www.viqua.com
520162-R_RevP
Advertisement
Table of Contents

Related Manuals for Viqua ABSOLUTE H2O IHS-10


Summary of Contents for Viqua ABSOLUTE H2O IHS-10
- Page 1 (+1) 519.763.1032 • tf. (+1) 800.265.7246 (solo EE. UU. y Canadá) t. (+31) 73 747 0144 (Europe seulement) • f. (+1) 519.763.5069 t. (+31) 73 747 0144 (solo Europa) • f. (+1) 519.763.5069 Courriel : info@viqua.com correo electrónico: info@viqua.com 425 Clair Rd. W, Guelph, Ontario, Canada N1L 1R1 www.viqua.com...
-
Page 2: Garantía Del Fabricante
Why should you insist on genuine factory supplied VIQUA replacement lamps? La cobertura de la garantía es específica de la gama de productos de VIQUA. La cobertura de la garantía está sujeta a las condiciones y limitaciones establecidas en la sección "Condiciones y limitaciones... -
Page 3: Section 1 Safety Information
Especificaciones Safety Information Section 1 Safety Information Síntoma Causa probable Posible solución Los equipos instalados aguas abajo del sistema UV funcionan como Asegurarse de que UV sea el último equipo de tratamiento. caldo de cultivo de agentes patógenos These are the original instructions. Please read this entire manual before operating this equipment. Pay attention to all El sistema funciona pero las danger, warning, and caution statements in this manual. -
Page 4: Water Chemistry
Safety Information Funcionamiento Botones y pantalla WA R N I N G Característica Descripción Función • During extended periods of no water flow, the water in your chamber can become very hot (Approx. 60 °C) and potentially lead to scalding. It is Pantalla del temporizador de ... -
Page 5: Mantenimiento
Mantenimiento General Information 4.3 Reposición de los cartuchos Section 2 General Information Es recomendable cambiar los cartuchos de filtro periódicamente (3 a 4 veces al año) en función de la calidad y el uso del agua. Una reducción gradual en la presión del agua después del dispositivo de filtrado es una indicación que los cartuchos previos al filtro están llegando al final de su vida útil. -
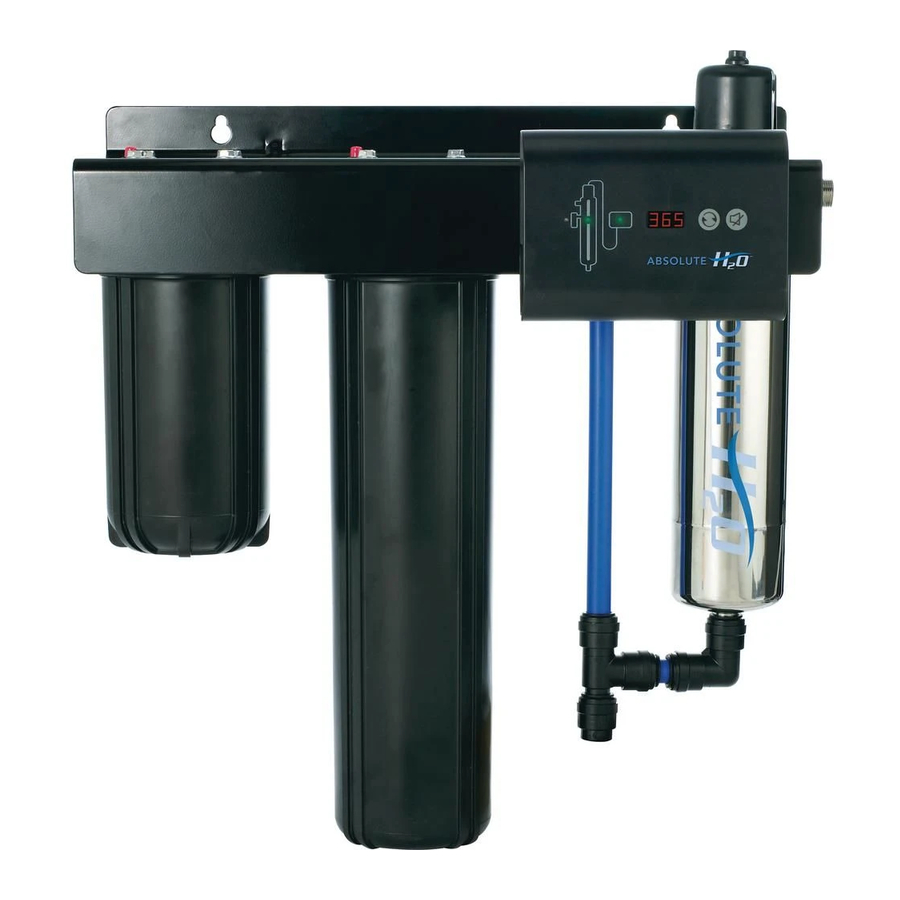
Page 6: Dimensions And Layout
General Information Mantenimiento Mantenimiento 2.1 Dimensions and Layout 4.2 Limpieza y reposición de la vaina tubular de cuarzo Nota: Los minerales del agua van formando lentamente una capa en la vaina tubular de la lámpara. Esta capa debe retirarse porque reduce la cantidad de luz UV que llega al agua, reduciendo de este modo el rendimiento de la desinfección. Si la vaina tubular no puede limpiarse, deberá... -
Page 7: Section 3 Installation
Mantenimiento Installation 4.1 Reemplazo de la lámpara UV Section 3 Installation AV I S O No utilice agua durante la reposición de la lámpara UV. 3.1 Installing UV System La reposición de la lámpara es un procedimiento rápido y sencillo que no necesita herramientas especiales. Se debe C A U T I O N reemplazar la lámpara después de 9000 horas de funcionamiento continuo (un año aproximadamente) con el fin de garantizar una desinfección adecuada. -
Page 8: Instalación
Installation Instalación 30 mins • Connect the green ground • Align connection pins with • Connect power. • Quite las carcasas del cárter con • Quite los cartuchos y vierta dos • Vuelva a instalar las carcasas. • Abra todos los grifos y encienda el wire and red strain relief wire the lamp connector by •... -
Page 9: Procedimiento De Desinfección
Instalación Installation 30 mins • Conecte el cable verde de toma • Alinee los pasadores de conexión • Conecte la alimentación. • Remove the sump housings • Remove cartridges and pour • Reinstall the housings. • Open all faucets and turn on de tierra y el rojo de alivio de con el conector de la lámpara, •... - Page 10 Maintenance Instalación 4.1 Replacing UV Lamp Sección 3 Instalación N O T I C E Do not use water during replacement of UV lamp. 3.1 Instalación del sistema UV Lamp replacement is a quick and simple procedure requiring no special tools. The UV lamp must be replaced after 9000 P R E C A U C I Ó...
- Page 11 Información general Maintenance 2.1 Dimensiones y distribución 4.2 Cleaning and Replacing Quartz Sleeve Note: Minerals in the water slowly form a coating on the lamp sleeve. This coating must be removed because it reduces the amount of UV light reaching the water, thereby reducing disinfection performance. If the sleeve can not be cleaned, it must be replaced.
-
Page 12: Sección 2 Información General
Maintenance Información general 4.3 Replacing Cartridges Sección 2 Información general It is recommended to change the filter cartridges regularly, approximately 3-4 times per year depending on water quality and usage. A gradual drop in water pressure after the filtration device is an indication that the pre-filter cartridges are nearing the end of their useful life. -
Page 13: Section 6 Troubleshooting
Información de seguridad Operation Buttons and Display A D V E R T E N C I A Feature Description Function Durante períodos prolongados sin flujo de agua, el agua del depósito se podría calentar excesivamente (aprox. 60 °C) y provocar quemaduras. •... -
Page 14: Specifications
Specifications Información de seguridad Sección 1 Información de seguridad Symptom Possible Cause Possible Solution Unit is unplugged. Plug unit into AC power outlet Estas son las instrucciones originales. Lea este manual en su totalidad antes de usar este equipo. Preste atención a todas No power at AC power outlet Replace fuse or reset breaker Lamp timer does not read... -
Page 15: Manufacturer's Warranty
VIQUA warrants the electrical (controller) and hardware components to be free from defects in material and workmanship for a period of three (3) years from the date of purchase. During this time, VIQUA will repair or replace, at its option, any (inadvertido) de lámparas de reposición no originales. -
Page 16: Manual Del Propietario
425 Clair Rd. W, Guelph, Ontario, Canadá N1L 1R1 t. (+1) 519.763.1032 • tf. (+1) 800.265.7246 (solo EE. UU. y Canadá) t. (+31) 73 747 0144 (solo Europa) • f. (+1) 519.763.5069 correo electrónico: info@viqua.com www.viqua.com 520162-R_RevP... -
Page 17: Manuel D'utilisation
425 Clair Rd. W, Guelph, Ontario, Canada N1L 1R1 t. (+1) 519.763.1032 • tf. (+1) 800.265.7246 (US et Canada seulement) t. (+31) 73 747 0144 (Europe seulement) • f. (+1) 519.763.5069 Courriel : info@viqua.com www.viqua.com 520162-R_RevP... - Page 18 Garantie limitée de dix ans pour la chambre à UV VIQUA VIQUA garantit la chambre à UV du produit VIQUA contre tout défaut de matière et de main-d'œuvre pour une durée de dix (10) années à compter de la date d'achat. Dans cette période, VIQUA pourra remplacer ou réparer à son choix, toute chambre ...
-
Page 19: Informations De Sécurité
Caractéristiques Informations de sécurité Section 1 Informations de sécurité Symptôme Cause possible Solution Possible Condensation d'air humide sur la chambre froide (accumulation lente) Contrôler l'humidité ou déplacer unité Ci-dessous sont les instructions originales. Veuillez lire la totalité de ce manuel avant d'utiliser cet équipement. Prêtez attention à... -
Page 20: Section 6 Dépannage
Informations de sécurité Fonctionnement Boutons et affichage AV E R T I S S E M E N T Caractéristique Description Fonction • Pendant les longues périodes où l'eau ne s'est pas écoulée, l'eau de votre chambre peut devenir très chaude (environ 60 ºC) et potentiellement mener à... -
Page 21: Section 2 Informations Générales
Maintenance Informations générales 4.3 Remplacement des cartouches Section 2 Informations générales Il est recommandé de changer les cartouches de filtre régulièrement, environ 3-4 fois par an en fonction de la qualité et de l'utilisation de l'eau. Une baisse graduelle de la pression hydrique après l'appareil de filtration est une indication que les cartouches de pré-filtre approchent de la fin de leur durée de vie. - Page 22 Informations générales Maintenance 4.2 Nettoyage et remplacement du manchon en quartz 2.1 Dimensions et agencement Remarque : les matières minérales dans l'eau forment progressivement un dépôt sur le manchon de lampe. Ce dépôt doit être éliminé parce qu'il réduit la quantité de lumière UV qui atteint l'eau, et limite donc les performances de désinfection. S'il n'est pas possible de nettoyer le manchon, celui-ci doit être remplacé.
-
Page 23: Installation
Maintenance Installation 4.1 Remplacement de la lampe UV Section 3 Installation AV I S Ne pas utiliser d'eau pendant le remplacement de la lampe UV. 3.1 Installation du système UV Le remplacement d'une lampe est une procédure simple et rapide ne nécessitant aucun outil spécial. La lampe UV doit AT T E N T I O N être remplacée après 9 000 heures de fonctionnement continu (environ un an) pour assurer une désinfection appropriée. -
Page 24: Procédure De Désinfection
Installation Installation 30 mins • Brancher the câble de terre • Alignez les broches de • Brancher l'alimentation. • Déposer les boîtiers de carter • Déposer les cartouches et • Reposer les boîtiers. • Ouvrir tous les robinets et vert et le support de câble connexion avec le connecteur •...
Need help?
Do you have a question about the ABSOLUTE H2O IHS-10 and is the answer not in the manual?
Questions and answers