Table of Contents
Advertisement
Available languages
Available languages
Quick Links
H-5276, H-5278
π
H-5279, H-6097
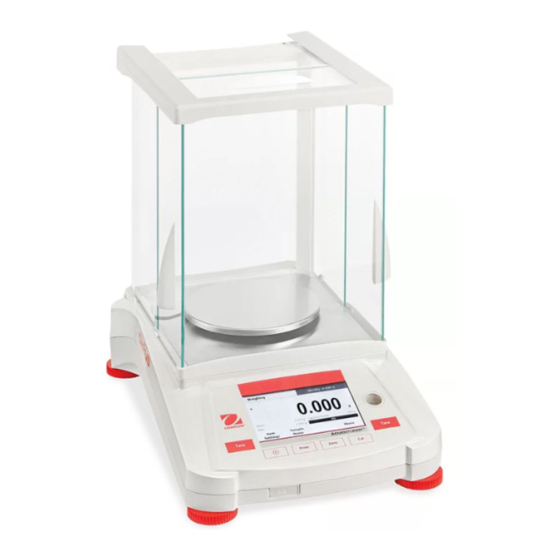
OHAUS ADVENTURER
BALANCE SCALE
CONTROL PANEL
CONTROL FUNCTIONS
BUTTON
PRIMARY
ON/OFF
FUNCTION
If scale is off, turns
(Short Press)
scale on.
SECONDARY
If scale is on, turns
FUNCTION
scale off.
(Long Press)
NOTE: The balance
will automatically
power on when
power is connected.
MAIN APPLICATION SCREEN
Application
Instructional Messages
Stability (*), Net (NET),
Gross (G) and/or center
of zero (>0<) indicators
Reference Fields
PAGE 1 OF 54
1-800-295-5510
uline.com
®
OVERVIEW OF CONTROLS
Dynamic Weighing
Place sample on the pan. Press Start to begin averaging.
0.00
>0<
Gross:
0.00g
Averaging Time:
Net:
0.00g
Automatic Mode:
Item
Save to
Start
Settings
USB
Tare
Print
Zero
5
1
2
Print
PRINT
Prints the present
data to a computer
printer.
Dynamic Weighing
Place sample on the pan. Press Start to begin averaging.
>0<
Gross:
Net:
Item
Settings
Max 4201 g
d=0.01 g e=0.01 g
g
5 s
Off
Start
Tare
A
DVENTURER™
Cal
5
4
3
Zero
ZERO
Performs zero
operation.
Max 4201 g
d=0.01 g e=0.01 g
0.00
g
0.00 g
Averaging Time:
0.00 g
Automatic Mode:
Save to
Start
Menu
USB
Para Español, vea páginas 19-36.
Pour le français, consulter les pages 37-54.
CONTROL PANEL PARTS
#
DESCRIPTION
1
ON/OFF Button
2
Print Button
3
Zero Button
4
Calibration Button
5
Tare Function Buttons
Cal
CALIBRATION
Performs calibration
Performs tare
operation.
operation.
Capacity and Readability
Result Field: Information
varies by application.
Touch g to change unit.
5 s
Off
Application Buttons:
Functions vary by
application.
Tare
TARE
0521 IH-5276
Advertisement
Table of Contents

Related Manuals for U-Line OHAUS ADVENTURER Н-5276


Summary of Contents for U-Line OHAUS ADVENTURER Н-5276
- Page 1 Para Español, vea páginas 19-36. Pour le français, consulter les pages 37-54. H-5276, H-5278 π 1-800-295-5510 H-5279, H-6097 uline.com OHAUS ADVENTURER ® BALANCE SCALE OVERVIEW OF CONTROLS CONTROL PANEL CONTROL PANEL PARTS DESCRIPTION Max 4201 g Dynamic Weighing d=0.01 g e=0.01 g Place sample on the pan.
-
Page 2: Operation
OPERATION TURNING BALANCE ON/OFF 3. Select the Menu Item: Continue until the desired setting is chosen in the menu list. Touch the setting to • To turn the balance ON, press the button. change it. The changed setting will be displayed as highlighted yellow for about one second to confirm •... -
Page 3: Enabling Units Of Measure
OPERATION CONTINUED ENABLING UNITS OF MEASURE Enter the weighing units sub-menu in the main menu to NOTE: Due to national laws, the balance may activate the desired units of measure. This menu can not include some of the units of measure listed. also be accessed by pressing the unit symbol in an application home screen. -
Page 4: Application Modes
OPERATION CONTINUED SPAN CALIBRATION (SINGLE POINT) APPLICATION MODES Span calibration uses two calibration points, one at zero Touch the top left application field (weighing in the load and the other at specified full load (span). example below) to select the application mode. (See Figures 4-5) NOTE: Factory default settings are shown in bold. -
Page 5: Item Settings
OPERATION CONTINUED ITEM SETTINGS If capacity bar is set to off, the reference field will show minimum weight and sample name. (See Figure 10) To view or adjust the current settings, touch the ITEM SETTINGS button. The Settings screen appears. Figure 10 (See Figure 7) Weighing... -
Page 6: Save To Usb
OPERATION CONTINUED SAVE TO USB 3. Place objects on the pan to display the weight. When stable, the * appears. Insert the USB flash drive into the USB slot located on the 4. The resulting value is displayed in the main display front of the balance. - Page 7 OPERATION CONTINUED ITEM SETTINGS CONTINUED Set a Known Average Piece Weight (APW): To adjust the APW value directly, touch the APW button. A numeric The next screen appears, with the message to place the input window appears. (See Figure 20) reference weight on the pan.
-
Page 8: Percent Weighing
OPERATION CONTINUED ITEM SETTINGS Auto Optimization: When set to ON, improves counting accuracy by recalculating the piece weight To view or adjust the current settings, touch the automatically as parts are added. Default is OFF. ITEM SETTINGS button. The Settings screen appears. NOTE: APW optimization occurs only when the (See Figure 24) number of pieces added to the pan is between... -
Page 9: Dynamic Weighing
OPERATION CONTINUED DYNAMIC WEIGHING Averaging Time: Set the averaging time to a value between 1 and 99 seconds. Default is 5 seconds. Automatic Mode: When set to ON, the cycle begins Use this application to weigh an unstable load, such as when an object is placed on the pan, and the held a moving animal. - Page 10 OPERATION CONTINUED MEASURING THE DENSITY OF A SOLID USING Step 1 of 2 – Weigh the Sample in Air: Press START. Follow screen instructions, then press ACCEPT to store WATER (DEFAULT) the dry sample weight (in air). (See Figure 33) Press the ITEM SETTINGS button to open the Density Determination settings screen.
-
Page 11: Measuring The Density Of A Buoyant Material Using Water
OPERATION CONTINUED MEASURING THE DENSITY OF A BUOYANT A numeric input window appears. (See Figure 38) MATERIAL USING WATER Figure 38 Press the ITEM SETTINGS button to open settings screen. Liquid Density (See Figure 36) 0.9982 g/cm3 Figure 36 Density Determination Save Density Type Auxilliary Liquid... - Page 12 OPERATION CONTINUED A numeric input window is displayed. (See Figure 41) Once the necessary weights have been determined, the density of the liquid sample is displayed in g/cm (along with the weight in air, weight in water) Figure 41 Sinker Volume on the application screen.
- Page 13 OPERATION CONTINUED Confirm the default values displayed (Water Temp.) Press BEGIN DENSITY CALCULATION. are correct. STEP 1 OF 3 – WEIGH THE UN-OILED SAMPLE To edit the default values, touch ITEM SETTINGS. The IN AIR. settings screen appears. (See Figure 47) Follow the screen instructions then press ACCEPT to store the dry sample weight (in air).
- Page 14 OPERATION CONTINUED Once the necessary weights have been determined, To set the over limit value, touch the OVER LIMIT button. the density of the sample is displayed in g/cm (along To set the under limit value, touch the UNDER LIMIT with the weight in air, un-oiled and oiled, and weight in button.
-
Page 15: Display Hold
OPERATION CONTINUED PEAK HOLD DISPLAY HOLD In the upper left portion of the home screen, select Display Hold. (See Figure 60) Two modes are available: (See Figure 58) 2. Choose Peak Hold mode in item settings. (See below) Display Hold - allows the user to capture and store a stable weight. - Page 16 OPERATION CONTINUED FORMULATION TOTALIZATION Use this application for compounding and recipe Totalization measures the cumulative weight of a making. (See Figure 64) The maximum number of sequence of items. (See Figure 62) The cumulative components is 50. total may exceed the capacity of the balance. The maximum number of samples (n) is 99.
-
Page 17: Weigh Below
OPERATION CONTINUED ITEM SETTINGS To view or adjust the current settings, touch the Figure 66 Formulation ITEM SETTINGS button. (See Figure 66) The settings screen appears. Filler: If set to ON, a filler material is asked for at the end Filler Auto Tare Print Settings... -
Page 18: Troubleshooting
MAINTENANCE CONTINUED CLEANING CONTINUED REMOVING AND REINSTALLING THE GLASS DOORS FOR CLEANING: 1. On the back of the balance, 2. After cleaning, slide the doors 3. Slide the doors into the slot until press the pin and slide out the into the slot while pressing the pin the back stopper aligns with the door. - Page 19 H-5276, H-5278 π 800-295-5510 H-5279, H-6097 uline.mx OHAUS ADVENTURER ® BÁSCULA RESUMEN DE LOS CONTROLES PANEL DE CONTROL PARTES DEL PANEL DE CONTROL Max 4201 g Dynamic Weighing DESCRIPCIÓN d=0.01 g e=0.01 g Place sample on the pan. Press Start to begin averaging. 0.00 Botón ON/OFF (Encendido y apagado) >0<...
-
Page 20: Navegación Por El Menú
FUNCIONAMIENTO ENCENDER/APAGAR LA BÁSCULA 2. Seleccionar el submenú: Encuentre el elemento en la lista del menú principal y tóquelo. Aparecerá el submenú. • Para encender la báscula, presione el botón. 3. Seleccionar el elemento de menú: Continúe hasta • Para apagar la báscula, presione y mantenga elegir la configuración deseada en la lista del presionado el botón. -
Page 21: Calibración Inicial
CONTINUACIÓN DE FUNCIONAMIENTO HABILITAR LAS UNIDADES DE MEDIDA Acceda al submenú de las unidades de pesaje para NOTA: Debido a las leyes nacionales, puede activar las unidades de medida deseadas. También se que la báscula no incluya algunas de las puede acceder a este menú... -
Page 22: Calibración De Linealidad
CONTINUACIÓN DE FUNCIONAMIENTO CALIBRACIÓN DE INTERVALO MODOS DE APLICACIÓN (UN SOLO PUNTO) Toque el campo de aplicación ubicado arriba a la izquierda (pesaje en el ejemplo que se muestra a La calibración de intervalo emplea dos puntos de continuación) para seleccionar el modo de aplicación. calibración, uno de la carga del cero y el otro del peso (Vea Diagramas 4 y 5) completo especificado (intervalo). -
Page 23: Configuración De Los Elementos
CONTINUACIÓN DE FUNCIONAMIENTO CONFIGURACIÓN DE LOS ELEMENTOS Si la barra de capacidad está desactivada, el campo de referencia mostrará el peso mínimo y el nombre de Para ver o ajustar la configuración actual, toque la muestra. (Vea Diagrama 10) el botón ITEM SETTINGS (CONFIGURACIÓN DE LOS ELEMENTOS). -
Page 24: Guardar En Usb
CONTINUACIÓN DE FUNCIONAMIENTO GUARDAR EN USB 3. Coloque los objetos sobre la bandeja para mostrar el peso. Cuando esté estable, aparecerá el símbolo *. Inserte la unidad USB en la ranura para USB ubicada en la parte delantera de la báscula. A continuación, presione el 4. - Page 25 CONTINUACIÓN DE FUNCIONAMIENTO CONTINUACIÓN DE CONFIGURACIÓN DE LOS Determinar un peso promedio por pieza (APW) conocido: Para ajustar el valor del APW directamente, ELEMENTOS toque el botón APW. Aparecerá una ventana donde Aparecerá la siguiente pantalla, con el mensaje de podrá...
- Page 26 CONTINUACIÓN DE FUNCIONAMIENTO CONFIGURACIÓN DE LOS ELEMENTOS Optimización automática: Cuando se pone en posición ON (ENCENDIDO), mejora la precisión del conteo Para ver o ajustar la configuración actual, toque recalculando el peso de la pieza automáticamente el botón ITEM SETTINGS (CONFIGURACIÓN DE LOS conforme se van agregando piezas.
-
Page 27: Pesaje Dinámico
CONTINUACIÓN DE FUNCIONAMIENTO PESAJE DINÁMICO Tiempo promedio: Determine el tiempo promedio para un valor de entre 1 y 99 segundos. El tiempo predeterminado es de 5 segundos. Use esta aplicación para pesar una carga inestable, Modo automático: Cuando está activado, el ciclo como un animal en movimiento. - Page 28 CONTINUACIÓN DE FUNCIONAMIENTO MEDIR LA DENSIDAD DE UN SÓLIDO USANDO Paso 1 de 2 – Pese la muestra en el aire: Presione START (INICIO). Siga las instrucciones que se muestran AGUA (PREDETERMINADO) en pantalla y luego presione ACCEPT (ACEPTAR) para Presione el botón ITEM SETTINGS (CONFIGURACIÓN guardar el peso de la muestra en seco (en aire).
- Page 29 CONTINUACIÓN DE FUNCIONAMIENTO MEDIR LA DENSIDAD DE UN MATERIAL FLOTANTE Aparecerá una ventana donde podrá ingresar números. (Vea Diagrama 38) USANDO AGUA Diagrama 38 Liquid Density Presione el botón ITEM SETTINGS (CONFIGURACIÓN DE LOS ELEMENTOS) para abrir la pantalla de 0.9982 g/cm3 configuración.
- Page 30 CONTINUACIÓN DE FUNCIONAMIENTO Se muestra una ventana donde podrá ingresar Una vez determinados los pesos necesarios, se muestra números. (Vea Diagrama 41) la densidad de la muestra líquida en g/cm (junto con el peso en aire y el peso en agua) en la pantalla de la aplicación.
- Page 31 CONTINUACIÓN DE FUNCIONAMIENTO Confirme que los valores predeterminados que se Presione BEGIN DENSITY CALCULATION (INICAR CÁCULO muestran (temperatura del agua) son correctos. DE DENSIDAD). Para editar los valores predeterminados, toque ITEM PASO 1 DE 3 – PESE LA MUESTRA SIN ENGRASAR SETTINGS (CONFIGURACIÓN DE LOS ELEMENTOS).
- Page 32 CONTINUACIÓN DE FUNCIONAMIENTO Una vez determinados los pesos necesarios, se muestra Para establecer el valor superior al límite, toque el la densidad de la muestra en g/cm (junto con el peso botón OVER LIMIT (SUPERIOR AL LÍMITE). Para establecer en aire, el peso engrasada y sin engrasar y el peso en el valor inferior al límite, toque el botón UNDER LIMIT agua) en la pantalla de la aplicación.
- Page 33 CONTINUACIÓN DE FUNCIONAMIENTO DISPLAY HOLD PEAK HOLD (PICO/RETENER) (RETENER MOSTRADO) En la parte superior izquierda de la pantalla de inicio, seleccione Display Hold (Retener mostrado). Hay dos modos disponibles: (Vea Diagrama 58) (Vea Diagrama 60) Display Hold (Retener mostrado) - permite al usuario 2.
- Page 34 CONTINUACIÓN DE FUNCIONAMIENTO FORMULACIÓN TOTALIZACIÓN Utilice esta aplicación para crear compuestos y recetas. La totalización mide el peso acumulado de una (Vea Diagrama 64) El máximo número de componentes secuencia de artículos. (Vea Diagrama 62) El total es de 50. acumulado podrá...
-
Page 35: Mantenimiento
CONTINUACIÓN DE FUNCIONAMIENTO CONFIGURACIÓN DE LOS ELEMENTOS Para ver o ajustar la configuración actual, toque Diagrama 66 Formulation el botón ITEM SETTINGS (CONFIGURACIÓN DE LOS ELEMENTOS). (Vea Diagrama 66) Aparecerá la pantalla de configuración. Filler Auto Tare Print Settings Relleno: Si está en posición ON (Activado), se solicitará que se agregue un material de relleno al final de la formulación. -
Page 36: Solución De Problemas
CONTINUACIÓN DE MANTENIMIENTO Asegúrese de que no penetre ningún líquido en el interior de la báscula. Limpie la báscula cada cierto periodo de tiempo. Las superficies de la carcasa se pueden limpiar con un paño libre de pelusas ligeramente mojado en agua o en un agente limpiador suave. - Page 37 H-5276, H-5278 π 1-800-295-5510 H-5279, H-6097 uline.ca OHAUS ADVENTURER BALANCE APERÇU DES COMMANDES PANNEAU DE COMMANDE ÉLÉMENTS DU PANNEAU DE COMMANDE Max 4201 g Dynamic Weighing DESCRIPTION d=0.01 g e=0.01 g Place sample on the pan. Press Start to begin averaging. 0.00 Touche ON/OFF (marche/arrêt) >0<...
-
Page 38: Navigation Dans Le Menu
FONCTIONNEMENT ALLUMER ET ÉTEINDRE LA BALANCE sur la liste du menu principal et appuyez pour le sélectionner. Le sous-menu s'affiche. • Pour allumer la balance, appuyez sur la touche. 3. Sélectionner l'élément du menu : Continuez jusqu'à ce que le paramètre souhaité ait été sélectionné •... -
Page 39: Sous-Menu D'étalonnage
FONCTIONNEMENT SUITE ACTIVER LES UNITÉS DE MESURE Accédez au sous-menu des unités de pesage dans le menu REMARQUE : En raison des lois nationales, la principal pour activer les unités de mesure souhaitées. Vous balance peut ne pas inclure certaines des pouvez également accéder à... -
Page 40: Modes D'application
FONCTIONNEMENT SUITE ÉTALONNAGE DE L'INTERVALLE DE MESURE comme nombre négatif. Appuyez sur TARE pour effacer. (UN SEUL POINT) MODES D'APPLICATION L'étalonnage de l'intervalle de mesure utilise deux points Appuyez sur le champ d'application supérieur gauche d'étalonnage, un à charge nulle, et l'autre à une pleine charge spécifiée (intervalle de mesure). - Page 41 FONCTIONNEMENT SUITE RÉGLAGES DE L'ÉLÉMENT principale de l'écran dans l'unité de mesure définie. Pour afficher ou modifier les réglages actuels, appuyez Figure 10 Weighing Max 4200 g d=0.01 g Figure 7 Weighing Over initial zero range Minimum Weight Capacity Bar Weighing Links Filter Level Minimum Weight: 500.00 g...
-
Page 42: Nom De L'échantillon
FONCTIONNEMENT SUITE SAUVEGARDE SUR CLÉ USB Si la barre de capacité est désactivée, le champ de référence indiquera le poids minimal et le nom de Insérez la clé USB dans le port USB situé à l'avant de l'échantillon. (Voir Figure 10) la balance. - Page 43 FONCTIONNEMENT SUITE certaines données ne puissent être transférées 3. Placez les objets sur le plateau pour afficher le poids. Lorsqu'ils sont stables, le symbole * apparaît. de la balance ou que l'écran puisse geler. Si cela se produit, débranchez la clé USB et 4.
- Page 44 FONCTIONNEMENT SUITE touche SAMPLES. Un pavé numérique apparaît. Définir le poids moyen d'une unité (APW) connu : Pour (Voir Figure 16) régler la valeur APW directement, appuyez sur la touche APW. Un pavé numérique apparaît. (Voir Figure 20) Utilisez les touches pour saisir la taille de l'échantillon souhaitée,puis appuyez sur SAVE.
-
Page 45: Pesage En Pourcentage
FONCTIONNEMENT SUITE Optimisation automatique : Lorsqu'elle l'échantillon et le poids de référence est affichée est réglée en position ON, cette fonction sous forme de pourcentage. améliore la précision de comptage en recalculant automatiquement le poids des unités à mesure que les unités sont ajoutées. Par défaut, cette fonction est en position OFF. - Page 46 FONCTIONNEMENT SUITE PESAGE EN MOUVEMENT RÉGLAGES DE L'ÉLÉMENT (DYNAMIC) Pour afficher ou modifier les réglages actuels, appuyez sur la touche ITEM SETTINGS. L'écran des réglages apparaît. (Voir Figure 24) Utilisez cette application pour peser une charge Figure 33 Density Determination Max 4200 g d=0.01 g Weigh sample in air.
- Page 47 FONCTIONNEMENT SUITE pour effacer le poids affiché et revenir à l'écran initial. Temps de calcul de la moyenne : Définissez le temps Figure 38 REMARQUE : Videz le plateau avant de commencer Liquid Density un nouveau cycle de pesage en mouvement. 0.9982 g/cm3 Figure 36 Density Determination Save...
-
Page 48: Détermination De La Densité
FONCTIONNEMENT SUITE DÉTERMINATION DE LA DENSITÉ MESURE DE LA DENSITÉ D'UN SOLIDE AVEC DE L'EAU (PAR DÉFAUT) Figure 41 Sinker Volume Appuyez sur la touche ITEM SETTINGS pour ouvrir l'écran des paramètres de détermination de la densité. 10.0 ml (Voir Figure 30) Veillez à... - Page 49 FONCTIONNEMENT SUITE Étape 1 de 2 – Peser l'échantillon dans l'air : Appuyez MESURE DE LA DENSITÉ D'UN MATÉRIAU sur START. Suivez les directives à l'écran, puis appuyez FLOTTANT AVEC DE L'EAU sur ACCEPT pour enregistrer le poids de l'échantillon sec Appuyez sur la touche ITEM SETTINGS pour ouvrir l'écran (dans l'air).
- Page 50 FONCTIONNEMENT SUITE Assurez-vous que les valeurs par défaut affichées Un pavé numérique apparaît. (Voir Figure 38) (densité de liquide, etc.) sont exactes. (Voir Figure 37) Saisissez la densité en g/cm , puis appuyez sur SAVE. L'affichage revient à l'écran précédent. Pour revenir Pour régler la valeur de la densité...
- Page 51 FONCTIONNEMENT SUITE du plomb) est exacte. Pour modifier les Lorsque les poids nécessaires ont été déterminés, la valeurs par défaut, appuyez sur SINKER densité de l'échantillon liquide est affichée en g/cm VOLUME. (avec le poids dans l'air, le poids dans l'eau) sur l'écran de l'application.
- Page 52 FONCTIONNEMENT SUITE Assurez-vous que les valeurs par défaut Appuyez sur BEGIN DENSITY CALCULATION. affichées ÉTAPE 1 DE 3 – PESER L'ÉCHANTILLON (température de l'eau) sont exactes. NON HUILÉ DANS L'AIR : Pour modifier les valeurs par défaut, appuyez sur ITEM SETTINGS. L'écran des réglages Suivez les directives à...
-
Page 53: Pesage De Vérification
FONCTIONNEMENT SUITE PESAGE DE VÉRIFICATION Lorsque les poids nécessaires ont été déterminés, la densité de l'échantillon est affichée en g/cm (avec le poids dans l'air, non huilé et huilé, et le poids dans l'eau) sur l'écran de l'application. Figure 66 Formulation La valeur demeure affichée à... -
Page 54: Dépannage
ENTRETIEN SUITE NETTOYAGE SUITE RETRAIT ET RÉINSTALLATION DES PORTES EN VERRE POUR LE NETTOYAGE : 1. Appuyez sur la tige à l'arrière de 2. Après le nettoyage, glissez les 3. Glissez les portes dans la fente la balance et faites glisser la portes dans la fente tout en jusqu'à...
Need help?
Do you have a question about the OHAUS ADVENTURER Н-5276 and is the answer not in the manual?
Questions and answers