Table of Contents
Advertisement
Available languages
Available languages
H-5819, H-5820
π
H-5821, H-5822
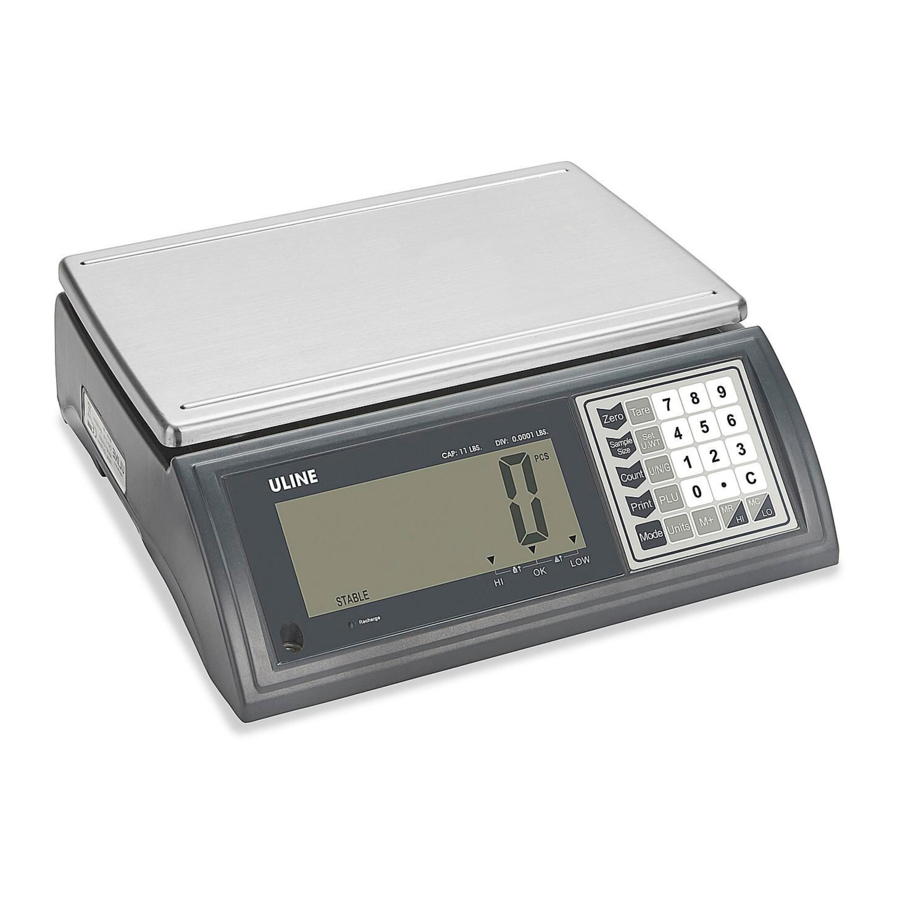
DELUXE
COUNTING SCALE
DISPLAY
∏
1
Recharge
2 3
4
5
DISPLAY DEFINITIONS
#
NAME
DESCRIPTION
Displays the total weight, unit weight and
1
DISPLAY
number of counted items.
Battery indicator. Indicates battery is low and
2
needs to be recharged.
Stable indicator. Indicates the scale weight is
3
STABLE
stable.
Charging indicator. Indicates the battery
4
RECHARGE
charging status.
5
ZERO
Zero indicator. Indicates the scale is at zero.
Gross indicator. Indicates scale is displaying
6
GROSS
the gross weight.
Net indicator. Indicates scale is displaying the
7
NET
net weight.
Limits indicator. Indicates the High-Low limits in
8
HI / OK / LOW
weighing and counting.
Accumulation indicator. Indicates the scale is
9
M+
in the accumulation mode.
Weighing unit indicator. Indicates current
10
LB / OZ / G / KG
weighing unit.
Automatic accumulation indicator. Indicates
11
AUTO
the scale is in automatic accumulation mode.
Counting indicator. Indicates the scale is in
12
PCS
the counting mode.
PAGE 1 OF 33
1-800-295-5510
uline.com
OVERVIEW OF CONTROLS
HI
OK
LOW
6
7
8
1
12
11
2
10
9
3
4
5
8
KEYPAD DEFINITIONS
#
NAME
DESCRIPTION
1
ZERO
Zero key. Used to clear and zero the display.
Sample size key. Used when keying in the
2
SAMPLE SIZE
sample amount.
Count key. Used to enter the counting operation.
3
COUNT
4
PRINT
Print key. Used to send data to a printer or PC.
Mode key. Used to select the application
5
MODE
mode – weighing, counting, check weighing,
check counting or accumulation.
Tare key. Used to zero out the weight of a
6
TARE
container being used to hold small parts.
Set Unit Weight key. Used to manually key in
7
SET U. WT
the unit weight.
Unit / Net / Gross Weight key. Used to show the
8
U / N / G
unit, net or gross weight.
Unit Weight Memory key. Used to store weights
9
PLU
into scale memory.
10
UNITS
Units key. Used to change weighing unit.
Memory key. Used to add current weight or
11
M+
count to memory.
Memory Recall key. Used to show total
accumulated weights or counts in memory.
12
MR / HI
HI key. Used to set high limit.
Memory Clear key. Used to clear
accumulated weights or counts from memory.
13
MC / LO
LO key. Used to set low limit.
14
C
Clear key. Used to clear incorrect numeric values.
Decimal key. Used to enter decimal place
15
•
when values are entered manually.
16
0-9
Numeric keys. Used to enter values manually.
Para Español, vea páginas 12-22.
Pour le français, consulter les pages 23-33.
KEYPAD
6
7
16
7 8 9
4 5 6
15
1 2 3
0 • C
14
9
10
11 12 13
0819 IH-5819
Advertisement
Table of Contents

Related Manuals for U-Line H-5819


Summary of Contents for U-Line H-5819
- Page 1 Para Español, vea páginas 12-22. Pour le français, consulter les pages 23-33. H-5819, H-5820 π 1-800-295-5510 H-5821, H-5822 uline.com DELUXE COUNTING SCALE OVERVIEW OF CONTROLS DISPLAY KEYPAD ∏ 7 8 9 4 5 6 1 2 3 0 • C...
-
Page 2: Selecting The Location
SETUP INSTALLING THE PLATFORM WARNING! Disconnect all power to the scale before installing, cleaning or servicing. Failure Place the scale on a flat surface. to do so could result in bodily harm or damage to the scale. 2. If desired, remove protective covering from the scale platform. -
Page 3: Operation
CALIBRATION WEIGHT (lb.) in a dry, temperate environment. Model # 1/3 WEIGHT (Minimum) FULL CAPACITY (Maximum) PRIOR TO USE H-5819 4 lb. 11 lb. • Fully charge battery before using scale for the first time. H-5820 9 lb. 27 lb. - Page 4 Zero CALIBRATION WEIGHT (lb.) display. LoAd2 Model # 1/3 WEIGHT 2/3 WEIGHT FULL CAPACITY H-5819 2 lb. 7 lb. 11 lb. H-5820 7 lb. 15 lb. 27 lb. 9. Place 2/3 of the scale capacity on the platform.
- Page 5 OPERATION CONTINUED ZERO SAMPLE OF UNIT WEIGHT The scale cannot determine how many pieces are on If there is a minor weight displayed, without anything a platform without a sample. There are two ways to on the platform, press the ZERO key to clear the calculate a sample weight.
-
Page 6: Check Counting
. Current high limit will be shown Minimum Sample Minimum Piece on the display. Model # Weight Weight 3. Enter 0 using the numeric keypad. H-5819 0.002 lb. 0.00005 lb. H-5820 0.01 lb. 0.00025 lb. 4. Press the ZERO key Zero H-5821 0.02 lb. -
Page 7: Manual Accumulation
OPERATION CONTINUED CLEAR CHECK COUNT RECALL DATA C PCS ACCU Press the MODE key until is shown on Press the MODE key until is shown on Mode Mode the display. the display. ACCU NOTE: If unit weight was preset or added to 2. -
Page 8: Enable Weighing Units
OPERATION CONTINUED 5. Add additional items to platform. New data will be NOTE: If data is not getting in your computer/ added to memory. Continue until all data is added. printer, interchange pin 3 and pin 2 connections. 6. To recall data and clear data, see sections above. 3. -
Page 9: Setup Menu
SETUP MENU ENABLE ACCUMULATION PRINTER SET-UP At startup, the accumulation mode is enabled. Enter this Enter this menu to select a printer. menu to turn the accumulation mode on or off. Tare 1. Turn on the scale and press the TARE key during PO CAL the self-test. -
Page 10: Date/Time Setup
SETUP MENU CONTINUED BACKLIGHT DATE/TIME SET UP At startup, the backlight will automatically turn on Enter this menu to set the date and time. when the scale is in use. Enter this menu to change the Tare 1. Turn on the scale and press the TARE key during backlight setting. -
Page 11: Auto Power Off
SETUP MENU CONTINUED AUTO POWER-OFF 4. Press the TARE key Tare to change the setting. When the auto power-off time is enabled, the scale will • Of 0 – Auto power-off is off. automatically turn off when there has been no load on •... - Page 12 H-5819, H-5820 π 800-295-5510 H-5821, H-5822 uline.mx BÁSCULA CONTADORA DE ALTA CALIDAD RESUMEN DE LOS CONTROLES PANTALLA TECLADO ∏ 7 8 9 4 5 6 1 2 3 0 • C Recharge 11 12 13 DEFINICIONES DE LA PANTALLA DEFINICIONES DEL TECLADO NOMBRE DESCRIPCIÓN...
-
Page 13: Seleccionar La Ubicación
CONFIGURACIÓN COLOCAR LA PLATAFORMA ¡ADVERTENCIA! Desconecte cualquier fuente de alimentación de la báscula antes de realizar tareas de instalación, limpieza o mantenimiento. 1. Apoye la báscula sobre una superficie plana. Si no lo hace, podría ocasionarle lesiones 2. Elimine la cubierta protectora de la plataforma de corporales o dañar la báscula. -
Page 14: Cambiar La Unidad De Medida
PESO DE CALIBRACIÓN (lb.) • Cargue la batería completamente antes de usar la Modelo No 1/3 DEL PESO (Mínimo) CAPACIDAD TOTAL (Máxima) báscula por primera vez. H-5819 4 lb. 11 lb. • Permita que la báscula se caliente durante 15 H-5820 9 lb. - Page 15 PESO DE CALIBRACIÓN (lb.) mostrará en la pantalla. LoAd2 Modelo No 1/3 DEL PESO 2/3 DEL PESO CAPACIDAD TOTAL H-5819 2 lb. 7 lb. 11 lb. 9. Coloque 2/3 de la capacidad de la báscula sobre H-5820 7 lb. 15 lb.
- Page 16 CONTINUACIÓN DE FUNCIONAMIENTO CERO MUESTRA DEL PESO UNITARIO La báscula no puede determinar cuántas piezas hay Si se muestra un peso pequeño, y no hay nada colocado colocadas sobre una plataforma sin una muestra. Hay en la plataforma, presione la tecla ZERO para borrar Zero dos formas de calcular el peso de una muestra.
- Page 17 Modelo No. Peso de Muestra Mínimo Peso de Pieza Mínimo 2. Presione la tecla HI . El límite superior actual se H-5819 0.9 g (0.002 lb.) 0.02 g (0.00005 lb.) mostrará en la pantalla. H-5820 4.5 g (0.01 lb.) 0.1 g (0.00025 lb.)
- Page 18 CONTINUACIÓN DE FUNCIONAMIENTO BORRAR LA VERIFICACIÓN DE CONTEO RECUPERACIÓN DE DATOS Mode Presione la tecla MODE hasta que aparezca el Presione la tecla MODE hasta que aparezca el Mode ACCU texto en la pantalla. C PCS texto en la pantalla. ACCU NOTA: Si se prestableció...
-
Page 19: Menú De Configuración
MENÚ DE CONFIGURACIÓN 5. Agregue artículos adicionales a la plataforma. Se NOTA: Si su computadora/impresora no agregarán los nuevos datos a la memoria. Continúe reciben datos, intercambie la posición de los hasta agregar todos los datos. conectores Pin 3 y Pin 2. 3. -
Page 20: Configuración De La Impresora
CONTINUACIÓN DEL MENÚ DE CONFIGURACIÓN HABILITAR LA ACUMULACIÓN CONFIGURACIÓN DE LA IMPRESORA Ingrese a este menú para seleccionar una impresora. Al encender la unidad, el modo de acumulación está habilitado. Ingrese a este menú para activar o Encienda la báscula y presione la tecla TARE Tare desactivar el modo de acumulación. -
Page 21: Configuración De Fecha/Hora
CONTINUACIÓN DEL MENÚ DE CONFIGURACIÓN RETROILUMINACIÓN CONFIGURACIÓN DE FECHA/HORA Al encender la unidad, la retroiluminación se activará Ingrese a este menú para configurar la fecha y la hora. automáticamente cuando la báscula esté en uso. Tare Encienda la báscula y presione la tecla TARE Ingrese a este menú... -
Page 22: Apagado Automático
CONTINUACIÓN DEL MENÚ DE CONFIGURACIÓN APAGADO AUTOMÁTICO 4. Presione la tecla TARE Tare parapara cambiar la configuración. Cuando el temporizador de apagado automático esté activado, la báscula se apagará automáticamente si no • Of 0 – El apagado automático está deshabilitado. se coloca ningún peso sobre la plataforma y la báscula se mantiene estable en posición de cero durante un periodo •... -
Page 23: Aperçu Des Commandes
H-5819, H-5820 π 1-800-295-5510 H-5821, H-5822 uline.ca BALANCE COMPTEUSE DE LUXE APERÇU DES COMMANDES AFFICHAGE CLAVIER ∏ 7 8 9 4 5 6 1 2 3 0 • C Recharge 11 12 13 ÉLÉMENTS DE L'AFFICHAGE ÉLÉMENTS DU CLAVIER DESCRIPTION... -
Page 24: Mise En Place
MISE EN PLACE INSTALLATION DE LA PLATEFORME AVERTISSEMENT! Coupez l'alimentation de la ARRÊT balance avant de procéder à l'installation, au nettoyage ou à l'entretien. Autrement, vous risquez Placez la balance sur une surface plane. de vous blesser ou d'endommager la balance. 2. - Page 25 POIDS D'ÉTALONNAGE (lb) • Chargez la pile complètement avant d'utiliser la N° de modèle 1/3 DU POIDS (minimum) PLEINE CAPACITÉ (maximum) balance pour la première fois. H-5819 4 lb 11 lb • Laissez la balance réchauffer pendant 15 minutes H-5820 9 lb 27 lb avant de l'utiliser.
- Page 26 POIDS D'ÉTALONNAGE (lb) LoAd2 N° de modèle 1/3 DU POIDS 2/3 DU POIDS PLEINE CAPACITÉ H-5819 2 lb 7 lb 11 lb 9. Placez le poids de l'étalonnage, 2/3 de la capacité H-5820 7 lb 15 lb 27 lb de la balance, sur la plateforme.
- Page 27 FONCTIONNEMENT SUITE ZÉRO ÉCHANTILLON D'UN POIDS UNITAIRE La balance ne peut pas déterminer le nombre d'articles Si un poids minime est affiché alors qu'il n'y a rien sur se trouvant sur la plateforme sans un échantillon. Il la plateforme, appuyez sur la touche ZERO pour Zero existe deux façons de calculer le poids de l'échantillon.
-
Page 28: Pesage De Contrôle
N° de modèle 2. Appuyez sur la touche HI . La limite supérieure d'un échantillon d'un article actuelle s'affichera. H-5819 0,9 g (0,002 lb) 0,02 g (0,00005 lb) 3. Saisissez 0 à l'aide du clavier numérique. H-5820 4,5 g (0,01 lb) - Page 29 FONCTIONNEMENT SUITE EFFACER LA VÉRIFICATION DE COMPTAGE RAPPEL DE DONNÉES 1. Appuyez sur la touche MODE jusqu'à ce que Mode 1. Appuyez sur la touche MODE jusqu'à ce que Mode ACCU s'affiche. C PCS s'affiche. ACCU 2. Appuyez sur la touche HI .
-
Page 30: Menu De Configuration
MENU DE CONFIGURATION 5. Ajoutez des articles supplémentaires sur la plateforme. REMARQUE : Si votre ordinateur/imprimante Les nouvelles données seront ajoutées à la mémoire. ne reçoit pas les données, interchangez les Continuez jusqu'à ce que toutes les données aient raccordements des broches 3 et 2. été... -
Page 31: Configuration De L'imprimante
MENU DE CONFIGURATION SUITE ACTIVER L'ACCUMULATION CONFIGURATION DE L'IMPRIMANTE Au démarrage, le mode d'accumulation est activé. Accédez à ce menu pour sélectionner une imprimante. Accédez à ce menu pour activer ou désactiver le mode Allumez la balance et appuyez sur la touche TARE Tare d'accumulation. -
Page 32: Réglage De La Date Et De L'heure
MENU DE CONFIGURATION SUITE 0RÉTROÉCLAIRAGE RÉGLAGE DE LA DATE ET DE L'HEURE Au démarrage, le rétroéclairage se met Accédez à ce menu pour régler la date et l'heure. automatiquement en marche lorsque la balance est Tare Allumez la balance et appuyez sur la touche TARE utilisée. -
Page 33: Arrêt Automatique
MENU DE CONFIGURATION SUITE ARRÊT AUTOMATIQUE 4. Appuyez sur la touche TARE Tare pour modifier le réglage. Lorsque le temps d'arrêt automatique est activé, la balance s' é teint automatiquement après une période de temps établie • Of 0 : La fonction d'arrêt automatique est désactivée. (en minutes) sans poids sur la plateforme et durant laquelle •...
Need help?
Do you have a question about the H-5819 and is the answer not in the manual?
Questions and answers