Ingenico NetPay Move 3500 User Manual
Hide thumbs
Also See for NetPay Move 3500:
- Quick start manual (12 pages) ,
- Getting started (10 pages) ,
- User manual (31 pages)

Related Manuals for Ingenico NetPay Move 3500


Summary of Contents for Ingenico NetPay Move 3500
- Page 1 Move 3500 Mobile GPRS USER GUIDE Visit our website at www.netpay.co.uk intelligent payments For technical support call: 0333 311 0200 (Option 3)
-
Page 2: Table Of Contents
Contents Hardware ....................04 01. Device overview .....................04 01.01. What is in the box ................. 05 01.02. Keyboard details and functionality .............06 01.03. Switching ON / OFF the terminal ............07 01.04. Location of the device ................07 01.05. Operating condition................07 01.06. Battery charging conditions ..............07 01.07. - Page 3 05.02. Chip and pin payment ................17 05.03. Contactless payment ................17 06. Terminal Base Overview ................18 Software .....................19 07. Display / Icons ....................19 07.01. Time and date display ................19 07.02. Terminal operation icons ..............19 08. Supervisor password ..................20 09.
-
Page 4: Hardware
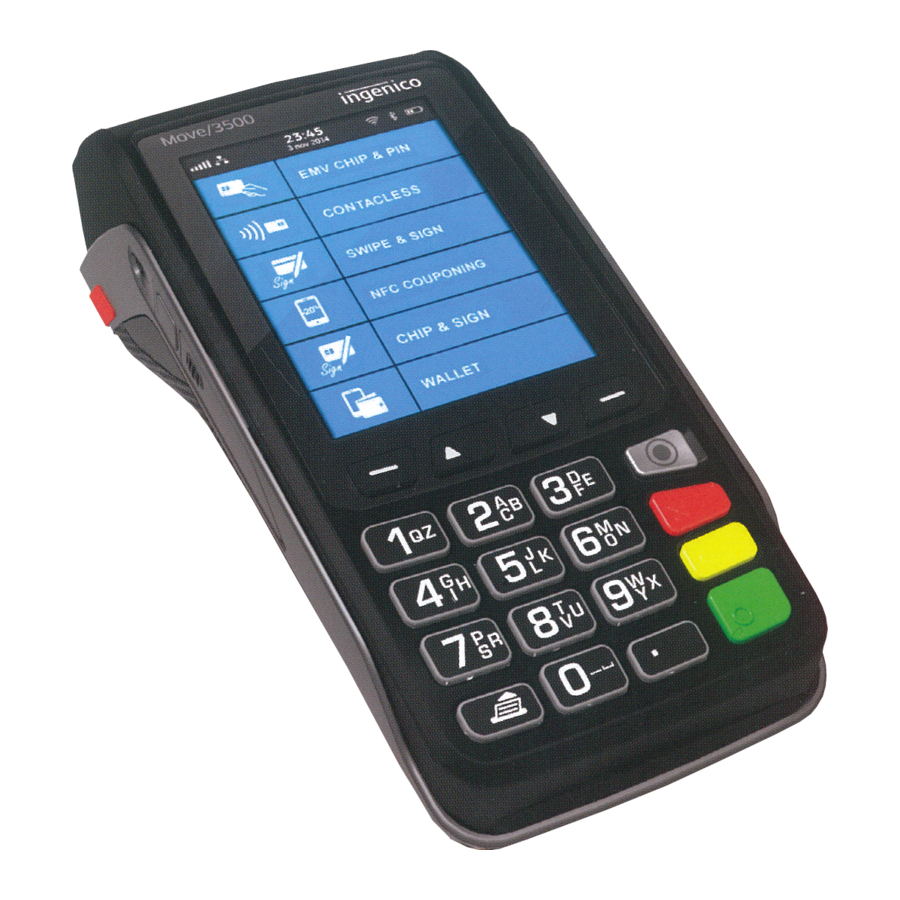
Hardware 01. Device overview Contactless card reader Easy loading printer 3"2 LCD display Magstripe reader Backlit keyboard Chip card reader Visit our website at www.netpay.co.uk intelligent payments For technical support call: 0333 311 0200 (Option 3) -
Page 5: What Is In The Box
1 x Terminal base 1 x Battery WARNING The power supply unit provided with this equipment is specially designed for Ingenico terminals. Do not use any other power supply. Weight (without paper roll 310g or battery) Dimensions (L x W x H) -
Page 6: Keyboard Details And Functionality
01.02. Keyboard details and functionality Arrow keys Menu key opens up the terminal menu. Red key cancels the procedure in progress. Yellow key cancels the last character. Green key validates input selections and information. It also switches the terminal on Paper feed (long press) Arrow keys: Enable you to choose options on screen. -
Page 7: Switching On / Off The Terminal
01.03. Switching ON / OFF the terminal To switch ON the terminal press on the keyboard. To switch OFF the terminal press and hold simultaneously for 1 second. ADVICE Before using the terminal, always check the paper roll is present. Installation 01.04. Location of the device Place the base on flat surface near an electric socket and if required near to the telephone or an Ethernet socket. The terminal should be placed far from any very hot zones, protected from vibrations, dust, damp and electromagnetic radiation (computer screen, anti-theft barrier etc.). -
Page 8: Micro Usb
01.08. Micro USB There is a Micro-USB connector on the left side of the Move3500 wireless terminal. (see picture). This connector manages Host and Slave connections. The terminal supports USB keys with FAT16 or FAT32. The USB key has to be used with an USB adapter USB micro AB (refer to accessories section). Connector used for USB key etc. -
Page 9: Opening The
01.10. Opening the back cover WARNING Switch off the terminal before opening the back cover. Turn the terminal over and unclip the back cover by pushing on the clip as shown with the arrows in the picture. 01.11. SAMs and SIMs •... -
Page 10: Connecting The Base
01.12. Connecting the base Set up your base unit in a convenient location close to a power source. To connect the power lead to your base, remove the back panel as shown in the diagram. Connect the right-angle adaptor and push it firmly into the socket. Power socket 02. -
Page 11: Mobile Network Icons
02.02. Mobile network icons The mobile network status is represented using several icons: No icon Battery charge greater than 80% Mobile network module is activated but not attached to a network. The terminal is connected to a mobile network but the GPRS session has not yet been established. -
Page 12: Battery
03. Battery 03.01. Main characteristics Operating conditions Capacity (depends on the Li-ion 2900 mAh model of terminal and use) Charge (power supply — 1.5A) 50% capacity in 1.5 hours; full capacity in 4 hours 03.02. Installing the battery • Turn the terminal over and unclip the back cover by pushing on the clip. -
Page 13: Charging The Battery
03.03. Charging the battery When does the battery need to be charged? • On initial startup. The battery should be charged for 16 hours under the environmental conditions stated earlier in this guide. • When used daily on battery power only. The terminal will automatically recharge its battery each time it is placed on its base. -
Page 14: Replacing The Battery
03.04. Replacing the battery WARNING It is imperative to use a battery authorized by Ingenico. There is danger of explosion if battery used is not approved by Ingenico. • Remove the terminal from its base. • Turn it off by pressing simultaneously for about one second. • Remove the back cover (see section “installing battery”). -
Page 15: R40 Paper Roll
• Direct contact with “diazo” papers. • Direct contact with water. • Rubbing or pressing the paper too strongly. WARNING For best performance use only heat sensitised paper roll approved by Ingenico. The use of non-approved paper is likely to damage the terminals printer. Visit our website at www.netpay.co.uk intelligent payments For technical support call:... -
Page 16: Installing A Paper Roll
04.02. Installing a paper roll • Open the paper compartment by lifting the catch located at the rear of the terminal and pull the cover to the rear of the terminal. • Insert the paper roll in the compartment following the directions shown in the picture. -
Page 17: Card Reading
05. Card reading 05.01. Magnetic stripe payment The card can be read either from bottom to top or from top to bottom, with the stripe facing the terminal. Use a regular movement in order to ensure a reliable card reading. 05.02. -
Page 18: Terminal Base Overview
06. Terminal Base Overview You should set up your base unit in a convenient location close to a power source and, for Bluetooth terminals. To open the base unit cover, located on the bottom of the base unit, you must unclip an access clip and lift the cover from the base unit. -
Page 19: Software
Software 07. Display / Icons 07.01. Time and date display ADVICE Icons displayed on your terminal display depend on your terminal type. Time displayed in 24 hour format with long date format. Time displayed in 12 hour format with short date format. ADVICE Date and time formats can be changed to suit your preference. Please call the technical support team for further information 24 hours a day, 7 days a week on: 0333 311 0200 (Option 3). -
Page 20: Supervisor Password
08. Supervisor password The Supervisor Code is designed to limit access to the Supervisor Functions configured for certain transaction types or access to certain Function Codes on the terminal to those who have access to the code. If you forget your code, please contact technical support who will be able to provide you with a temporary code to allow you to reset it to a new value. ADVICE The default supervisor code is 0000. -
Page 21: Taking Card Payments
09. Taking card payments 09.01. Chip card reader Customer cards must be inserted as shown, with the chip upwards. Push the card fully into the slot below the keypad and follow the instructions on screen. If you see a “BAD READ” message, check the card orientation and try again. -
Page 22: Chip And Pin Refund Transaction
09.03. Chip and PIN refund transaction From the idle screen, press , then choose “REFUND”. Enter the refund amount for the transaction and press key. Once the customers card is presented you will be prompted for the Supervisor Code. The terminal will now connect to the acquirer for authorisation, if the refund is authorised then “REFUND ACCEPTED” will be shown. The terminal will print the merchant copy which the customer must sign. -
Page 23: Chip And Pin Transaction Receipt (Merchant Copy)
09.04. Chip and PIN transaction receipt (merchant copy) Terminal ID Merchant ID Sequence number Scheme reference ID Transaction referencing Card issuer Card AID and label Card number Card details EXP for expiry date, STT for start date, Entry method ISS for issue number ICC for inserted cards, SWIPED for swiped cards, Transaction type... -
Page 24: Contactless Sale Transaction
09.05. Contactless sale transaction From the idle screen, enter the sale amount for the transaction and press the key. For example enter £12.34 as 1234. If you make a mistake, press the key and re-enter the amount. The cardholder should present their card/payment device against the contactless symbol on the terminal display. The terminal will now print the merchant receipt. If the customer requests a receipt this must be done before the next transaction takes place. -
Page 25: Reports
10. Reports 10.01. End of day reports To access the reports menu press the key until ‘SYSTEM MENU’ is displayed and then select “Totals”. Press to highlight the required option and press to select it. If required enter the supervisor password and press END OF DAY: This indicates the total value of transactions that have been processed and shows...
Need help?
Do you have a question about the NetPay Move 3500 and is the answer not in the manual?
Questions and answers
Hello, Our card machine has locked last night and telling us to phone the helpdesk number on the card machine and it's not letting me through to anyone. Please can you advise? The machine is move 3500 and we need to print the end of day from yesterday.