
Related Manuals for ZERO-X swift+


Summary of Contents for ZERO-X swift+
- Page 1 swift+ Foldable HD Drone with WIFI FPV DRONE USER MANUAL Capture the skies.™ ZX-SWT+...
- Page 3 Test your knowledge at knowyourdrone.gov.au Be aware of local legislations and read the instructions carefully before using your drone. Keep yourself and others safe when flying your Zero-X drone. Always fly your drone within visual line-of-sight and only fly one drone at a time.
-
Page 4: Table Of Contents
GENERAL SAFETY ...................3 2.0 PRODUCT CONTENTS ................4 PRODUCT OVERVIEW ..................4 CONTROLLER OVERVIEW ................5 3.0 BATTERY SAFETY ..................6 4.0 SETTING UP YOUR ZERO-X SWIFT+ ............8 INSTALLING THE BATTERY ................8 SWIFT+ APP .....................8 REPLACING ROTOR BLADES .................9 INSTALLING ROTOR GUARDS ..............10 REMOTE CONTROL ..................10... -
Page 5: Welcome
Thank You for purchasing a Zero-X Swift+ Drone, get ready to have the time of your life! We’re sure your Zero-X Swift+ Drone will bring you a world of great experiences in the air. Please take the time to read the following safety warnings and operating instructions carefully. -
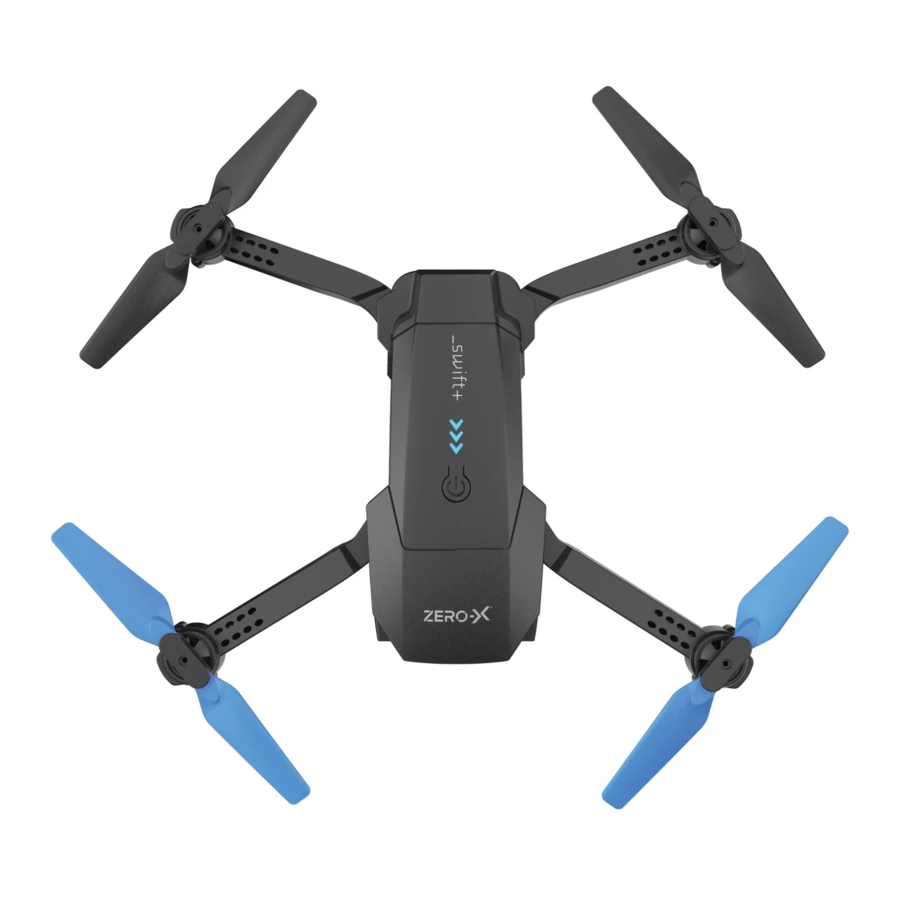
Page 6: Product Contents
PRODUCT CONTENTS 1. Swift+ Drone 5. USB AC Wall Charger 2. Remote Control 6. USB Charging Cable 3. Rotor Blades x 4 7. Screw Driver 4. Rotor Guards x 4 8. User Manual PRODUCT OVERVIEW 1. Camera 2. Rotor Blades 3. -
Page 7: Controller Overview
CONTROLLER OVERVIEW 1. Speed 7. Photo 2. Reverse 8. Video 3. Left Control Stick (Pulse / 9. Headless Mode Descend, Yaw Left / Right) 10. 360 Flip 4. One Key Take Off / Landing 11. LED Power ON 5. Emergency Stop 12. -
Page 8: 3.0 Battery Safety
When handled incorrectly, Lithium polymer batteries can be dangerous and can potentially harm and do damage to persons or property. Zero-X does not accept any liability for damage to persons or property if the battery is not correctly charged, stored or protected. - Page 9 PLEASE NOTE: YOUR ZERO-X DRONE COMES WITH A CERTIFIED ZERO-X USB AC CHARGING ADAPTER FOR 240V CHARGING OF YOUR DRONE BATTERY. USE OF A NON ZERO-X CERTIFIED USB AC CHARGING ADAPTER WILL VOID YOUR WARRANTY AND MAY DAMAGE BOTH YOUR BATTERY AND DRONE.
-
Page 10: Setting Up Your Zero-X Swift
SETTING UP YOUR ZERO-X SWIFT+ INSTALLING THE BATTERY For detailed instructions on how to install the battery please follow the steps below. 1. Ensure that the battery is fully charged. 2. Insert the battery into the rear of the drone in the correct orientation (the tab on the battery should be facing down). -
Page 11: Replacing Rotor Blades
4. Once connected, open the ZX-SWT+ App on your smartphone. NOTE: • When the drone has paired with the controller first, the APP will only operate to view real time video. The APP will not be able to control the drone's flying. -
Page 12: Installing Rotor Guards
INSTALLING ROTOR GUARDS Installing the rotor guards is optional. Installing the rotor guards will protect your rotor blades and motors against bumps and light crashes. 1. To install the rotor guards please insert the rotor guards pegs into the designated holes near the motors on the Swift+'s arms and tighten the screw. -
Page 13: Flight Safety
FLIGHT SAFETY Before flying your Swift+ make sure that you are in a safe setting. CASA restrictions regarding flying drones require the drone to be no closer than 5.5kms from any airport or airfield while flying. Drones should also not be flown over populated areas or any closer than 30 metres from vehicles, people or animals. -
Page 14: Your Drone Is Ready To Take Off
YOUR DRONE IS READY TO TAKE OFF Please ensure that the drone is kept on a flat surface and away from any obstructions. There are 2 methods to begin flying your drone: 1. Press the One Key Take Off / Landing button (Fig 3). 2. -
Page 15: Flying Your Swift+ Drone
FLYING YOUR SWIFT+ DRONE BASIC FLIGHT UP AND DOWN FORWARD AND BACKWARDS Push the left control stick up to gain Push the right control stick up and altitude and down to descend down to fly forwards and backwards. ROTATION LEFT/RIGHT FLIGHT Push the left control stick left and Push the right control stick left and right to pivot left/right. -
Page 16: Speed Mode
TRIM FORWARD/BACKWARD TRIM LEFT/RIGHT FLIGHT When the drone is hovering in place, When the drone is hovering and and starts to drift forward, press the starts to drift to the side, push the right control stick backwards until it's right stick to the left/right until the stable. -
Page 17: Downloading The Swift+ App To Your Mobile Phone
4. Once connected, Open the ZX-SWIFT+ App on your smart phone. Minimum Smartphone Requirements (for use of the Zero-X Swift+ App). iPhone: iPhone 6 or later using iOS 8.0 and above. Samsung Galaxy: S5 and later using Mobile Android 5.0 and above. Minimum 3G network connection for GPS functionality. -
Page 18: Camera / Video Features
CAMERA / VIDEO FEATURES VIEWING PHOTOS AND VIDEOS To view recorded footage and videos you will need to connect to the Swift+ App. CAMERA MODE 1. With the drone turned on and paired, press the Photo button. 2. The remote control will beep once and the LED lights of the drone will blink once to indicate that a photo was taken. -
Page 19: Headless Mode
HEADLESS MODE When headless mode is enabled, the drone will move in the direction that the remote controller stick is pressed, regardless of its orientation. This makes it easy to bring the drone home when it is far away from you. To ensure headless mode works well, please use the correct take off position. -
Page 20: Emergency / Stop
To thank you for your support of Zero-X and your drone purchase, we would like to help you build your confidence in learning how to fly your drone. We would like to offer you 50% off your first two orders of any spare parts, by using the codes in the coupons below. -
Page 21: Warranty Terms & Conditions
Zero-X and its subsidiaries and affiliates or the Zero-X services, relating to or arising out of your breach of any provision of these terms, your misuse of the Zero-X or Zero-X services, or your unauthorized modification or alteration of products or software. - Page 22 Zero-X has a limited warranty on whereby Zero-X warrants to you and only to you that the Zero-X drones and accessories will be free from defects in materials and workmanship for one (1) year from the date of your purchase of the on Zero-X drones and accessories, computer software, or other hardware (unless a longer warranty period is required by law).
- Page 23 Zero-X does not exclude, limit or suspend other rights you have, including those that may arise from the nonconformity of a sales contract. For a full understanding of your rights you should consult the laws of your state, province, or country. For our Australian Customers: please...
-
Page 24: Notes
15.0 NOTES... - Page 28 Capture the skies.™ All Images, Information and Content are Copyright © 2021 Directed Electronics www.zero-x.com.au | www.zero-x.co.nz Australia Pty Ltd. All Rights Reserved.
Need help?
Do you have a question about the swift+ and is the answer not in the manual?
Questions and answers