
Related Manuals for ZERO-X nova ZX-NVA


Summary of Contents for ZERO-X nova ZX-NVA
- Page 1 •• • N O V A • •• DRONE USER MANUAL PRODUCT CODE: ZX-NVA www.zero-x.com.au • www.zero-x.co.nz...
-
Page 2: Table Of Contents
Remote Control .................... 7 Fig 2.2.3 ....................7 Remote Control LCD Screen ................ 8 Fig 2.2.4 ....................8 Setting up you Zero-X Nova Drone ...............8 3.1 Charging the Battery ..................8 3.2 Installing the Nova Battery ................8 3.3 Camera ......................9 3.4 Installing a Micro SD Card... - Page 3 4.7 Trimming ....................15 Fig 4.7.1 ....................15 4.8 Flipping and Stunt Mode................15 Fig 4.8.1 ....................15 4.9 Using Diirectional Lock ................16 To Activate Directional Lock ................ 16 4.10 Camera ....................16 Shooting Video ................... 16 Shooting Photos ..................16 Maintenace ....................17 5.1 Cleaning ....................
-
Page 4: Welcome
WELCOME Thanks for purchasing a Zero-X Nova, get ready to have the time of your life! We’re sure your Zero-X Nova will bring you a world of great experiences in the air. Please take the time to read the following safety warnings and operating instructions carefully. -
Page 5: Battery Safety
BATTERY SAFETY When handled incorrectly, Lithium polymer batteries can be dangerous and can potentially harm and do damage to persons or property. Zero-X does not accept any liability of damage to persons or property if the battery is not correctly charged, stored or protected. -
Page 6: Introduction
INTRODUCTION 2.1 PACKAGE CONTENTS Nova Remote Control Spare Rotor Blades Spare Motors Drone Battery Drone Charger Rotor Guards Manual Screwdriver 10. USB Wall Charger *Fig 2.1.1... -
Page 7: Product Overview
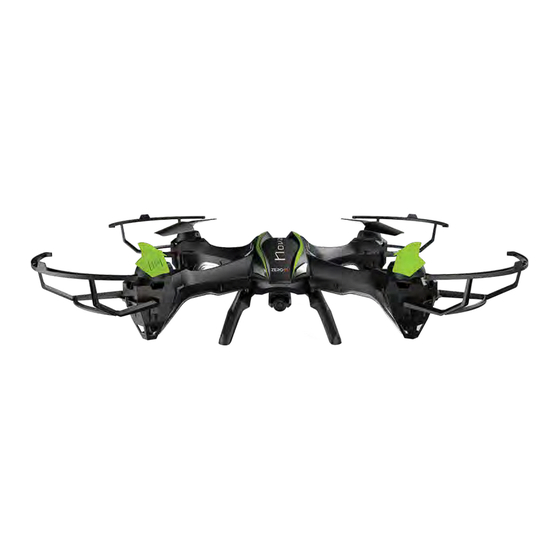
2.2 PRODUCT OVERVIEW NOVA DIAGRAM Under Side View Top View *Fig 2.2.1 *Fig 2.2.2 Front Rotor Blades Battery Rear Rotor Blades Camera Micro SD Card Slot* LED Lights REMOTE CONTROL DIAGRAM Feet Power Switch * Micro SD Card not included Power Switch Left Thumbstick (Acceleration/Yaw) -
Page 8: Remote Control Lcd Screen
PLEASE NOTE: YOUR ZERO-X DRONE COMES WITH A CERTIFIED ZERO-X USB AC CHARGING ADAPTER FOR 240v CHARGING OF YOUR DRONE BATTERY. USE OF A NON ZERO-X CERTIFIED USB AC CHARGING ADAPTER WILL VOID YOUR WARRANTY AND MAY DAMAGE BOTH YOUR BATTERY AND DRONE. -
Page 9: Camera
3.3 CAMERA The camera on the Nova should already be connected. It is advised that this camera is not removed and reconnected as this can potentially damage the camera connection. If it is necessary to plug these cables in make sure that the plugs are facing the correct way as plugging these in incorrectly could permanently damage the connection pins on the Nova. -
Page 10: Flight Safety
This is done during the set up and launching of the Nova and requires you to have the Zero-X Nova App installed. 1. To find the Zero-X Nova App search ‘Zero-X Nova’ on the Apple App store if you are using an iPhone, or on the Google Play store if you are using an Android phone. -
Page 11: Fig 4.2.3
3. On your Android or Apple Smart-phone, open your wifi settings and connect to the ZX NOVA WiFi connection. Once connection is made, open the Zero-X app on your Smart-phone. 4. Position your phone in the remotes smart phone holder. -
Page 12: App Navigation
4.4 APP NAVIGATION Once you have connected your Smart-phone to the Nova via WiFi and launched the Zero-X Nova App, you will be able to access the App’s FPV mode. This screen has all of the control options and settings, as well as an on screen control system. - Page 13 BACK The BACK button will take you back to the Start Up/Settings screen. PHOTO/VIDEO PLAYBACK This starts the App’s photo and video playback mode. In this menu, videos and photos can be viewed and transferred to your Smart-phone. SHOW/HIDE CONTROL INTERFACE The SHOW/HIDE CONTROL INTERFACE button will show or hide the control scheme displayed on screen.
-
Page 14: Controlling Your Nova
4.5 CONTROLLING YOUR NOVA BASIC CONTROLS Lift / Descent Push up the Throttle Rudder Stick and the drone will fly up. Push down the Throttle Rudder Stick and the drone will fly down. Yaw Left / Right Push the Left Rudder Stick to the left or to the right, the drone will rotate in the corresponding direction. -
Page 15: Trimming
4.7 TRIMMING Trimming is used to balance the Nova when the flight is off centred. Please check before attempting to use trimming that the Nova’s flight is not being affected by outside forces such as wind. Trimming Pitch To trim the Novas’ pitch, use the Pitch Trim Controller which is the small switch on the Remote Control to the left of the Right Thumbstick. -
Page 16: Using Diirectional Lock
When you are intending to use the camera, please ensure that you have inserted a Micro SD Card (not included) into the Micro SD card slot in the Nova and have the Zero-X Nova App downloaded on your Android or Apple Smart-phone. -
Page 17: Maintenace
MAINTENANCE 5.1 CLEANING: Avoid exposing your Nova and it’s accessories to dust, sand and moisture as these can damage the Nova. If the Nova is exposed to dust or sand, use a soft brush to remove any visible particles. 5.2 ROTOR BLADE REPLACEMENT: 1. -
Page 18: Fig 5.4.2
2. Carefully remove the motor housing panel and the LED window. (Refer to 5.4.2) *Fig 5.4.2 3. Turn the Nova right side up and remove the two screws from the motor. (Refer to 5.4.3) *Fig 5.4.3 4. Remove the motor from the bottom of the motor housing. -
Page 19: Parts And Accesssories
PARTS AND ACCESSORIES To purchase parts and accessories for your Zero-X Nova, please visit your nearest Zero-X retailer or visit us online at www.zero-x.com.au or www.zero-x.co.nz ZXRBSRBW Rotor Blades: Spectre, Rapture, Rapture & Nova – Black and White ZXRBSRBO Rotor Blades: Spectre, Rapture, Rapture &... -
Page 20: Warranty
This warranty is provided in addition to your rights under the Australian & New Zealand Consumer Law. Zero-X warrants that this product is free from defects in material and workmanship for a period of 12 months from the date of purchase or for the period stated on the packaging.
Need help?
Do you have a question about the nova ZX-NVA and is the answer not in the manual?
Questions and answers