Table of Contents
Advertisement
Quick Links
Advertisement
Table of Contents

Related Manuals for ZERO-X Glyden


Summary of Contents for ZERO-X Glyden
-
Page 3: Table Of Contents
CONTENTS 1.0 WELCOME ....................3 BEFORE YOU GET UP IN THE AIR ..............3 GENERAL SAFETY ...................3 2.0 PRODUCT CONTENTS ................4 PRODUCT OVERVIEW ..................4 REMOTE CONTROL OVERVIEW ..............5 3.0 BATTERY SAFETY ..................6 4.0 SETTING UP YOUR DRONE ................ 8 INSTALLING THE BATTERY ................7 INSTALLING ROTOR GUARDS ...............7 REMOTE CONTROL ..................8... -
Page 5: Welcome
WELCOME Thank you for purchasing a Zero-X Glyden Drone. The Zero-X Glyden Drone has been specifically designed to provide the intermediate to advanced user with a great flight experience. Please take the time to read the following safety warnings and operating instructions carefully. In this document, the Zero-X Glyden Drone will be referred to as the "Drone". -
Page 6: Product Contents
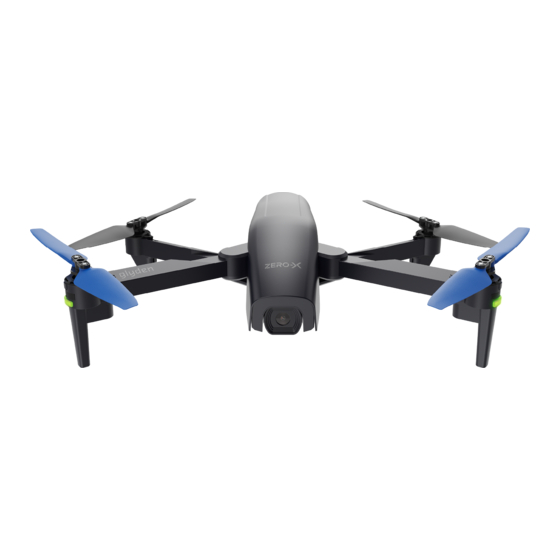
PRODUCT CONTENTS 1. Zero-X Glyden Drone 6. USB Charging Cables x 2 (One for Drone and another for 2. Remote Control rechargebale Remote Control) 3. Rotor Blades x 4 7. Screwdriver 4. Rotor Guards x 4 8. User Manual 5. USB AC Wall Charger 2.1 PRODUCT OVERVIEW... -
Page 7: Remote Control Overview
2.2 REMOTE CONTROL OVERVIEW 1. Left Control Stick (Ascend/ 8. 360º Flip Descend, Yaw Left/Right) 9. Speed 2. One Key Take Off/Landing 10. Photo/Video 3. Headless Mode 11. Power: Green light 4. On/Off 12. Charging : Red light 5. Trim Button (The light is red during charging and will go off 6. -
Page 8: Battery Safety
• DO NOT over charge the battery. Once charged, please remove the battery from the charger as soon as possible. • Only use the included or replacement Zero-X Glyden chargers and batteries. • You must charge the Lithium polymer battery in a safe area away from flammable materials. - Page 9 PLEASE NOTE: YOUR ZERO-X GLYDEN DRONE COMES WITH A CERTIFIED ZERO-X USB AC CHARGING ADAPTOR FOR 240V CHARGING OF YOUR DRONE BATTERY. USE OF A NON ZERO-X CERTIFIED USB AC CHARGING ADAPTOR WILL VOID YOUR WARRANTY AND MAY DAMAGE BOTH YOUR BATTERY AND DRONE.
-
Page 10: Setting Up Your Drone
SETTING UP YOUR DRONE 4.1 INSTALLING THE BATTERY For detailed instructions on how to install the battery please follow the steps below. 1. Ensure that the battery is fully charged. 2. Insert the battery into the rear of the Drone in the right direction (the tab on the battery should be facing down). -
Page 11: Remote Control
4.3 REMOTE CONTROL 1. The remote control comes with a built-in rechargeable 3.7V 400mAh Li-on battery. When the remote control is low in power, the power indicator light on the remote control will keep on blinking to indicate that it is time to recharge the remote control. -
Page 12: Flying Your Drone
NOTE: • Please repeat Step 5 before every flight. • Please pair the remote control within 5 metres of the Drone to avoid interference with other signals. 4.5 YOUR DRONE IS READY TO TAKE OFF Please ensure that the Drone is kept on a flat surface and away from any obstructions. -
Page 13: Basic Flight
5.2 BASIC FLIGHT UP AND DOWN FORWARD AND REVERSE Push the left control stick up to gain Push the right control stick up and altitude and down to descend down to fly forward and reverse. ROTATION LEFT/RIGHT FLIGHT Push the left control stick left and Push the right control stick left and right to pivot left/right. -
Page 14: Trim Function
5.3 TRIM FUNCTION Trimming is used to balance out your Drone if it is drifting when flying. To adjust the Trimming please follow the steps below. You can only use the Trim function when the Drone is airborne. 1. Make sure that the remote control and Drone are switched on and correctly paired. -
Page 15: Speed Mode
5.4 SPEED MODE The Drone has 2 speed modes that control the acceleration and maneuverability of the Drone. To cycle through the speed modes, use the Speed button at the top left of the remote control. Each mode will be identifiable by a series of beeps. -
Page 16: Flip Function
FLIP FUNCTION Fly your Drone to a height of more than 3 metres and press the FLIP button at the top right of your remote control. Then immediately push the right control stick to either forward/reverse or left/right position to flip your Drone. NOTE: •... -
Page 17: Emergency/Stop
EMERGENCY/STOP To activate an emergency stop while the Drone is airborne, long press the One Key Take Off/Landing button. The rotor blades will lock and the drone will fall to the ground. NOTE: • It is highly recommended that you do not push this button unless it is an emergency. 10.0 OPTICAL FLOW POSITION The Optical Flow Position enables your Drone to fly stably so that it can take photos and videos with high quality results. -
Page 18: Downloading The Zx-Fly App To Your Smartphone
Drone allowing you to view the Drone camera's live view, trigger recording, and control and fly your Drone. ZERO-X-ZX-AIR To connect your smartphone to the Drone please follow the instructions below. 1. Go to the Google Play store if you are using an Android smartphone, or the Apple Store if you are using an iPhone and search for the App named “ZX-FLY”. -
Page 19: Drone Maintenance
13.0 DRONE MAINTENANCE 13.1 REPLACING ROTOR BLADES If your rotor blades become damaged or the Drone is no longer flying straight, the rotor blades may need to be replaced. To replace the Drone's rotor blades, please follow the directions below. There are two types of rotor blades included with the Drone, A blades (clockwise rotation) and B blades (counter clockwise rotation). -
Page 20: Replacement Parts
'close call' can turn into a to receive crash landing. Accidents happen! 50% OFF To thank you for your support of Zero-X and your Drone purchase, we would like to help your spare parts purchase! you build your confidence in learning how to... -
Page 21: Warranty Terms And Conditions
WARRANTY AND WARRANTY DISCLAIMER Zero-X has a limited warranty, whereby Zero-X warrants to you and only to you that this Zero-X product will be free from defects in materials and workmanship for one (1) year from the date of your purchase (unless a longer warranty period is required by law). - Page 22 Zero-X makes no warranty that the Zero-X product and services will meet your requirements or that use of the Zero-X services will be uninterrupted, timely, secure or error-free. Nor does Zero-X make any warranty as to the accuracy or reliability of any information obtained through Zero-X (including third party...
- Page 23 Zero-X. Any liability for negligence is limited to direct losses usually and typically foreseeable in such case. Should the claim...
-
Page 24: Notes
NOTES... - Page 26 Capture the skies.™ ANOTHER DIRECTED BRAND All Images, Information and Content are Copyright © 2023 Directed Electronics Australia Pty Ltd. All Rights Reserved. www.zero-x.com.au | www.zero-x.co.nz www.directed.com.au | www.directed.co.nz...
Need help?
Do you have a question about the Glyden and is the answer not in the manual?
Questions and answers