Table of Contents
Advertisement
Advertisement
Table of Contents

Subscribe to Our Youtube Channel
Related Manuals for ZERO-X Pro Evolved 4K


Summary of Contents for ZERO-X Pro Evolved 4K
- Page 1 evolved 4k USER MANUAL...
-
Page 4: Table Of Contents
HOW TO CHANGE THROTTLE MODE ............18 9.0 SETTING UP THE MOBILE PHONE HOLDER ..........19 10.0 DOWNLOADING THE EVOLVED 4K APP TO YOUR MOBILE PHONE ..20 10.1 WHERE TO DOWNLOAD ................20 10.2 ZERO-X EVOLVED 4K APP ................20 10.3 CONNECTING TO THE EVOLVED 4K WIFI..........20... - Page 5 10.4 SAVING PHOTOS AND VIDEOS ..............20 11.0 PRE-FLIGHT CHECKLIST ................21 12.0 FLIGHT SAFETY ..................21 13.0 FLYING YOUR EVOLVED 4K DRONE ............21 13.1 PAIRING YOUR DRONE AND REMOTE CONTROL ........21 13.2 CALIBRATING YOUR DRONE ...............22 13.3 GYROSCOPE CALIBRATION ................24 13.4 OPTIMAL TRANSMISSION ZONE ..............24 13.5 SETTING A HOME POINT ................25 13.6 BASIC FLIGHT CONTROLS ................25...
-
Page 6: Welcome
WELCOME Thank You for a purchasing a Zero-X Pro Evolved 4K Drone. The Zero-X Pro range has been specifically designed to provide the intermediate to advanced user with a great flight experience. Please take the time to read the following safety warnings and operating instructions carefully. -
Page 7: Product Contents
PRODUCT CONTENTS 1. Evolved 4K Drone 5. USB Charging Cable 2. Remote Control 6. User Manual 3. Rotor Blades x 4 7. Small Screw Driver 4. USB AC Wall Charger 8. Screws... -
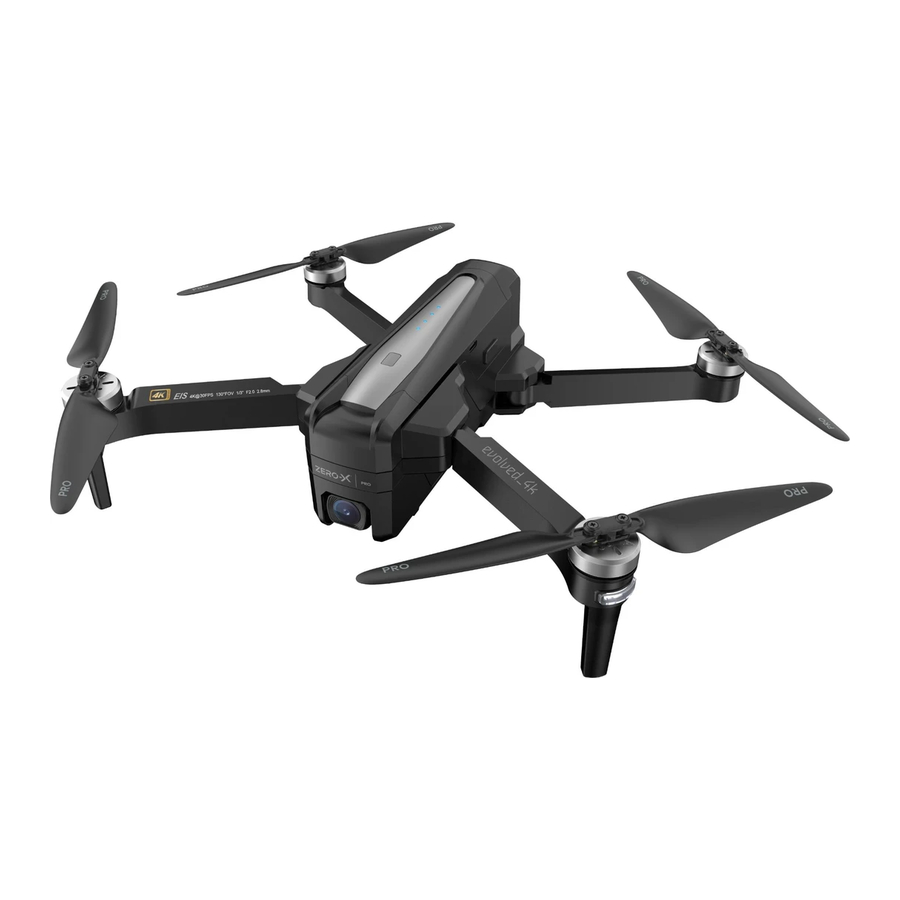
Page 8: Product Overview
PRODUCT OVERVIEW 1. Camera 2. Rotor blades 3. Motor 4. Power Button 5. Battery Release Buttons 6. Bottom Lights 7. Front Lights 8. Optical Flow Camera 9. Rear Light CONTROLLER OVERVIEW 1. Photo/Video 2. Left Thumb Stick (Yaw left/Right) 3. Lock/Unlock Button 4. -
Page 9: 3.0 Battery Safety
• Do not over charge the battery. Once the charging process is completed, remove the battery from the charger as soon as possible. • Only use the included or replacement Zero-X Pro Evolved 4K chargers and batteries. • You must charge the Lithium polymer battery in a safe area away from flammable materials. - Page 10 PLEASE NOTE: YOUR ZERO-X DRONE COMES WITH A CERTIFIED ZERO-X USB AC CHARGING ADAPTER AND CABLE FOR 240V CHARGING OF YOUR DRONE BATTERY. USE OF A NON ZERO-X CERTIFIED USB AC CHARGING ADAPTER AND CABLE WILL VOID YOUR WARRANTY AND MAY DAMAGE BOTH YOUR BATTERY AND DRONE.
-
Page 11: Installing The Battery
INSTALLING THE BATTERY 1. Ensure that the battery is fully charged. 2. Insert the battery into the middle of drone in the correct orientation. 3. Slide the battery all the way down until it securely slots into place. NOTE • Do not force the battery, if the battery is not fitting into position, please check that you have the battery in the correct orientation. -
Page 12: Replacing Rotor Blades
REPLACING ROTOR BLADES To remove and replace the rotor blades, please follow the instructions below. 1. Unscrew the two screws on the top of the rotor blades using the supplied screwdriver. It is advised that you replace the blades one at a time to avoid losing screws or installing blades incorrectly. -
Page 13: Folding/Unfolding The Evolved 4K Drone
• Be aware of the sharp edges on the blades. Please handle them with care. • Only use the Zero-X Pro Evolved 4K Blades. Do not mix with other blades. • To avoid injury do not touch the blades when they are spinning. - Page 14 Please see the table below for reference when your drone status indicator lights are activated and what they mean. LED Status Indicates Front & rear lights flash yellow Drone is disconnected from the rapidly controller. Front & rear lights flash red, green Drone is in initialisation detection and yellow alternatively.
-
Page 15: Remote Control
REMOTE CONTROL The remote control is battery operated and will require two AA batteries to use. To access and open the battery door you will need to unfold the hand sticks. Place the two batteries in the correct positions and close the battery door. -
Page 16: Remote Control Functions
REMOTE CONTROL FUNCTIONS SWITCHING BETWEEN FLIGHT MODES To choose which mode to fly your drone in, switch the GPS button to either the ON or OFF positions. The ON flight mode is shown on the LCD display. GPS mode ON GPS mode OFF LCD SCREEN DISPLAY Distance from... -
Page 17: Photo/Video Controls
PHOTO/VIDEO CONTROLS To take a photo with your drone, short press the button on the remote control. The same icon on the LCD screen will flash once, indicating that one photo has been taken. To record a video with your drone, long press the button on the remote control. -
Page 18: Drone Low Battery Warning
DRONE LOW BATTERY WARNING If the rear indicator lights on the drone are flashing red slowly, this indicates your battery level is starting to get low. The battery icon on the remote control LCD screen will be (See Pic 1 below for reference). If your drone is more than 100 metres away or more than 30 metres in altitude from the take off location (home point), it will return home automatically. -
Page 19: Signal Strength Indicator
SIGNAL STRENGTH INDICATOR On the remote LCD screen you will see identical bars on the left and right, these indicate the strength of the connection between your remote control and the drone. The stronger the signal is, the more bars will show. •... -
Page 20: Throttle Control Stick Mode
NOTE • You can use the button in case of an emergency to lock the drone's motors. Hold the button for 3 seconds to activate the lock. Please do not use this in normal flight, only in emergency situations. • Please ensure there is a safe distance between you and the drone before locking the motors. -
Page 21: Setting Up The Mobile Phone Holder
The mode number you are currently on will be displayed on the remote LCD screen at the bottom right. NOTE In order to change the throttle mode the signal must be in signal connection mode. If it is not in this mode it will not allow you to change the throttle mode. -
Page 22: Downloading The Evolved 4K App To Your Mobile Phone
Go to Google Play store if you are using an Android Smartphone, or the Apple Store if you are using an iPhone and search for the App named “ZXP-EVD4K or Zero-X Evolved 4K”, once located please download and install the App. -
Page 23: Pre-Flight Checklist
• All arms are fully unfolded. • Camera lens is clean, free of dirt and dust. • All parts used are genuine Zero-X Pro Evolved 4K products. Using other parts that are not made specifically for the Evolved 4K drone may cause safety issues or cause the drone to malfunction. -
Page 24: Calibrating Your Drone
3. The remote control will begin to pair with the drone automatically. Once a successful connection has been made the remote control will beep two times. The drone's indicator lights will change to alternatively flashing yellow for front and rear. The signal connection bars on the remote LCD screen will now show . - Page 25 STEP 2: VERTICAL CALIBRATION Hold the drone vertically with the camera facing up and rotate it 360° by the centre at least 3 times. Be sure to keep the camera always facing up, otherwise calibration will not work. When the vertical calibration is completed and successful the lights will change to solid red on the front lights and yellow on the rear lights.
-
Page 26: Gyroscope Calibration
13.3 GYROSCOPE CALIBRATION After the drone has finished calibrating, put the drone on flat ground and pull both thumb sticks to the bottom left corner together at the same time. (See picture below for reference). Once the calibration is complete the front and rear lights turn from flashing green to solid red at the front and yellow at the rear. -
Page 27: Setting A Home Point
NOTE: • You can connect to the WIFI at this time to view the real time video. Please refer to "CONNECTING TO THE EVOLVED 4K WIFI" on page 20 on how to connect to WIFI. 13.5 SETTING A HOME POINT If the GPS signal is strong (Satellite level over 7) before take off, the take off location will automatically be saved as the drone's Home Location. -
Page 28: Beginner Mode
14.0 BEGINNER MODE 1. Max flight altitude - The default factory setting is OFF, therefore the drone can reach a maximum altitude of 120 metres. If you want to change the maximum altitude the drone can reach, switch the setting to ON and move the slider to set the desired altitude (between 15m-120m). -
Page 29: Speed Mode
15.0 SPEED MODE The Evolved 4K Drone has 2 speed modes that control the acceleration and maneuverability of the drone. To cycle through the Speed Modes, use the Speed Button on the top right of the controller. 16.0 HEADLESS MODE 1. -
Page 30: Follow Me Mode (Gps Mode Enabled)
To activate the Follow-Me Function, the drone will follow your smartphone wherever you go. Please make sure the smartphone is connected with your Evolved 4K drone successfully and the Zero-X Evolved 4K App is installed and open. 1. Press the icon on the left side of the App to launch options. -
Page 31: Way Point Flight (Gps Mode Enabled)
19.0 WAY POINT FLIGHT (GPS MODE ENABLED) To activate the way point flight, the drone will fly according to the path which you have set. Please make sure your smartphone is connected with your Evolved 4K drone successfully and the App is working. Also make sure that you have downloaded and saved the local map onto your smartphone. -
Page 32: Return Home (Gps Mode Enabled)
4. Press the button again to exit the way point flight mode and regain flight control of the drone. 5. To reset the flight path, press the delete button on the bottom right corner of the App screen.. NOTE Please note the Way Point Flight mode may not function correctly if there is WiFi interference. - Page 33 LOW BATTERY RETURN TO HOME When the drone senses the battery level is low, a failsafe is triggered. It is recommended to initiate the Return to Home function with your drone or land it immediately. There are two warnings for low battery levels: 1.
-
Page 34: Optical Flow
19.2 OPTICAL FLOW The optical flow system consists of the optical flow lens modules. This system is an image positioning system, it will obtain the drone's position through the optical image which ensures safe flights and accurate positioning. See below for reference where the optical flow camera is located within your drone. -
Page 35: Viewing Photos And Videos
19.5 VIEWING PHOTOS AND VIDEOS To view your recorded footage and videos you will need to connect the Micro SD card to your computer via either a USB Micro SD card reader or via a SD card converter if your computer has a SD card reader. (Not provided) or you can click the media gallery on your App to view the picture and video. -
Page 36: Replacement Parts
To thank you for your support of Zero-X and your drone purchase, we would like to help you build your confidence in learning how to fly your drone. We would like to offer you 50% off your first two orders of any spare parts, by using the codes in the coupons below. -
Page 37: Warranty Terms & Conditions
Zero-X and its subsidiaries and affiliates or the Zero-X services, relating to or arising out of your breach of any provision of these terms, your misuse of the Zero-X or Zero-X services, or your unauthorized modification or alteration of products or software. - Page 38 Zero-X drones and accessories, computer software, or other hardware. You agree that Zero-X is not an insurer and that Zero-X is not providing me with insurance of any type. Any amounts that you pay Zero-X for the Zero-X service are not insurance premiums and are not related to the value of your vehicle or property, anyone else’s property located in your vehicle or...
- Page 39 This warranty and warranty disclaimer give you specific legal rights, and you may have other rights that vary by state, province, or country. Other than as permitted by law, Zero-X does not exclude, limit or suspend other rights you have, including those that may arise from the nonconformity of a sales contract.
-
Page 40: Notes
22.0 NOTES... - Page 44 Capture the skies.™ All Images, Information and Content are Copyright © 2021 Directed Electronics www.zero-x.com.au | www.zero-x.co.nz Australia Pty Ltd. All Rights Reserved.
Need help?
Do you have a question about the Pro Evolved 4K and is the answer not in the manual?
Questions and answers