
Related Manuals for ZERO-X Hydra ZX-HRA


Summary of Contents for ZERO-X Hydra ZX-HRA
- Page 1 hydra Full HD Camera Drone with WIFI, GPS & FPV DRONE USER MANUAL Capture the skies.™ ZX-HRA...
-
Page 2: Table Of Contents
BATTERY SAFETY ................... 05 PACKAGE CONTENTS ................06 PRODUCT OVERVIEW ................06 CONTROLLER OVERVIEW ..............07 SETTING UP YOUR ZERO-X HYDRA............08 CHARGING THE BATTERY ..............08 REMOVING AND INSTALLING THE BATTERY ........09 INSTALLING A MICRO SD CARD ............10 REMOVING A MICRO SD CARD ............ - Page 3 OUT OF RANGE ALARM ............... 18 MOTOR LOCK DOWN ................18 TRIMMING ....................19 RETURN TO HOME................19 4.10 POINT OF INTEREST ................19 APP NAVIGATION ................. 21 APP CONTROL SCREEN ............... 21 MAINTENANCE ................24 REPLACING ROTOR BLADES ............... 24 REPLACEMENT PARTS ................
-
Page 4: Welcome
WELCOME Thanks for purchasing a Zero-X Hydra, get ready to have the time of your life! We’re sure your Zero-X Hydra will bring you a world of great experiences in the air. Please take the time to read the following safety warnings and operating instructions carefully. -
Page 5: Battery Safety
BATTERY SAFETY When handled incorrectly, Lithium polymer batteries can be dangerous and can potentially harm and do damage to persons or property. Zero-X does not accept any liability for damage to persons or property if the battery is not correctly charged, stored or protected. -
Page 6: Package Contents
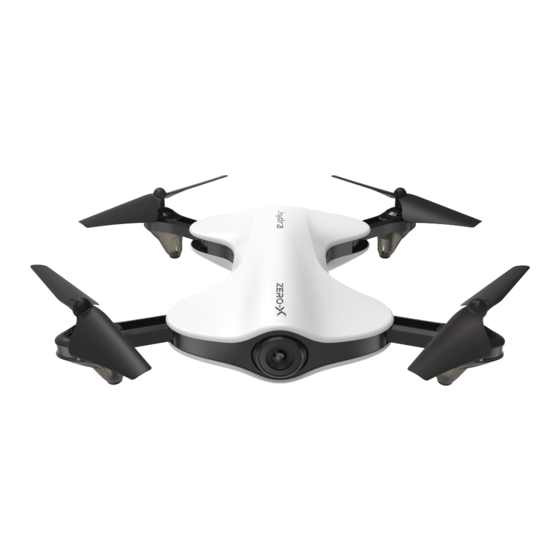
PACKAGE CONTENTS Hydra Drone Battery Remote Control Rotor Blades Charger User Guide AC Wall Charger PRODUCT OVERVIEW Front Left Foot Power Button Camera Rear Right Foot Front Right Rotor Blade Front Right Foot Battery 10. Front Left Rotor Blade Battery Release 11. -
Page 7: Controller Overview
CONTROLLER OVERVIEW Phone Holder Photo Button Video Button Right Thumbstick Left Thumbstick One Button Take Off / Landing / Emergency Stop Return To Home Button Power Switch... -
Page 8: Setting Up Your Zero-X Hydra
PLEASE NOTE: YOUR ZERO-X DRONE COMES WITH A CERTIFIED ZERO-X USB AC CHARGING ADAPTER FOR 240v CHARGING OF YOUR DRONE BATTERY. USE OF A NON ZERO-X CERTIFIED USB AC CHARGING ADAPTER WILL VOID YOUR WARRANTY AND MAY DAMAGE BOTH YOUR BATTERY AND DRONE. -
Page 9: Removing And Installing The Battery
REMOVING AND INSTALLING THE BATTERY To remove the hydra’s battery please follow the instructions below. Slide and hold the Battery Release latch on the underside of the drone back towards the power button. While holding the Battery Release latch in the release position lift the battery out of the battery slot. -
Page 10: Installing A Micro Sd Card
INSTALLING A MICRO SD CARD If you want to record your flights using the Hydra’s built in camera it is required that you install a Micro SD Card (not included). It is recommended that you use a class 10 Micro SD Card, up to 32 GB. To install a Micro SD Card, please follow the instructions below. -
Page 11: Remote Control
REMOTE CONTROL Ensure that the Remote Control power switch is in the OFF (down) position. Remove the battery cover on the rear of the Remote Control by sliding it downward. Insert 4 x AA batteries (AA Batteries not included) making sure that they are in the orientation specified. -
Page 12: Flight Safety
Hydra and requires you to have the Zero-X Hydra App installed. To find the Zero-X Hydra App search ‘Zero-X Hydra’ on the Apple App store if you are using an iPhone, or on the Google Play store if you are using an Android phone. -
Page 13: Using The Remote Control Smart Phone Holder
The lights on the arms of the Hydra will flash. While these lights are flashing the WiFi signal will start up be available for connection. In your Smart-phone’s WiFi settings find the and select the Zero-X Hydra WiFi connection. Open the Zero-X Hydra App. - Page 14 Switch the Remote Controls power switch to the up ON position. The Remote Control should beep once and the light commence flashing to indicate power up has been successful. Next push the LEFT Thumb stick (Acceleration/Yaw) on the Remote Control to the maximum lowest (down) position, the Remote Control light should now change to a slow flash.
- Page 15 10. Level Correction: When the indicator lights on the left side of the Hydra Drone are flashing, please place the Hydra on a flat level horizontal surface, then lifting it slightly off the ground (around 10cms) rotate the drone 4 times in 180 degree increments in a clockwise direction until the remote control makes a long “beep”...
-
Page 16: Basic Flight
BASIC FLIGHT Push the left stick Push the right stick up to gain altitude up to fly forward Push the left stick back to descend Push the right stick back to fly backward Left Stick Right Stick Push the left stick Move the right stick left to pivot left to the left to fly to left... -
Page 17: One Button Take Off/Landing
been checked turn both the Hydra and the Remote Control off and start the launching process again. ONE BUTTON TAKE OFF/LANDING The one button take off and landing button allows you to easily get your drone off the ground and land once the Hydra is paired and the motors are unlocked. -
Page 18: Speed Modes
SPEED MODES The Hydra drone has three speed modes. To cycle through the speed modes, use the speed button on the rear of the controller. Each mode will be identifiable by a series of beeps. Low Speed Mode: One beep Medium Speed Mode: Two beep High Speed Mode: Three Beeps CONTROLLER ALERTS... -
Page 19: Trimming
TRIMMING Trimming is used to balance out your drone if it is drifting when flying. To adjust the trimming please follow the steps below. Make sure that the Remote Control and Hydra are switched on and correctly paired. Hold the Trimmer button on the rear of the Remote Control. While still holding the Trimmer button use the right thumb stick to counter the direction that your Hydra is drifting. - Page 20 Press Down Moving the right thumb stick right will make the Hydra circle the target clockwise while focusing on the target. Moving the left thumb stick left will make Hydra circle the target counter clockwise while focusing on the target. Moving the thumb stick down will move the Hydra away from the target making the circle bigger.
-
Page 21: App Navigation
APP NAVIGATION Once you have connected your Smart-phone to the Hydra via WiFi and launched the Zero-X Hydra App, you will be able to access the App’s Control screen. This screen has all of the control options and settings, as well as access to the on screen control system. - Page 22 drone to follow your drawn path. EMERGENCY STOP Pressing this will cause the Hydra’s motors to stop and the drone will fall to the ground. Only use this in the case of an emergency. MICRO SD CARD This will show is a micro SD card is inserted in the Hydra’s on board camera.
- Page 23 MEDIA This will take you to all recorded files both on your phone and saved to the Micro SD Card installed in your Hydra drone (Micro SD Card not included). SPEED MODE Select your required speed mode. ONE BUTTON TAKE OFF This button will launch the drone.
-
Page 24: Maintenance
VIEWING AND TRANSFERRING PHOTOS AND VIDEOS To view your photos and videos select the Media setting from the home screen. From this screen, you can select whether you want to view the files recorded to the inserted Micro SD Card, or the files that have been transferred to your phone. -
Page 25: Replacement Parts
To thank you for your support of Zero-X and your drone purchase, we would like to help you build you confidence in learning how to fly your drone. We would like to offer you 50% off your first two orders of any spare parts, by using the codes in the coupons below. -
Page 26: Warranty Terms & Conditions
National network, a store within that chain, along with satisfactory proof of purchase. The retailer will then return the goods to Zero-X. Zero-X will repair, replace or refurbish the product at its discretion. The retailer will contact you when the product is ready for collection. -
Page 27: Notes
NOTES... - Page 28 Capture the skies.™ www.zero-x.com.au | www.zero-x.co.nz...
Need help?
Do you have a question about the Hydra ZX-HRA and is the answer not in the manual?
Questions and answers