Table of Contents
Advertisement
Quick Links
Advertisement
Table of Contents

Subscribe to Our Youtube Channel
Related Manuals for PiezoDrive PDUS210


Summary of Contents for PiezoDrive PDUS210
- Page 1 PDUS210 210 Watt Ultrasonic Driver PDUS210 V4 Modified 6/02/2021...
-
Page 2: Table Of Contents
Overview ............................4 Electrical Specifications ........................5 Standard Output Voltage Ranges ....................5 Mechanical Specifications ........................ 7 PDUS210-FLEX Specifications ......................8 Introduction to Ultrasonic Transducers .................... 8 PDUS210 Operation ........................10 Choosing the Voltage Range ......................14 Front Panel ............................ 16 Rear Panel ............................. -
Page 3: Safety Warnings
If you already have expert knowledge of ultrasonic transducers and their different operating modes, go straight to the section on Desktop Software. Delivery Contents (Standard) PDUS210 Amplifier (in chosen configuration) Handheld controller Handheld controller cable (DSUB9 3ft) ... -
Page 4: Overview
The PDUS210 is available with standard output voltage ranges from 17 Vrms to 282 Vrms, and current ranges from 0.7 Arms to 11 Arms. These ranges are optimized for load impedances ranging from 1.5 Ohms to 400 Ohms at resonance. -
Page 5: Electrical Specifications
2% of the full-scale range. * The load impedance range is the range of impedances which guarantee more than 100W of power supplied to the load. Higher or lower impedances can be driven but with reduced power. PDUS210 V4 Modified 6/02/2021... - Page 6 �� ������ For example, the optimal impedance of the PDUS210-400 is 100 Ohms, so with a 50 Ohm load, the normalized impedance is 0.5, From the plot, it can observed that greater than 100 W can be achieved with a normalized impedance from 0.65 to 2.1, which for the PDUS210-400, is 65 Ohms to 210 Ohms.
-
Page 7: Mechanical Specifications
Mechanical Specifications Specification Value Notes Enclosure Dimensions 227 x 168 x 54 mm L x W x H Mass 1.4 kg Temperature Range 0C - 50C Humidity Non-condensing PDUS210 V4 Modified 6/02/2021... -
Page 8: Pdus210-Flex Specifications
PDUS210-FLEX Specifications The PDUS210-FLEX is identical to the standard PDUS210 except that it requires an external transformer connected between the amplifier and transducer using the supplied cable. This allows the user to switch between different output voltage ranges by changing the external transformer. -
Page 9: Introduction To Ultrasonic Transducers
Introduction to Ultrasonic Transducers An introduction to the behaviour and operation of ultrasonic transducers can be viewed at the following link. Please familiarize yourself with these concepts before operating the PDUS210. https://www.piezodrive.com/ultrasonic-drivers/intro-ultrasonic/ The most important concept to understand is the relationship between the electrical and mechanical impedance response of a transducer. -
Page 10: Pdus210 Operation
PDUS210 Operation Overview The operating principle of the PDUS210 is summarized in Figure 4. The transducer is connected on the right hand side to the output transformer. The transformer converts the internal +/-24V drive voltage to the desired output voltage range, for example +/-200V. By default, the output connection to the transducer is electrically isolated from ground but the negative output can also be internally grounded using the jumper shown. - Page 11 Applications with high losses, i.e. low quality factor, may have a non-zero impedance phase angle at resonance, e.g. 45 degrees. In such cases, an impedance response should be performed first, to identify the desired operating phase that corresponds to the desired mechanical resonance. PDUS210 V4 Modified 6/02/2021...
- Page 12 Constant voltage is the natural operating mode of the PDUS210 but constant current can also be achieved by enabling the current tracking mode. The operation of current tracking mode is illustrated in Figure 5.
- Page 13 In some applications, such as welding, it may be preferable to control the dissipated power rather than the vibration amplitude. The PDUS210 has a power control function that varies the voltage to maintain a constant power dissipation in the load. As shown in the Figure 6, the power control loop includes the power measurement ��...
-
Page 14: Choosing The Voltage Range
Choosing the Voltage Range The PDUS210 is available in voltage ranges from 17 Vrms to 282 Vrms, which suit load load impedances ranging from 1.5 Ω to greater than 400 Ω. The optimal choice is determined by the transducer impedance at resonance, and the choice of series or parallel resonance. If the load... - Page 15 This can be performed with an impedance analyser or simply a signal generator and oscilloscope. If possible, these tests should be performed at moderate power with both minimum and maximum load conditions, i.e. using a PDUS210 driver. Fill out the values in the table below: Unloaded Fully Loaded ��...
-
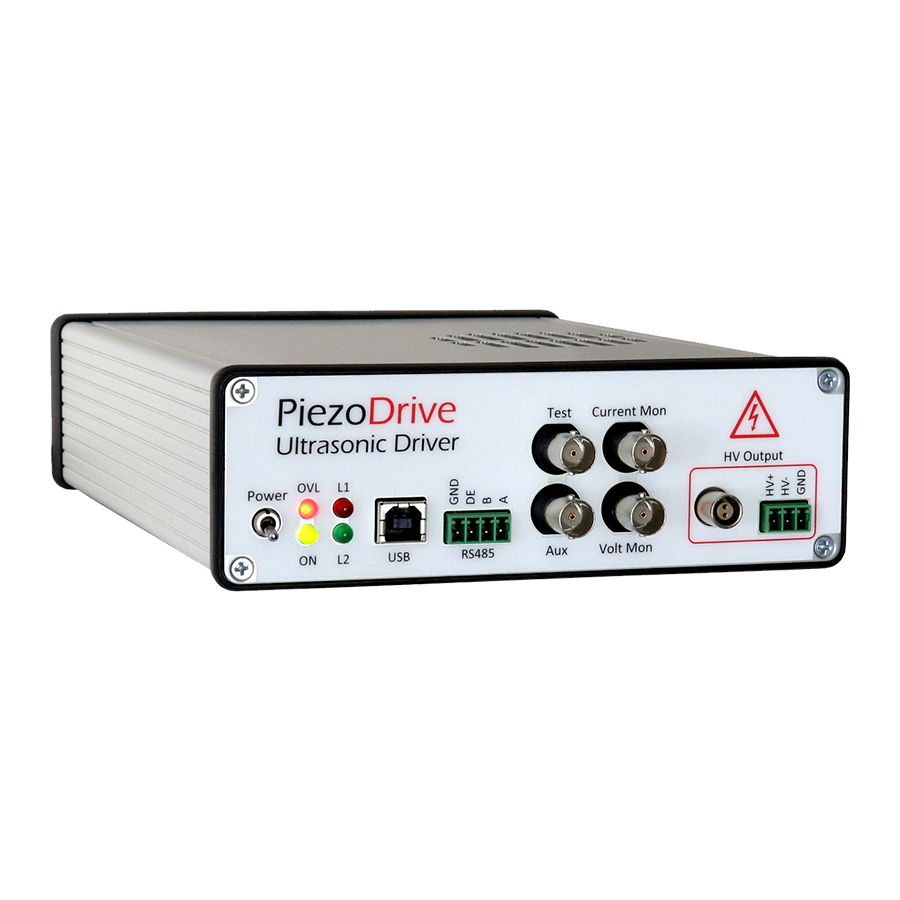
Page 16: Front Panel
The sensitivity of the current and voltage monitors are determined by the peak-to-peak output voltage range. For example, the peak-to-peak output voltage range of the PDUS210-400 is 400 V, so the current gain is 1.056 V/A, and the voltage gain is 0.01265 V/V. -
Page 17: Rear Panel
Rear Panel Label Function 48V 280W Suits Amphenol TJ0331530000G Connector 48V 280W Suits 6-Pin power connector for Meanwell GST280A48-C6P Remote Control Refer to section Handheld Controller PDUS210 V4 Modified 6/02/2021... -
Page 18: Overload Protection
Thermal Overload This overload is triggered when the heatsink temperature exceeds 70C. An enable command is required to clear this overload. Check the fan and heatsink for blockages. PDUS210 V4 Modified 6/02/2021... -
Page 19: Desktop Software
(piezodrive.exe). First Connection The PDUS210 uses the HID device class to communicate over USB. For the first connection, the amplifier should be powered on before connecting it to the PC. After this first connection, widows will assign the appropriate driver. - Page 20 Use the file browser to select the downloaded firmware. The software will now show the ‘File Loaded’ status. Click the update firmware switch and restart the PDUS210 when prompted. This update process has an identical result to the online procedure.
- Page 21 Will disable current tracking The voltage will not be adjusted until the phase tracking is locked, i.e. there is less than 10 degrees difference between the measured phase and the phase set point. PDUS210 V4 Modified 6/02/2021...
- Page 22 Power Control Gain Shows and sets the control gain for power tracking. Accepts only positive values. Increasing the value will increase the controller speed but may lead to instability. Saves all current settings to the amplifier non-volatile memory. Save On Device PDUS210 V4 Modified 6/02/2021...
- Page 23 Zooms to fit the voltage and current waveforms Auto-scale Current waveform, measured at 5.2 (M samples/s), 250 Current waveform samples are displayed. Voltage waveform, measured at 5.2 (M samples/s), 250 Voltage waveform samples are displayed. PDUS210 V4 Modified 6/02/2021...
- Page 24 The number of samples saved is the same as the number of samples for the graphs, which can be changed in the settings tabs. This save function is recommended for any logging that may be required. PDUS210 V4 Modified 6/02/2021...
- Page 25 15 kHz to 200 kHz. 3. Zoom over the desired resonance; you may need to consult the transducer manufacturer if you do not know the operating frequency range. The assistant will start the second sweep over the selected region. PDUS210 V4 Modified 6/02/2021...
- Page 26 A far better model for operating at the parallel resonance would be PDUS210-800. 5. Enter the desired load power; this will adjust either the current setpoint of the output voltage depending on the type of resonance selected.
- Page 27 The minimum delay between frequency steps. A longer delay provides greater settling time between frequencies, which may be required for systems with low damping or quality factor above 100. 7 Start sweep. 8 Pause sweep. 9 Stop sweep. PDUS210 V4 Modified 6/02/2021...
- Page 28 Frequency Sweep Graph Description Save the sweep data as a csv file Sets the impedance scale to log Sets the impedance scale to linear Auto-scale Phase data Impedance data PDUS210 V4 Modified 6/02/2021...
-
Page 29: Pdus210-Flex Operation
PDUS210-FLEX Operation The PDUS210-FLEX is identical to the standard PDUS210 except that it requires an external transformer connected between the amplifier and transducer using the supplied cable. This allows the user to switch between different output voltage ranges by changing the external transformer. - Page 30 100, 200, 400, 600, and 800 Vpk-pk. Figure 7. PDUS210-FLEX Output transformer (e.g. TX210-800) To operate the PDUS210-FLEX, the instructions are identical to the standard PDUS210 except for the following steps that must be completed first, or when changing the transformer: 1.
-
Page 31: Handheld Controller
When the ON button is pressed momentarily, the PDUS210 is armed, which means the output is enabled but the output amplitude is set to zero. If the ON button is pressed and held, and tracking functions are enabled and the output is set to the value indicated by the amplitude knob. - Page 32 Custom Remote Controllers PiezoDrive encourages the development of application specific remote controllers; for example, a footswitch. The following schematic of the hand controller can be used as a template. The only required components are the On and Shutdown switches. The dial functionality provided by the variable resistor can be bypassed using the remote amplitude switch in the desktop software.
-
Page 33: Rs485 Interface
(Introduction to RS485). The PDUS210 responds to the commands described in https://github.com/PiezoDrive/RS485-API For testing purposes or to control the amplifier from a PC, an RS485 USB cable is required, for example, FTDI USB-RS485-WE-1800-BT. The connection diagram below is recommended. A... -
Page 34: Warranty And Service
Warranty and Service The PDUS210 is guaranteed against manufacturing defects for 12 months from the date of purchase. Contact your distributor or info@piezodrive.com for service. Please include the amplifier serial number. PDUS210 V4 Modified 6/02/2021...
Need help?
Do you have a question about the PDUS210 and is the answer not in the manual?
Questions and answers