Taurus UB9.9 Assembly And Operating Instructions Manual
Hide thumbs
Also See for UB9.9:
- Assembly and operating instructions manual (48 pages) ,
- Assembly and operating instructions manual (48 pages)

Related Manuals for Taurus UB9.9


Summary of Contents for Taurus UB9.9
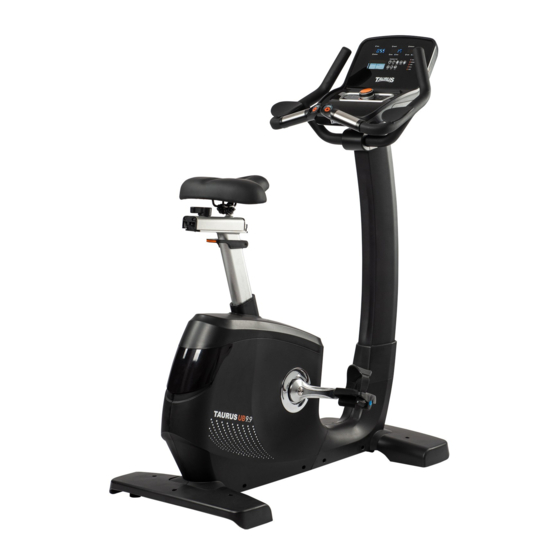
- Page 1 Assembly and Operating Instructions max. 180 kg ~ 90 Min. 58 kg L 122 | B 61 | H 154 TF-UB99.01.05 Upright Bike UB9.9 TF-UB99...
- Page 2 UB9.9...
-
Page 3: Table Of Contents
Content GENERAL INFORMATION Technical Data Personal Safety Electrical Safety Set-Up Place ASSEMBLY General Instructions Scope of Delivery Assembly OPERATING INSTRUCTIONS Console display Button functions Powering on the crosstrainer Standby mode MANUAL (Manual programmes) 3.5.1 Quick-Start programme 3.5.2 Target programmes PROGRAM (Profile programmes) USER (User defined programme) H.R.C. - Page 4 RECOMMENDED ACCESSORIES ORDERING SPARE PARTS Serial Number and Model Name Parts List Exploded Drawing WARRANTY CONTACT UB9.9...
- Page 5 With Taurus® fitness equipment, the focus is on what sport is all about: maximum performance! Therefore, the equipment is developed in close consultation with athletes and sports scientists.
- Page 6 This notice indicates potentially hazardous situations which, if not avoided, will result in death or serious injuries! NOTICE This notice indicates further useful information. Retain these instructions in a safe place for future reference, maintenance or when ordering replacement parts. UB9.9...
-
Page 7: General Information
GENERAL INFORMATION Technical Data LCD Display: Training duration in min. Speed in km/h Training distance in km Calories in kcal Incline in % Heart rate (using the hand pulse sensors or a chest strap) Watts Brake system: Electro-magnetic induction brake Resistance levels: Watt range: 10–350W (to be set in 5 W steps) -
Page 8: Personal Safety
Make sure that nobody is within the range of motion of the equipment during training so as not to endanger you or other persons. ࣑ ATTENTION Do not insert any objects of any kind into the openings of the device. UB9.9... -
Page 9: Electrical Safety
Electrical Safety DANGER ⚠ In order to reduce the risk of an electric shock, always unplug the equipment from the mains socket immediately after your workout, before assembly or dismantling, and before maintenance or cleaning. Do not pull on the cable. ⚠... -
Page 10: Assembly
To prevent damage to the equipment and the floor, assemble the equipment on a mat or packaging board. NOTICE In order to make the assembly as simple as possible, some screws and nuts to be used can already be pre-assembled. Ideally, assemble the equipment at its later set-up place. UB9.9... -
Page 11: Scope Of Delivery
Scope of Delivery The scope of delivery consist of the following parts. At the beginning, check whether all parts and tools belonging to the device are included in the scope of delivery and whether damage has occurred. In the event of complaints, the contractual partner must be contacted directly. CAUTION ⚠... -
Page 12: Assembly
These are not required for assembly. Lift the rear frame and mount the rear stabiliser (2) to the main frame (1) with four washers (16), four spring washers (9), two screws (7A), two screws (7) (see fig. 1-4) and hand-tighten the screws. UB9.9... - Page 13 M8x1.25x70L M8x1.25x110L D15.4xD8.2x2T D16xD8.5x1.2T 9 16 9 16 Step-1...
- Page 14 (1) (see fig. 2-3). NOTICE If the seat position does not meet your requirements after assembly has been completed, the height of the seat and its lateral alignment can be adjusted as shown in figs. 2-3 and 2-4. Step-2 UB9.9...
- Page 15 Step 3: Mounting the front post Slide the cover (75) on the front post (17) upwards (see fig. 3-1). Connect the two console cables (64 & 65) together (see fig. 3-2). ࣑ ATTENTION Make sure not to clamp the cables during the next step. Place the front post (17) on the main frame (1) and mount the front post (17) with four washers (16), four spring washers (9) and four screws (15).
- Page 16 Mount the console (76) on the front post (17) with four screws (39) (see fig. 4-3) and hand-tighten the screws. Mount the console cover (40) below the console (76) on the front post (17) using four screws (39) (see fig. 4-4) and hand-tighten the screws. M5*12L Step-4 UB9.9...
- Page 17 Step 5: Mounting the handles and bottle holder Connect the cables from the console (76) to the cables for the speed buttons (37L & 37R). Mount the handlebar (36) to the front post (17) using two curved washers (8) and two screws (41) and hand-tighten the screws.
- Page 18 Turn the right pedal (51R) clockwise on the right crank (48R) on the main frame (1). Place the rear and front covers (5) on the rear and front stabilzers (2 & 4) and mount each cover (5) with three screws (39). M5*12L UB9.9...
- Page 19 Step 7: Alignment of the feet If the floor is uneven, you can stabilise the equipment by turning the adjustable screws under the main frame. Lift the equipment on the desired side and rotate the adjustable screws under the main frame. Rotate the screws clockwise in order to unscrew them, therefore raising the equipment.
-
Page 20: Operating Instructions
Display of the current revolutions per minute (RPM) (0-999) LEVEL Display of the current resistance level WATTS Display of the Watt value (0 -999) Display of your heart rate (0-230) PULSE Set a heart rate target with the rotary knob (0-30-230) in singluar increments UB9.9... -
Page 21: Button Functions
Button functions BUTTON DESCRIPTION Increasing the setting value or resistance level Rotary knob Decreasing the setting value or resistance level Setting confirmation BODY FAT Body fat test RECOVERY Heart rate test on your recovery condition Returns you to the previous training mode while making settings or RESET selecting an option. -
Page 22: Powering On The Crosstrainer
USER PROGRAM (user defined programme) H.R.C (Heart rate controlled programmes) WATT (Watt programme) Standby mode The console goes into standby mode after four mintues without inputs or movement- The console will exit standby mode as soon as it registers movement. UB9.9... -
Page 23: Manual (Manual Programmes)
MANUAL (Manual programmes) Under MANUAL you can choose between the Quick-Start programme and one of the target programmes. For target programmes, settings for time (TIME), distance (DISTANCE), caloires in kcal (CALORIES) or heart rate (PULSE) are possible. 3.5.1 Quick-Start programme In the main menu, select MANUAL and confirm your choice with a single push of the rotary knob. -
Page 24: Program (Profile Programmes)
During training it is possible to change the resistance level with the rotary knob. To pause the programme, press the START/STOP button again. NOTICE While the programme is paused it is possible to change the training time. To end the programme, press the RESET button. UB9.9... -
Page 26: User (User Defined Programme)
START/STOP button to directly start your training. NOTICE During training it is possible to change the resistance level with the rotary knob. To pause the programme, press the START/STOP button again. To end the programme, press the RESET button. UB9.9... -
Page 27: Heart Rate Controlled Programmes)
H.R.C. (Heart rate controlled programmes) WARNING ⚠ This crosstrainer is not medical equipment. The heart rate measurement of the crosstrainer can be unprecise. Different factors can influence the heart rate reading. The heart rate readings are only meant as a guide for training. There are three heart rate programmes available to choose from. -
Page 28: Watt (Watt Programme)
If you wish to prematurely end the recovery function, press the RECOVERY button again. Based on the final pulse readings, once the countdown ends you'll receive a fitness grade from F1 to Very good Good Average Adequate Very bad UB9.9... -
Page 29: Body Fat (Body Fat Analysis)
3.11 BODY FAT (Body fat analysis) Choose your user profile (U1-U4). To start the body fat analysis, in the main menu press the BODY FAT button and hold on to the hand pulse sensors. NOTICE Should you not properly grip the hand pulse sensors, the display will show the error code E-1. NOTICE If you wish to prematurley end the body fat analysis and return to the previous program, press the BODY FAT button again. -
Page 30: Bluetooth And Fitness Apps
Training apps can be found on the App Store or on GooglePlay. For example you can find the apps "Kinomap" or "iconsole+". Please note that these apps are offered from a third party developer. Sport- Tiedje is not responsible for the availability, functionality or the contents of these programs. Example: Kinomap UB9.9... -
Page 31: Storage And Transport
STORAGE AND TRANSPORT General Instructions ࣑ ATTENTION Make sure that the equipment is protected from moisture, dust and dirt in the selected storage location. The storage location should be dry and well ventilated and have a constant ambient temperature between 5°C and 45°C. WARNING ⚠... -
Page 32: Troubleshooting, Care And Maintenance
Use a suitable chest strap (see RECOMMENDED ACCESSORIES) Wrong position of chest No pulse display Reposition chest strap and/or strap moisten electrodes Chest strap defective or Changing batteries battery empty Check if pulse display by hand pulse Pulse display defective possible UB9.9... -
Page 33: Error Codes And Troubleshooting
Error Codes and Troubleshooting The electronics of the equipment continuously carries out tests. In case of deviations, an error code appears on the display and normal operation is stopped for your safety. E-1 No values were received during the body fat analysis. Make sure that, during the analysis, you hold on to the hand pulse sensors with both hands. -
Page 34: Recommended Accessories
We will be happy to advise you! chest strap floor mat chest strap contact gel silicone spray towels UB9.9... -
Page 35: Ordering Spare Parts
Standard/Norm: Maximum weight/max. Benutzergewicht: Class/Klasse: Date/Datum: Sport-Tiedje GmbH, Flensburger Str. 55, 24837 Schleswig MADE IN Serial nº.: Enter the serial number in the appropriate field. Serial number: Brand / Category: Taurus / recumbent bike Model Name: UB9.9 Article Number: TF-UB99... -
Page 36: Parts List
60*28.7*10T bearing 58006-6-1040-01 #6004-2RS(C0) waved washer 55120-5-2705-DA D27*D20.3*0.5T Screw 54203-2-0030-F0 M3*0.5*30L C ring 55519-1-2312-DA D22.5*D18.5*1.2T cross screw 54203-2-0012-F0 M3*0.5*12L crank axle 734S0-3-2903-00 pulley wheel 58008-6-1037-D0 D260*25*3T anti-loose nut 55206-1-2006-FA M6*1.0*6T Hex bolt 50106-5-0015-C0 M6x1.0x15L Multi-groove belt 58004-6-1113-00 440 PJ8 UB9.9... - Page 37 Round Magnet 174R4-6-2574-00 Upper cable for quick button(2) 734S0-6-2539-00 400L Upper cable for quick button(1) 734S0-6-2542-00 400L Upper cover for handpulse 747S0-6-2517-B0 184.5*20.8*50 Lower cover for handpulse 747S0-6-2518-B0 184.5*35.2*50 Membrane button (-) 734S0-6-2534-00 Membrane button (+) 734S0-6-2533-00 Handlebar 734S0-3-2400-J0 Lower cable for quick button(2) 747S0-6-2536-00 850L Lower cable for quick button(1)a...
- Page 38 Flat Washer 55108-1-2830-NA D28*D8.5*3T Plastic cover 803K0-6-1082-00 D3*30L spring 58003-6-1024-N0 D2.2*D14*65L Fixing Plate For Idle Wheel 734S0-3-1600-00 Plastic Flat washer 55110-1-2404-BF D10*D24*0.4T Hex nut 55208-2-2006-NA M8*1.25*6T 55208-1-2008-FA M8*1.25*8T Adjustable rod 734S0-3-2225-N0 Bolt 51608-5-0016-F0 M8*1.25*16L spring 58003-6-1067-N0 D10xD1.5x73L Bolt 53205-2-0040-N0 M5*0.8*40L UB9.9...
- Page 39 Fixing bar 734S0-6-2210-N0 D6*49L Tighten gasket 734S0-6-4086-B0 D38*11T screw 54006-5-0045-F3 M6*1.0*45L Pull handle 734S0-6-2274-B0 152.5*53*32.2 End cap for adjustable handle 734S0-6-4085-B0 74*D37*3T bolt 50508-5-0050-D3 M8x1.25x50L buffer 55308-4-0020-G9 D10.5*20L block plate 734S0-6-4073-N0 31*31*6T moving wheel 26100-6-1087-B0 D65*24 Round head cross screw 50805-2-0010-F0 M5x0.8x10L Inner hex fastening screw...
-
Page 40: Exploded Drawing
Exploded Drawing UB9.9... -
Page 41: Warranty
WARRANTY Training equipment from Taurus® is subject to strict quality control. However, if a fitness equipment purchased from us does not work perfectly, we take it very seriously and ask you to contact our customer service as indicated. We are happy to help you by phone via our service hotline. - Page 42 For that reason, we also want to resolve your queries quickly and in a straightforward manner. Thus, please always keep your customer number and the serial number of the faulty equipment handy. UB9.9...
-
Page 43: Contact
CONTACT TECHNICAL SUPPORT TECHNICAL SUPPORT & SERVICE TECHNICAL SUPPORT & SERVICE �� �� �� +49 4621 4210-900 80 90 16 50 +33 (0) 172 770033 +49 4621 4210-945 +49 4621 4210-933 �� +49 4621 4210-698 �� �� info@fitshop.dk service-france@fitshop.fr �� technik@sport-tiedje.de ��... - Page 44 The company employs numerous sports scientists, fitness trainers and competitive athletes. Visit us also on our social media platforms or our blog! UB9.9...
- Page 45 Notes...
- Page 46 Notes UB9.9...
- Page 48 Upright Bike UB9.9...
Need help?
Do you have a question about the UB9.9 and is the answer not in the manual?
Questions and answers