Table of Contents
Advertisement
Advertisement
Table of Contents

Subscribe to Our Youtube Channel
Related Manuals for Pax Technology A920


Summary of Contents for Pax Technology A920
- Page 1 0333 123 1243 www.libertypay.co.uk info@libertypay.co.uk PAX A920 User Guide...
-
Page 2: Your Account
WIFI network orin mobile environments. Your Account The LibertyPay team will make sure your A920 is set up and ready to use straight outof the box, saving you time and ensuring you’re ready to collect card payments right away. -
Page 3: Symbols And Icons
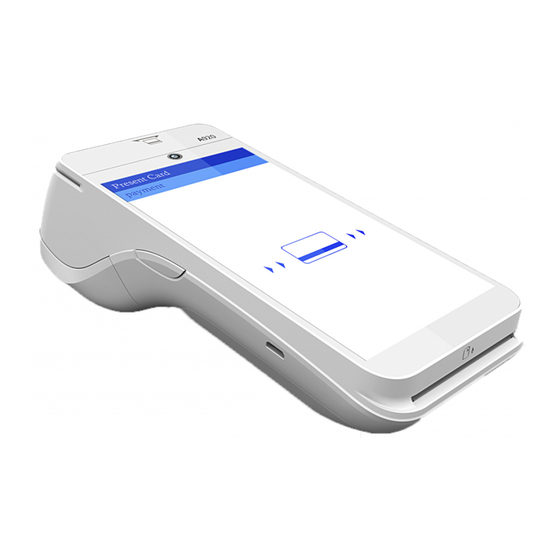
PAX A920 Features Contactless Area Contactless Area Reader Printer Hatch Front Facing Camera MAC Address LCD Screen Label 5MP Rear Camera Volume - Volume + POGO PINS USB Type-C Port Hatch EMV Reader Symbols & Icons Battery fully charged Battery charging... -
Page 4: Power On/Off
PAX A920 Power On/Off You can turn on the A920 by pressing and holding the small rectangle button on the right side Charging Instructions of the terminal for 2-4 seconds and Before starting up the A920, the then release. battery should be fully charged. - Page 5 PAX A920 GPRS Setup If you have chosen a 4G model of the A920 your SIM NOTE: The 4G model will have no more than 1GB of card will already be installed in the device when you data per month. Once the mobile data is exhausted you receive it.
-
Page 6: Accepting Payments
PAX A920 Quick Data Display • Your user ID On the Main Menu screen you will find a small data display that will • Your department ID give you some quick information • Your terminal ID about your device. •... - Page 7 PAX A920 Accepting Payments If the customer wishes to pay by Contactless payment, the device will ask if you want to print a customer copy of the receipt. Select either yes or no. The receipt will print automatically. When paying by Chip and Pin you will be asked if cashback is required.
- Page 8 PAX A920 Refunding A Payment If you need to issue a Card Not Present payment or refund, select the “Card Not Present” button in the main menu. You will be asked if you are issuing a refund or taking a payment.
-
Page 9: Testing The Connection
PAX A920 Uploading Transactions You can upload your transactions by selecting the “Submit Transactions” button from the Main Menu. The upload will then start automatically. Once complete, you will see a green tick on the screen to let you know the upload was successful. - Page 10 It will also break down cashback, gratuity and vouchers, card types and the amount taken on each card type. Printing History Reports History reports will give you a detailed look at transactions on your A920. This will include: • Whether the transactions was a sale or refund •...
-
Page 11: Reprinting Receipts
PAX A920 Printing Receipts • Navigating to the Main Menu Most receipts will automatically print at the end of a transaction. When • Selecting the Burger Menu in the top right corner taking Contactless payments you will be asked if you require a customer •... -
Page 12: Removing And Replacing The Battery
Removing & Replacing the Battery To remove and replace the battery, To install a battery, first remove the position the A920 to show the protective cover over the battery backside of the terminal. connectors. Then insert the battery... -
Page 13: Customer Service
PAX A920 Updating the Device If you need to update the device settings, navigate to the Admin Menu and select the “Download Manager” button. You can then choose to update the device. The device will then check for any available updates. If the device finds any updates to download it will automatically start the process.
Need help?
Do you have a question about the A920 and is the answer not in the manual?
Questions and answers