Pax Technology PRIORITY A80 Reference Manual
Hide thumbs
Also See for PRIORITY A80:
- Quick reference manual (7 pages) ,
- Quick reference manual (4 pages)
Table of Contents
Advertisement
Advertisement
Table of Contents

Related Manuals for Pax Technology PRIORITY A80


Summary of Contents for Pax Technology PRIORITY A80
- Page 1 A80 Reference Guide 12-15-2021 V1.3...
- Page 2 The Bluetooth® word mark and logos are registered trademarks owned by Bluetooth SIG, Inc. and any use of such marks by PAX Technology, Inc. is under license. Other trademarks and trade names are those of their respective owners.
- Page 3 A80 REFERENCE GUIDE Revision History Date Version Description 08-21-2020 V1.0 Initial release. 01-04-2021 V1.1 Updated formatting and document organization. 03-05-2021 V1.2 Updated doc name, intro, Tech Details and Specs. table, added cert. and unified with existing A80 doc. 12-15-2021 V1.3 Added microSD trademark and updated stand information.
-
Page 4: Table Of Contents
A80 REFERENCE GUIDE Table of Contents 1. Introduction ......................... 1 1.1 Purpose ............................1 1.2 Intended Audience ........................1 1.3 Acronyms and Terms ........................2 2. Technical Details and Specifications ................3 3. A80 Hardware Overview ....................5 3.1 A80 Side Views ..........................5 3.1.1 Front View ................................. - Page 5 A80 REFERENCE GUIDE 6. Frequently Asked Questions ..................55 7. PAX Customer Support ....................57 v1.3 | iv...
-
Page 6: Introduction
A80 REFERENCE GUIDE 1. Introduction The A80 is a SmartDesktop payment terminal powered by Android™ that can be used as a countertop PIN pad or an indoor portable device. Packed with the latest PCI PTS 5.x, SRED, and NFC contactless certifications, A80 delivers the highest payment security and protects transaction privacy. -
Page 7: Acronyms And Terms
Definition Bluetooth® The Bluetooth® word mark and logos are registered trademarks owned by Bluetooth SIG, Inc. and any use of such marks by PAX Technology, Inc. is under license. Other trademarks and trade names are those of their respective owners. -
Page 8: Technical Details And Specifications
A80 REFERENCE GUIDE 2. Technical Details and Specifications The technical details and specifications for the A80 are listed in the following table. A80-MBA-RD5-12AA A80-MBA-RD5-13AA Feature Description Description Operating PAXBiz powered by PAXBiz powered by System Android 6.0, Android 7.1, unified mainboard unified mainboard Application CPU: Quad- Application CPU: Quad-... - Page 9 A80 REFERENCE GUIDE A80-MBA-RD5-12AA A80-MBA-RD5-13AA Feature Description Description Certifications PCI PTS 5.x, SRED | EMV PCI PTS 5.x, SRED | EMV L1 & L2 | EMV L1 & L2 | EMV Contactless L1 |Discover Contactless L1 |Discover D-PAS | MasterCard D-PAS | MasterCard Contactless| Visa Contactless| Visa...
-
Page 10: A80 Hardware Overview
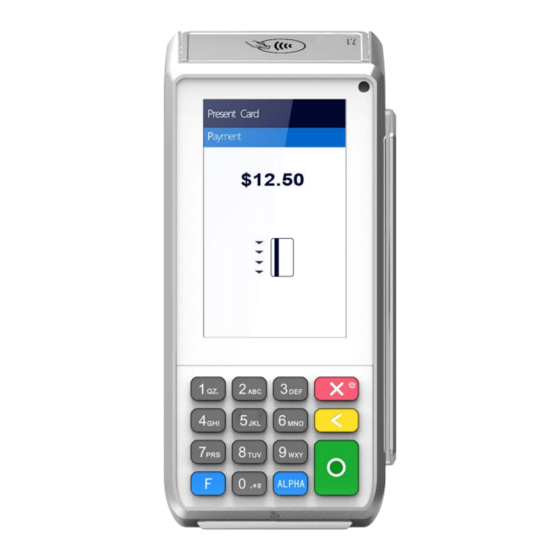
A80 REFERENCE GUIDE 3. A80 Hardware Overview The following section provides information on the A80’s hardware functionalities. 3.1 A80 Side Views The following images point out the various hardware features of the A80. 3 .1.1 F RONT Printer Latch/Cover Contactless Area Camera Magnetic Stripe Reader LCD Screen... -
Page 11: Back View
A80 REFERENCE GUIDE 3 .1.2 B Printer Latch/Cover Cable Guides USB OTG USB HOST Power Port Phone Port PIN Pad Port Line Port RS232 SAM Slots SD Card Slot 3 .1.3 L Printer Cover v1.3 | 6... -
Page 12: Right Side View
A80 REFERENCE GUIDE 3 .1.4 R IGHT Printer Cover 3.2 AC Power Connection The A80 can be powered by (5V, 1A) power cable into the power port on the back of the device. Please Note: • Connecting the power source before all the other cables are connected first may result in damage to the terminal or connected devices. -
Page 13: Terminal Identification
A80 REFERENCE GUIDE 3.3 Terminal Identification This section provides information on terminal identification numbers and where to locate them. For an in- depth breakdown of terminal serial numbers and part numbers, please see “Appendix A: Part Number and Serial Number Keys” on page 3 .3.1 S ERIAL UMBER... -
Page 14: A80 Warranty
A80 REFERENCE GUIDE 3.4 A80 Warranty All PAX terminals include a standard two-year warranty from date of purchase. For a list of associated device RMA fees and other FAQs, please see the PAX RMA Portal. WARNING The warranty period for terminals and associated equipment is 2-years from date PAX sold the terminal to the distributor, not the current terminal owner’s date of purchase from the distributor. -
Page 15: Camera/Scanner
A80 REFERENCE GUIDE 3.5 Camera/Scanner The A80 comes with a 0.3MP camera capable of scanning bar codes and QR codes. 3 .5.1 C AMERA OCATION Camera 3.6 Printer The A80 includes a high-speed thermal printer with a print speed of 90mm/s and a paper width of 58mm/ paper diameter of 50mm. -
Page 16: Printer Roll Installation
A80 REFERENCE GUIDE 3 .6.2 P RINTER NSTALLATION 1. Pull the paper latch toward the front of the device to open the hatch. Printer Latch/Cover 2. Install paper roll; ensure that the paper is coming out from the top of the roll before closing the hatch. -
Page 17: Sim, Sam, And/Or Sd Card
A80 REFERENCE GUIDE 3.7 SIM, SAM, and/or SD Card The A80 supports the following card types and sizes: Terminal and Option SD Size SAM Size SIM Size A80, 3 x SAM slots Micro SD (1) Mini SIM Sized (3) 3 .7.1 SIM/SAM, SD C IZING While PAX devices support a range of SIM card sizes, the maximum SAM card size supported in all devices... -
Page 18: Sam, And Sd Card Slot Location
A80 REFERENCE GUIDE 3 .7.2 SAM, SD C OCATION The SAM and Micro SD card slots are located at the back of the device. 3 .7.3 SAM, SD C NSTALLATION 1. Slide the back cover down to remove it from the terminal. Android 7.1 2. -
Page 19: Card Readers
A80 REFERENCE GUIDE 3.8 Card Readers This section describes the following card readers available on the A80: • Magnetic Stripe Reader (MSR) • EMV Card Reader • NFC (Near Field Communication)/Contactless Card Reader 3 .8.1 M AGNETIC TRIPE EADER The Magnetic Stripe Reader (MSR) is located on the right side of the device. The reader includes triple track reading and bidirectional reading. -
Page 20: Emv Card Reader
A80 REFERENCE GUIDE 3 .8.2 EMV C EADER The A80 includes an EMV card reader at the bottom of the device. To use the EMV card reader, insert the card fully into the reader with the metallic contacts facing up and towards the device. -
Page 21: Nfc/Contactless Card Reader
A80 REFERENCE GUIDE 3 .8.3 NFC/C ONTACTLESS EADER The A80 has a contactless card reader with an RF antenna located at the top of the device. The read area is indicated by the contactless icon. To use the contactless card reader, place the card roughly parallel to the contactless area. For best results, place as close to the contactless area as possible with the card centered. -
Page 22: A80 Accessories
A80 REFERENCE GUIDE 3.9 A80 Accessories The following section provides information on a few of the major A80 accessories. For ordering of accessories, terminals or replacement parts, please see the A80 Ordering Guide located in Confluence. 3 .9.1 C ABLES This section describes A80 compatible cables, their part numbers for identification purposes only, and their use cases. -
Page 23: A80 Ps200 Stand
A80 REFERENCE GUIDE Cable Part Number Use Case Image Type-A USB Male 200204030000263 Used for programming to Micro C Type with the CU100 in USB Male Cable, addition to standard 1 Meter power cable 3 .9.2 A80 PS200 S TAND The PS200 Terminal Stand mounts and secures the POS terminal to the counter. -
Page 24: Basic Operating Instructions
A80 REFERENCE GUIDE 4. Basic Operating Instructions This section provides information and step-by-step instructions for the A80’s basic operations. 4.1 Intended Use Case The A80 is intended for indoor, attended use only. IP/IK Rating Operating Environment Storage Environment IP/IK Ratings are Temperature: Temperature: done for terminals... -
Page 25: Adjusting The Display Brightness
A80 REFERENCE GUIDE 4.4 Adjusting the Display Brightness 1. Select [Settings]. 2. Scroll down and select [Display]. v1.3 | 20... - Page 26 A80 REFERENCE GUIDE 3. Select [Brightness level]. 4. Slide the toggle either right or left to brighten or dim the display. v1.3 | 21...
-
Page 27: Turning Key Beep On/Off
A80 REFERENCE GUIDE 4.5 Turning Key Beep On/Off 1. Select [Settings]. 2. Select [Language & input]. v1.3 | 22... - Page 28 A80 REFERENCE GUIDE 3. Select [Android Keyboard (AOSP)]. 4. Select [Preferences]. v1.3 | 23...
-
Page 29: Adjusting The Volume
A80 REFERENCE GUIDE 5. Slide the toggle to turn on/off [Sound on keypress]. 4.6 Adjusting the Volume 1. Select [Settings]. v1.3 | 24... - Page 30 A80 REFERENCE GUIDE 2. Scroll down and select [Sound & notification]. 3. Slide the [Media volume] toggle either right or left to increase or decrease the terminal’s volume. v1.3 | 25...
-
Page 31: Setting The Screen Sleep Time
A80 REFERENCE GUIDE 4.7 Setting the Screen Sleep Time 1. Select [Settings]. 2. Select [Display]. v1.3 | 26... - Page 32 A80 REFERENCE GUIDE 3. Select [Sleep]. 4. Select desired sleep time. v1.3 | 27...
-
Page 33: Taking A Photo
A80 REFERENCE GUIDE 4.8 Taking a Photo 1. Select [Camera]. 2. Tap the [Camera] icon to take a photo. v1.3 | 28... -
Page 34: Cleaning The Device
A80 REFERENCE GUIDE 4.9 Cleaning the Device WARNING Do not use industrial strength or abrasive cleaner as it may damage or scratch the device. • Do not immerse the device in water or liquid. • Do not spray water or cleaner into EMV Card Reader or ports. •... -
Page 35: Communications Setup
A80 REFERENCE GUIDE 5. Communications Setup The A80 supports Ethernet and Wi-Fi for network and Internet access. Wi-Fi is a wireless computer network that links two or more devices using wireless communication to a local area network (LAN) within a limited area, such as a store or office building. Available access types of Wi-Fi on the A80 are DHCP, Static IP, Manual Static IP, and Manual Proxy. - Page 36 A80 REFERENCE GUIDE 2. Select [Wi-Fi]. 3. Slide the [Wi-Fi] toggle right to enable Wi-Fi. v1.3 | 31...
- Page 37 A80 REFERENCE GUIDE 4. Select desired network. 5. Enter network password. v1.3 | 32...
-
Page 38: Static Ip
A80 REFERENCE GUIDE 6. Select [CONNECT]. 5.2 Static IP The A80 supports Static IP setup for network and Internet access. Static IP addresses allow network devices to keep the same IP address all the time instead of automatically assigning IP addresses such as in a DHCP setup. - Page 39 A80 REFERENCE GUIDE 2. Select [Wi-Fi]. 3. Slide the [Wi-Fi] toggle right to enable Wi-Fi. v1.3 | 34...
- Page 40 A80 REFERENCE GUIDE 4. Select the desired Wi-Fi network. 5. Enter network password. v1.3 | 35...
- Page 41 A80 REFERENCE GUIDE 6. Select [Advanced options]. 7. Scroll to select [IP Settings]. v1.3 | 36...
- Page 42 A80 REFERENCE GUIDE 8. Select [Static]. 9. Enter the [IP address], [Gateway], [Network prefix length], [DNS 1], and [DNS 2]. v1.3 | 37...
-
Page 43: Manual Static Ip
A80 REFERENCE GUIDE 10. Select [CONNECT]. 5.3 Manual Static IP If the broadcast SSID is disabled on an access point, the terminal will not display the SSID under available Wi-Fi network listings. In this case, it is necessary to manually configure the terminal for Static IP connection types. - Page 44 A80 REFERENCE GUIDE 2. Select [Wi-Fi]. 3. Slide the [Wi-Fi] toggle right to enable Wi-Fi. v1.3 | 39...
- Page 45 A80 REFERENCE GUIDE 4. Select the horizontal dots in the top-right hand corner. 5. Select [Add network]. v1.3 | 40...
- Page 46 A80 REFERENCE GUIDE 6. Enter the case-sensitive network [SSID]. 7. Select [Security]. v1.3 | 41...
- Page 47 A80 REFERENCE GUIDE 8. Select the security type from the pull-down menu. Selections include WPA/WPA2 PSK, 802.1 x EAP, FT PSK, FT EAP, WAPI PSK, WAPI CERT. 9. Select [Advanced options]. v1.3 | 42...
- Page 48 A80 REFERENCE GUIDE 10. Select [IP settings]. 11. Select [Static]. v1.3 | 43...
- Page 49 A80 REFERENCE GUIDE 12. Enter the [IP address], [Gateway], [Network prefix length], [DNS 1], and [DNS 2]. 13. Select [SAVE]. v1.3 | 44...
-
Page 50: Proxy
A80 REFERENCE GUIDE 5.4 Proxy The A80 supports a proxy setup. In this case, another computer, or proxy server, acts as a hub through which the Internet requests for the A80 are processed. By connecting through the server, the device sends its requests to the server which, in turn, processes the request and then returns the response to the device. - Page 51 A80 REFERENCE GUIDE 3. Slide the Wi-Fi toggle in the top right-hand corner to enable Wi-Fi. 4. Select the horizontal dots in the top right corner. v1.3 | 46...
- Page 52 A80 REFERENCE GUIDE 5. Select [Add network]. 6. Enter the case-sensitive network [SSID]. v1.3 | 47...
- Page 53 A80 REFERENCE GUIDE 7. Select [Security]. 8. Select the security type from the pull-down menu. Selections include WPA/WPA2 PSK, 802.1 x EAP, FT PSK, FT EAP, WAPI PSK, WAPI CERT. v1.3 | 48...
- Page 54 A80 REFERENCE GUIDE 9. Select [Advanced options]. 10. Select [Proxy]. v1.3 | 49...
- Page 55 A80 REFERENCE GUIDE 11. Select [Manual]. 12. Enter [Proxy hostname], [Proxy port], and [Bypass proxy]. v1.3 | 50...
- Page 56 A80 REFERENCE GUIDE 13. Scroll to select [IP settings]. 14. Select [Static]. v1.3 | 51...
- Page 57 A80 REFERENCE GUIDE 15. Enter the [IP address], [Gateway], [Network prefix length], [DNS 1], and [DNS 2]. 16. Select [SAVE]. v1.3 | 52...
-
Page 58: Ethernet
A80 REFERENCE GUIDE 5.5 Ethernet 1. Plug the Ethernet cable into the LAN port on the back of the device. 2. Select [Settings]. v1.3 | 53... - Page 59 A80 REFERENCE GUIDE 3. Select [Ethernet]. 4. Slide the toggle to enable Ethernet. v1.3 | 54...
- Page 60 A80 REFERENCE GUIDE 6. Frequently Asked Questions This section provides answers to frequently asked questions. 1. What is the PAXSTORE? The PAXSTORE is an online marketplace for terminal applications and provides terminal management solutions. The PAXSTORE connects merchants and their PAX terminals with the opportunity to purchase and download applications.
- Page 61 A80 REFERENCE GUIDE 8. Can the A80 be integrated with a POS or ECR device? The A80 can be integrated with a POS or ECR device using the PAX POSDK SDK. 9. What size is the thermal paper roll? The thermal paper roll is 2-1/4" wide x 1-1/2" diameter and approx. 50' Length. 10.
Need help?
Do you have a question about the PRIORITY A80 and is the answer not in the manual?
Questions and answers