Confer Plastics ROLLGUARD 7200 Assembly, Installation And Use Manual
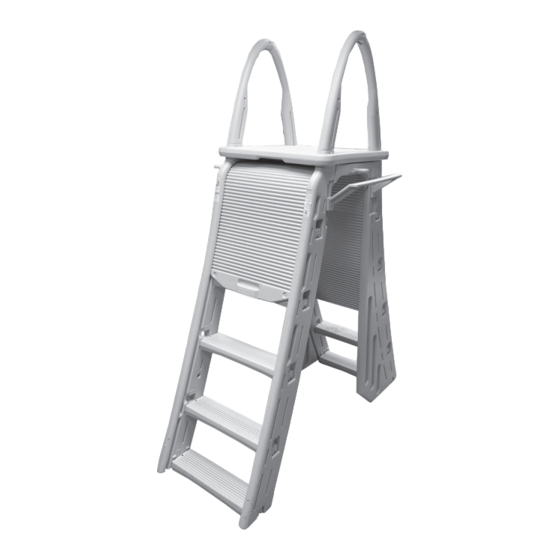
A-frame ladder adjusts to fit pools 48” to 54”
Hide thumbs
Also See for ROLLGUARD 7200:
- Assembly, installation and use manual (9 pages) ,
- Assembly and installation manual (9 pages) ,
- Assembly and installation manual (8 pages)
Advertisement
Available languages
Available languages
Quick Links
Dealer/Installer: Give manual to homeowner.
Installer: Read "Safe Installation" on page # 2 and all instructions before beginning. For proper assembly
and installation, instructions must be followed completely.
Homeowner: Read "Safe Use" on back cover before using. Save these instructions.
Installation must comply with local codes and may require permits.
"ROLLGUARD
Ladder must be attached to pool frame -
not for use on soft-sided/inflatable pools.
ASSEMBLY, INSTALLATION AND USE MANUAL
Assembly video available online: www.conferplastics.com
Scan to
see our
Installation
Videos
To reduce the risk of drowning, entrapment, falls, paralysis, electrocution,
or other serious injury or death:
MODEL #7200
" A-FRAME LADDER
®
Adjusts to fit pools 48" to 54"
WEIGHT LIMIT 300 LBS.
Proudly Made in U.S.A. by
US Patent Numbers
8,191,682
8,191,681
8,202,018
Advertisement

Related Manuals for Confer Plastics ROLLGUARD 7200


Summary of Contents for Confer Plastics ROLLGUARD 7200
- Page 1 To reduce the risk of drowning, entrapment, falls, paralysis, electrocution, or other serious injury or death: Dealer/Installer: Give manual to homeowner. Installer: Read "Safe Installation" on page # 2 and all instructions before beginning. For proper assembly and installation, instructions must be followed completely. Homeowner: Read "Safe Use"...
-
Page 2: Conversion Kit
Model #7200 “ROLLGUARD ” A-FRAME LADDER ® Ladder must be attached to pool frame - DO NOT USE with soft-sided/inflatable pools. If missing parts call - Toll free U.S./Canada - 800-635-3213 or www.conferplastics.com Parts List 4 - Handrail 1 - ROLLGUARD ®... - Page 3 Helpful Hints: 1). Assemble the ladder by laying it down on a smooth flat surface. 2). All ten treads are the same, but must be installed tab marked minus [-] into tread lock opening marked minus [-] and tab marked plus [+] into tread lock opening marked plus [+] on the rails.
- Page 4 STEP 2: Tools needed: rubber mallet Parts needed: 1- Outside left rail (marked “OL” at the top) 1- Outside right rail (marked “OR” at the top) OUTSIDE LADDER 5- Ladder treads Track Track #1: Lay “OL” rail on flat #2: Correct, tap down Incorrect, do not until seated, note track is block track.
- Page 5 Tools needed: rubber mallet, cordless drill w/Phillips driver STEP 3: Parts needed: 1- Deck 4- Handrails 1- Left bridge with lock assembly HANDRAILS/DECK 1- Right bridge 2- #10 x 1-1/4” self tapping screws 2- 1/4 - 20 x 1” machine screws 2- 1/4 - 20 Hex Nuts #1-3: Push handrails up through bottom of deck leaving about 3”...
- Page 6 STEP 4: Tools needed: rubber mallet Parts needed: 1- ROLLGUARD ® 1- Ladder tread INSTALLING ROLLGUARD ® #1: With the ladder laying on #2-6: Slide ROLLGUARD around to other side of ladder. ® its side, slide the ROLLGUARD ® into track, grab handle first. #7-8: Install bottom tread.
- Page 7 Tools needed: garden hose, cordless drill w/Phillips driver 5/16” drill bit, STEP 5: Phillips screwdriver, pliers Parts needed: 2 - Angled Stabilizer Rails 2 - 1/4" Hex Nuts 8 - #10 x 1- 1/4" Screws 2 - 1/4-20 x 2- 1/4" Pan Head PLACING LADDER IN POOL 2 - 1/4"...
-
Page 8: Maintenance: Winterizing
To reinstall, see installation instructions Step 5: Placing ladder in pool. CONFER PLASTICS INC. FIVE YEAR WARRANTY Confer Plastics Inc. warrants their swimming pool ladders and spa products to be free from defects in workmanship for five years from date of purchase. - Page 9 Lire au dos du manuel. Propriétaire : « Utilisation sécuritaire » ATTENTION Pour réduire le risque de noyade, de chutes, de paralysie, d’électrocution, d’autres blessures graves ou de mort : Détaillant/installateur : Remettre le manuel au propriétaire. Installateur : Avant de débuter, lire « Installation sécuritaire » à la page 2 et toutes les instructions. Pour assurer un assemblage et une installation conformes, suivre toutes les instructions à...
- Page 10 Échelle Rollguard à bâti en A, Modèle Nº 7200 ® L’échelle doit être fixée au cadre de la piscine. NE JAMAIS utiliser sur une piscine gonflable ou à parois souples. Main courante En cas de pièces manquantes – Sans frais É.-U./Canada : 800-635-3213 ou www.conferplastics.com Plateforme Liste des pièces...
- Page 11 Trucs et astuces utiles 1) Assembler l’échelle sur une surface plate et nivelée. 2) Les dix échelons de l’échelle sont identiques. Pour les poser, enfoncer le tenon marqué d’un moins [-] dans la mortaise marquée d’un moins [-] d’un montant, puis le tenon marqué d’un plus [+] dans la mortaise marquée d’un plus [+] de l’autre montant.
- Page 12 ÉTAPE 2 Outils nécessaires : Maillet en caoutchouc Pièces nécessaires : 1 - montant extérieur gauche (portant la marque OL sur le dessus) ÉCHELLE EXTÉRIEURE 1 - montant intérieur droit (portant la marque OR sur le dessus) 5 - échelons No 1 : Poser le montant Erreur de montage.
- Page 13 ÉTAPE 3 Outils nécessaires : Maillet en caoutchouc, perceuse à batterie avec embout Phillips Pièces nécessaires : 1 - plateforme MAINS COURANTES, 4 - mains courantes PLATEFORME 1 - pont gauche avec accessoire à verrou 1 - pont droit 2 - vis auto-taraudeuses n° 10 de 1 ¼ po 2 - vis à...
- Page 14 ÉTAPE 4 Outils nécessaires : Maillet en caoutchouc Pièces nécessaires : 1 - écran Rollguard ® 1 - échelon INSTALLATION DE L’ÉCRAN ROLLGUARD ® No 1 : Poser l’échelle sur le Nos 2 à 6 : Faire coulisser Rollguard® tout autour jusqu’à l’autre flanc.
- Page 15 ÉTAPE 5 Outils nécessaires: Tuyau d’arrosage, perceuse à batterie avec embout Phillips, mèche de 5/16 po, tournevis Phillips, pince. Pièces nécessaires: PLACER L’ÉCHELLE 2 - supports stabilisateurs coudés 2 - écrous hexagonaux ¼ po DANS LA PISCINE 8 - vis n° 10 de 1 ¼ po 2 - vis ¼...
- Page 16 5 : Placer l’échelle dans la piscine. GARANTIE DE CINQ ANS DE CONFER PLASTICS INC. Confer Plastics Inc. garantit que les échelles de piscine et les marchepieds sont exempts de défaut de fabrication pendant une période de cinq (5) ans à compter de la date d’achat.
Need help?
Do you have a question about the ROLLGUARD 7200 and is the answer not in the manual?
Questions and answers