Table of Contents
Advertisement
Notus
User Manual
Notus
Date: June 2021
Doc Version: 1.2
English
Thank you for choosing our product. Please read the instructions carefully before
Thank you for choosing our product. Please read the instructions carefully
operation. Follow these instructions to ensure that the product is functioning properly.
before operation. Follow these instructions to ensure that the product is
The images shown in this manual are for illustrative purposes only.
functioning properly. The images shown in this manual are for illustrative
purposes only.
P a g e
| 1
For further details, please visit our Company's website www.zkteco.com.
For further details, please visit our Company's website
www.zkteco.com.
Copyright©2020 ZKTECO CO., LTD. All rights reserved.
User Manual
Advertisement
Table of Contents

Subscribe to Our Youtube Channel
Related Manuals for ZKTeco Notus


Summary of Contents for ZKTeco Notus
- Page 1 The images shown in this manual are for illustrative purposes only. functioning properly. The images shown in this manual are for illustrative purposes only. For further details, please visit our Company’s website www.zkteco.com. For further details, please visit our Company’s website www.zkteco.com.
- Page 2 Copyright © 2021 ZKTECO CO., LTD. All rights reserved. Without the prior written consent of ZKTeco, no portion of this manual can be copied or forwarded in any way or form. All parts of this manual belong to ZKTeco and its subsidiaries (hereinafter the "Company" or "ZKTeco").
- Page 3 Notus User Manual relating to the use of the information contained in or referenced by this manual, even if ZKTeco has been advised of the possibility of such damages. This manual and the information contained therein may include technical, other inaccuracies or typographical errors.
- Page 4 Its products are protected by intellectual property rights. About the Manual This manual introduces the operations of Notus Product, a smart video intercom door station with fingerprint and dual-frequency RFID card readers. All figures displayed are for illustration purposes only. Figures in this manual may not be exactly consistent with the actual products.
- Page 5 The general information which helps in performing the operations faster. The information which is significant. Care taken to avoid danger or mistakes. The statement or event that warns of something or that serves as a cautionary example. P a g e Copyright©2021 ZKTECO CO., LTD. All rights reserved.
-
Page 6: Table Of Contents
VIDEO DOOR PHONE CONNECTION ....................... 18 VIDEO DOOR PHONE SETTINGS ......................19 APP SETTINGS ............................20 ZKBIOACCESS CONFIGURATION ...................... 21 WEBSERVER ............................24 LOGIN ................................24 DEVICE ................................ 25 P a g e Copyright©2021 ZKTECO CO., LTD. All rights reserved. - Page 7 DATE AND TIME ................................ 30 5.3.6 OPERATION LOGS ..............................31 DEVICE MANAGEMENT..........................31 5.4.1 UPDATE AND RESET ..............................31 5.4.2 LOAD CERTIFICATE ..............................32 PRIVACY POLICY ............................33 ECO-FRIENDLY OPERATION ........................35 P a g e Copyright©2021 ZKTECO CO., LTD. All rights reserved.
-
Page 8: Overview
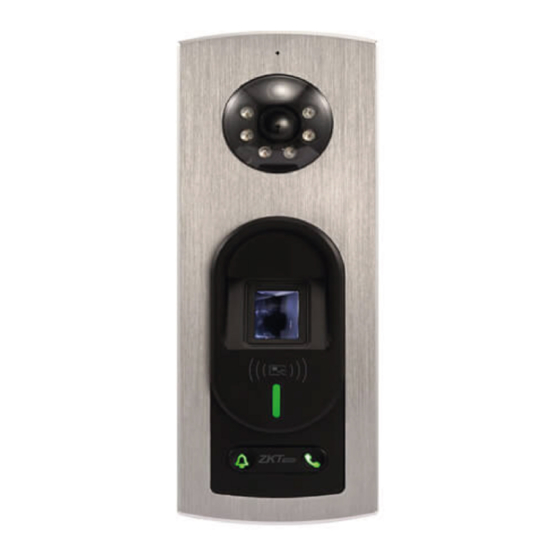
User Manual Overview Notus is a Fingerprint access control device with an HD camera (2 MP/1080p) to support video intercom function. The ZSmart app supports two-way audio and one-way video communication. The Notus will also support remote unlock with password, capturing images and video recordings. -
Page 9: System Specifications
Supported Maximum Transaction 200,000 Records Maximum no. of Users (1: N) 50,000 Capacity Maximum no. of Cards 50,000 Maximum no. of Fingerprints 10,000 Power 12V, 3A Product PIN Diagram P a g e Copyright©2021 ZKTECO CO., LTD. All rights reserved. -
Page 10: Installation Set-Up
Connect the Door Sensor to the SEN and GND terminals. • Connect the Alarm to the AL + and AL- terminals. • Connect the Auxiliary Device to the GND and AUX terminals. P a g e Copyright©2021 ZKTECO CO., LTD. All rights reserved. -
Page 11: Lock Relay Connection
The Normally Opened Lock (normally opened at power on) is connected with 'NO1' and 'COM' terminals, and the Normally Closed Lock (normally closed at power on) is connected with 'NC1' and 'COM' terminals. P a g e | 10 Copyright©2021 ZKTECO CO., LTD. All rights reserved. -
Page 12: Weigand Reader Connection
Ethernet Connection Note: In LAN, IP addresses of the Server (PC) and the device must be in the same network segment when connecting to the ZKBioAccess software. P a g e | 11 Copyright©2021 ZKTECO CO., LTD. All rights reserved. -
Page 13: Rs485 Connection
(OFF), it means 0 (OFF). For example, to set a device number as 15=1+2+4+8, which corresponds to the binary code 1111, move the numbers 1, 2, 3, and 4 to ON position. 485 Address Switch Settings 485 Address Switch Settings P a g e | 12 Copyright©2021 ZKTECO CO., LTD. All rights reserved. - Page 14 5 is used to switch modes, port 6 is to set the state of terminal resistor. Switch Modes Port Switch Settings All-in-one & Wiegand reader RS485 Reader P a g e | 13 Copyright©2021 ZKTECO CO., LTD. All rights reserved.
-
Page 15: Restore To Factory Settings
Press your finger firmly onto the fingerprint reader. Ensure that the center of your finger is aligned with the fingerprint reader. Too low Too close to the edge Vertical P a g e | 14 Copyright©2021 ZKTECO CO., LTD. All rights reserved. -
Page 16: Verification Modes
The device's indicator light will turn green after successful verification, and red if it is not verified successfully. P a g e | 15 Copyright©2021 ZKTECO CO., LTD. All rights reserved. -
Page 17: Connect To Zsmart App
[Device]> [Video Intercom setting] on the web application of the device. The process is as follows: The process is as follows: Click Add Device in the Home Page. Click the icon in the upper right corner to scan and add devices. P a g e | 16 Copyright©2021 ZKTECO CO., LTD. All rights reserved. - Page 18 Notus User Manual After the addition is successful, the device is displayed on the Home page. P a g e | 17 Copyright©2021 ZKTECO CO., LTD. All rights reserved.
-
Page 19: Video Door Phone Connection
Visitors click the Call key on the main interface of the device to call and the phone will ring. The user can select accept or decline the call. After the user accepting, it will enter the visual talk interface. P a g e | 18 Copyright©2021 ZKTECO CO., LTD. All rights reserved. -
Page 20: Video Door Phone Settings
Click to make a record video. Photo album View and delete screenshots and recorded videos. Click to open the door remotely. The unlocking record is saved in Me > Unlock Message Center. P a g e | 19 Copyright©2021 ZKTECO CO., LTD. All rights reserved. -
Page 21: App Settings
The default is One-way Talk. Help and feedback Fill in and submit the feedback. Firmware Displays the firmware version of the device and the date of the last update. Information P a g e | 20 Copyright©2021 ZKTECO CO., LTD. All rights reserved. -
Page 22: Zkbioaccess Configuration
After the addition is successful, the device will be displayed in the device list. Add Persons to the Software and Online Fingerprint Registration In the device list, select the device and click Set up > Set as Registration Device. P a g e | 21 Copyright©2021 ZKTECO CO., LTD. All rights reserved. - Page 23 Click Personnel > Person > New. Enter the required details of the user. Click to enter the online fingerprint registration interface. Click Driver Download to install the driver first. P a g e | 22 Copyright©2021 ZKTECO CO., LTD. All rights reserved.
- Page 24 Duress fingerprint: In any case, a duress alarm is generated when a fingerprint matches a duress fingerprint. Click OK to save the user. Note: For other specific operations, please refer the ZKBioAccess User Manual. P a g e | 23 Copyright©2021 ZKTECO CO., LTD. All rights reserved.
-
Page 25: Webserver
Password: admin@123 (default) After successful login, it will jump to [Change Password] page. Enter your Previous password, New password and Confirm password. Then click OK, as shown below: P a g e | 24 Copyright©2021 ZKTECO CO., LTD. All rights reserved. -
Page 26: Device
After the modification is successful, it will return to the login interface. Device 5.2.1 Device Status Click [Device Status] to view the Device name, Serial number, MAC address, etc. of the current device. P a g e | 25 Copyright©2021 ZKTECO CO., LTD. All rights reserved. -
Page 27: Change Password
ZSmart App. If you have installed the APP, you can scan the QR code to bind the device. The process has been clearly explained in "3 Connect to ZSmart App". P a g e | 26 Copyright©2021 ZKTECO CO., LTD. All rights reserved. -
Page 28: Settings
If DHCP is enabled, IP addresses cannot be set manually. IP Address: The default value is192.168.1.201, it can be modified according to the available network parameters. P a g e | 27 Copyright©2021 ZKTECO CO., LTD. All rights reserved. -
Page 29: Wireless Network Settings
Enable Wireless DHCP: Dynamic Host Configuration Protocol (DHCP) dynamically allocates IP addresses to network clients. If the DHCP is enabled, then the IP cannot be set manually. P a g e | 28 Copyright©2021 ZKTECO CO., LTD. All rights reserved. -
Page 30: Cloud Settings
Proxy Settings: The IP address and the port number of the proxy server is set manually when the proxy is enabled. 5.3.4 System Settings Click [System Settings] to set the device volume. Enter the volume value and click OK. P a g e | 29 Copyright©2021 ZKTECO CO., LTD. All rights reserved. -
Page 31: Date And Time
Click [Date and Time] to set the device date and time. The fields description is as follows: Auto: Automatically synchronizes the PC time. Manual: Need to manually input the date and time. P a g e | 30 Copyright©2021 ZKTECO CO., LTD. All rights reserved. -
Page 32: Operation Logs
Download: Select the starting and ending time, and then click download, the operation log of the selected time will be automatically downloaded. Device Management 5.4.1 Update and Reset Click [Update and Reset] to set the device Update, Factory Reset and Reboot settings. P a g e | 31 Copyright©2021 ZKTECO CO., LTD. All rights reserved. -
Page 33: Load Certificate
Click Please select a file, upload the certificate file and private key file, and click OK to complete the file upload operation. Note: Please load the certificate file first and then load the private key file. P a g e | 32 Copyright©2021 ZKTECO CO., LTD. All rights reserved. -
Page 34: Privacy Policy
Privacy Policy Notice: To help you better use the products and services of ZKTeco (hereinafter referred as “we”, “our”, or “us”) a smart service provider, we consistently collect your personal information. Since we understand the importance of your personal information, we took your privacy sincerely and we have formulated this privacy policy to protect your personal information. - Page 35 Welcome to visit our official website at any time to learn our latest privacy policy. P a g e | 34 Copyright©2021 ZKTECO CO., LTD. All rights reserved.
-
Page 36: Eco-Friendly Operation
The components which contain toxins or harmful elements are included due to the current economic or technical limitations which prevent their replacement with non-toxic materials or elements. P a g e | 35 Copyright©2021 ZKTECO CO., LTD. All rights reserved. - Page 37 Phone : +86 769 - 82109991 Phone : +86 769 - 82109991 : +86 755 - 89602394 : +86 755 - 89602394 www.zkteco.com www.zkteco.com Copyright © 2021 ZKTECO CO., LTD. All Rights Reserved. Copyright © 2020 ZKTECO CO., LTD. All Rights Reserved.
Need help?
Do you have a question about the Notus and is the answer not in the manual?
Questions and answers