Table of Contents
Advertisement
Quick Links
Advertisement
Table of Contents

Subscribe to Our Youtube Channel
Related Manuals for Munters WS55


Summary of Contents for Munters WS55
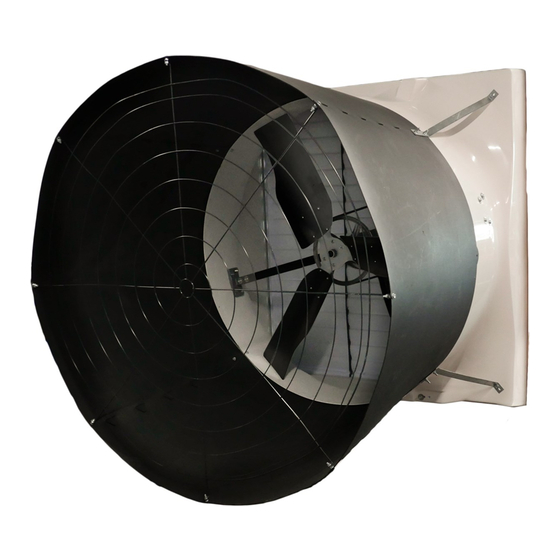
- Page 1 WS55 Exhaust Fan Fiberglass w/ Instruction Manual Plastic Cone 1-Pack Quick Kit WS55 Exhaust Fan Fiberglass w/ Plastic Cone - 1-Pack Quick Kit Models: WS55xKxCP WS55xKxGP WS55xPxCP-PE • • • WS55xPxCT-PE © Munters Corporation, November 2019 QM1232r2...
-
Page 2: Warranty
With the proper installation and maintenance it will provide many years of service. Please Note: To achieve maximum performance and insure long life from your Munters product it is essential that it be installed and maintained properly. Please read all instructions carefully before beginning installation. Warranty: For Warranty claims information see the “Warranty Claims and Return Policy”... - Page 3 Tools for Installation 2. Installation Instructions Wall Framing Fan Assembly Motor Mounting Cone Installation 3. Electrical Wiring Recommended Wire Routing Operation Maintenance Winterizing Winterizing Winter Weather Protection Troubleshooting 8. Exploded View and Parts List 28-29 © Munters Corporation, November 2019 QM1232r2...
-
Page 4: Unpacking The Equipment
1 – Belt Tensioner Bracket, Powder Coated 1 – V-Belt, A-Section 1 – Motor Sheave 1 – 3” Idler Pulley, A-Section C.I., Blue 1 – Rotary Tensioner Arm, AL 1 – Hardware Package (HP1440) 1 – Hardware Package (HP1442) © Munters Corporation, November 2019 QM1232r2... - Page 5 ” x 1¼” O.D. Flat Washer, SS HP1210 HP1210 – Hardware Package for 1 – WS55xKxGP Guard Attachment Qty. Cat. No. Description KS0650 ⁄ ”-20 x ⁷⁄₈” Truss Head Bolt, SS KN1717 ⁄ ”-20 Hex Flange, Nylock Nut, SS © Munters Corporation, November 2019 QM1232r2...
-
Page 6: Fan Dimensions
1.3 Tools Required For Installation 10mm [ ⁄ ”] Socket 13mm [½”] Socket 17mm [ ⁄ ”] Socket or Wrench 27mm [1- ⁄ ”] Wrench ⁄ ” Socket Phillips Screwdriver, #3 Size ⁄ ” Hex Wrench © Munters Corporation, November 2019 QM1232r2... -
Page 7: Installation Instructions
4 x 4 or 4 x 6 Posts 4 x 4 or 4 x 6 Posts 2 x 4 Framing (See Chart A) Figure 1B 4 x 4 Post Construction - Elevation View 2 x 8 Banner boards © Munters Corporation, November 2019 QM1232r2... -
Page 8: Fan Assembly
Remove the Cone Pieces, Guard, BK1170/BK1172 Box and Motor from the front of the crate. See Figure 2A. Motor Cone Pieces and Guard BK1170/BK1172 Figure 2A Step 2B See Figure 2B. Remove the Shutter from the back of the crate. Shutter Figure 2B © Munters Corporation, November 2019 QM1232r2... - Page 9 Attach the Motor Plate and the Belt Tensioner Bracket to the Tube Strut using (3) Long Bolts [C], (2) Washers [B] and (3) Nuts [E]. See Figure 4. Motor Plate Long Bolt [C] Washer [B] Nut [E] Belt Tensioner Bracket Figure 4 © Munters Corporation, November 2019 QM1232r2...
-
Page 10: Motor Mounting
Motor shaft with the hub facing towards the motor. ONLY tighten the set screw enough to hold the Sheave in place at this time. See Figure 6. Motor Sheave Motor Key Motor Figure 6 © Munters Corporation, November 2019 QM1232r2... - Page 11 Brace to Strut Brace using (1) Short Bolt [D] and Nut [E]. See Figure 8. Short Bolt [D] Short Bolt [D] Strut Brace Nut [E] Motor Bracket Motor Bracket Brace Nut [E] Brace Figure 8 © Munters Corporation, November 2019 QM1232r2...
- Page 12 Slide V-belt over Propeller and install by wrapping it around 2 smaller pulleys and starting it over larger Sheave. Continue rolling it onto the larger Sheave until it fits into groove. See Figure 10A. Figure 10A © Munters Corporation, November 2019 QM1232r2...
- Page 13 Figure 10B Note: If the fan package came with a Discharge Cone then proceed to Step 11 for cone installation. If the fan package came with an Outlet Guard then proceed to Step 15. © Munters Corporation, November 2019 QM1232r2...
-
Page 14: Cone Installation
(1) Short Bolt [D] and Nut [E] with the bolt head on the side with the tabs. See Figure 12A. Nut [L]/[E] Short Bolt [K]/[D] Outer Hole Short Bolt [K]/[D] Inner holes Nut [L]/[E] Cone Support Bracket Figure 12A © Munters Corporation, November 2019 QM1232r2... - Page 15 (1) Cone Support Bracket to the inner hole using (1) Short Bolt [D] and Nut [E] with bolt head on inside of cone. See Figure 12B. Short Bolt [K]/[D] Cone Support Bracket Nut [L]/[E] Short Bolt [K]/[D] Nut [L]/[E] Figure 12B © Munters Corporation, November 2019 QM1232r2...
- Page 16 Flat Washer [M] and Nut [L]. For WS55xP Fan fasten end of Cone Support Bracket with slot to fan housing using Short Bolt [D], Flat Washer [B] and Nut [E]. Repeat for each corner. See Figure 13B. Nut [L]/[E] Flat Washer [M]/[B] Short Bolt [K]/[D] Figure 13B © Munters Corporation, November 2019 QM1232r2...
- Page 17 Install eyelets over bolts already installed in cone and fasten with Nut [E]. Secure remaining eyelets using Short Bolt [D] and Nut [E]. See Figure 14. Previously installed - Bolt and Nut Nut [L]/[E] Short Bolt [K]/[D] Nut [L]/[E] Figure 14 © Munters Corporation, November 2019 QM1232r2...
- Page 18 Step 16 The Drain Holes in bottom of Fan Housing can be plugged if preferred, using provided Hole Plugs [J]. See Figure 16. Hole Plug [J] Drain Holes in Bottom of Fan Housing Figure 16 © Munters Corporation, November 2019 QM1232r2...
- Page 19 Fasten shutter in place by rotating the side and top shutter clips over the shutter flanges, See Figure 17B. Installation is now complete, proceed to electrical wiring section. Shutter Fixed Shutter Clip [N] Figure 17A Figure 17B © Munters Corporation, November 2019 QM1232r2...
-
Page 20: Electrical Wiring
For electrical connection requirements, refer to diagram on motor nameplate and to information enclosed with the Munters environmental control to be used. Single Phase Fans: motor overload protection should be provided for each fan. -
Page 21: Recommended Wire Routing
"Zip" tie the cable to strut to prevent cable from getting tangled in the pulley or belt. See Figure 19. Then run the cable out of the fan to the circuit breaker or control panel. (Continued on next page). Drip loop Figure 19 © Munters Corporation, November 2019 QM1232r2... -
Page 22: Operation
Single phase fans are designed for single speed operation only. WARNING Three Phase Fans: If a frequency drive is used, the minimum operating frequency is 30 Hz. Moving Parts: Disconnect Power Before Servicing. WARNING Do Not Power Wash Electrical Devices. © Munters Corporation, November 2019 QM1232r2... -
Page 23: Maintenance
Wiring should be secure and in good condition. Remove any dust Do Not Power Wash Electrical Devices. NEVER CLEAN build-up from control case and sensor using a soft brush or cloth. ELECTRICAL EQUIPMENT WITH A PRESSURE WASHER! © Munters Corporation, November 2019 QM1232r2... - Page 24 Mark 2 on the tensioner arm. Hold at this setting and tighten the 10mm bolt to 40 ft.lbs. [54 N-m] torque Mark 2 on Tensioner Arm Hex on Tensioner Arm 10mm Bolt Single Mark on Base © Munters Corporation, November 2019 QM1232r2...
-
Page 25: Winter Weather Protection
Munters Product and System manufacturers recommendations. The supplier listing above is given Warranties do not cover cone or fan as a reference only. Munters does not endorse any specific snow guard product and no performance warranty is implied. damage from external sources. -
Page 26: Troubleshooting
3. Motor or propeller shaft bent 3. Repair or replace motor or propeller shaft Fan Never Turns Off 1. Override thermostat set incorrectly 1. Set to the correct temperature 2. Control set for continuous operation 2. Set control correctly © Munters Corporation, November 2019 QM1232r2... - Page 27 This page left blank intentionally © Munters Corporation, November 2019 QM1232r2...
-
Page 28: Exploded View
Exploded View © Munters Corporation, November 2019 QM1232r2... - Page 29 Outlet Guard, Round, CTD BLK FH4655 FH4655 Discharge Cone Section, PL FH2434 FH2435 Cone Support Bracket, PC type (GZ/PWDCTD) FH2956 FH2956 Fan Housing, WS55, White, FG FH1968 FH1968 1-Hole Pivoting Shutter Clip, BLK PL FP1456 FP1556 Prop Assembly, 3-Blade (GZ/PWDCTD) FH1516* FH1516*...
- Page 30 WS55 is developed and produced by Munters Corporation, Lansing, Michigan U.S.A. 1-800-227-2376 Munters Europe AB, Isafjordsgatan 1, P.O. Box 1150, SE-164 26 Kista, Sweden. Phone +46 08 626 63 00, Fax +46 8 754 56 66. Munters Corporation 2691 Ena Drive Lansing, MI 48917 U.S.A. Phone +1 800-227-2376, Fax +1 517-676-7078 www.munters.us...
Need help?
Do you have a question about the WS55 and is the answer not in the manual?
Questions and answers