Table of Contents

Related Manuals for Munters WM54


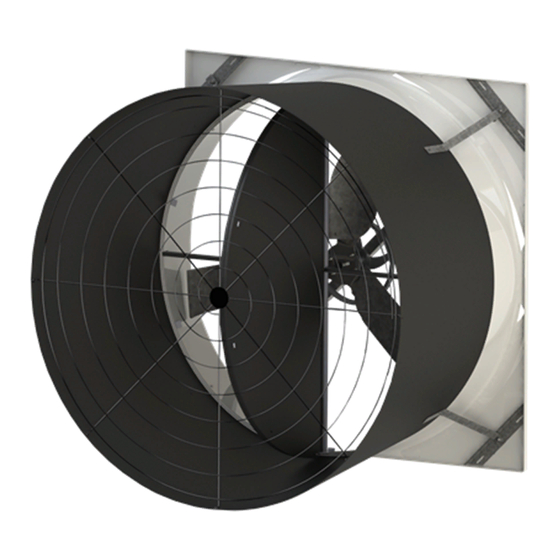
Summary of Contents for Munters WM54
- Page 1 WM54F Wall Mount Fan Manual for use and maintenance With Damper Door including assembling instructions + CE Declaration of conformity WM54 Fiberglass Wall Mount Fan with Damper Door Air extraction fan Ag/MIT/UmGB-2483-07/17 Rev 1.2...
- Page 2 This document is destined for the user of the apparatus: it may not be reproduced in whole or in part, committed to computer memory as a file or delivered to third parties without the prior authorisation of the assembler of the system. Munters Italy S.p.A.
-
Page 3: Table Of Contents
9. TROUBLESHOOTING ..........................36 10. WINTERIZING ............................37 10.1 Winterizing ......................... 37 10.2 Winter Weather Protection ....................37 11. EXPLODED VIEW ............................. 38 WARNING All the components and spare parts MUST be storaged in dry and clean environment. © Munters AB, 2019... -
Page 4: Ce Declaration
UNI EN 953:2009, UNI EN ISO 12100:2010, UNI EN ISO 12499:2009, UNI EN ISO 13857:2008, CEI EN 60204-1:2006 (CEI 44-5), UNI EN ISO 5801:2009 Chiusavecchia, 19 September 2019 Massimo Colombo Legal Representative © Munters AB, 2019... -
Page 5: Disclaimer
The information contained herein has been prepared by qualified experts within Munters. While we believe the information is accurate and complete, we make no warranty or representation for any particular purposes. The information is offered in good faith and with the understanding that any use of the units or accessories in breach of the directions and warnings in this document is at the sole discretion and risk of the user. -
Page 6: Safety Aspects
• do not for any reason modify parts of the fan in order to fit additional devices. © Munters AB, 2019... -
Page 7: Safety Devices
© Munters AB, 2019... -
Page 8: Residual Risks
The fan must only be used if it is in perfect operating condition, by personnel, aged more than 14 years who are perfectly aware of the safety measures and possible hazards, and in strict compliance with the instructions given in this manual. © Munters AB, 2019... -
Page 9: Operating Conditions
IMPROPER USE. In the event of IMPROPER USE the manufacturer declines all liability in relation to any damage that may be caused to persons or property, and any kind of warranty will be considered invalidated. © Munters AB, 2019... - Page 10 Whenever it is intended to use the fans in ambients characterized by the presence of particularly aggressive agents (ammonia, clavulanic acid, etc.) the user, before installing the fan at the installation site must verify that the environmental conditions are compatible with the intended use of the materials that compose the fan. © Munters AB, 2019...
-
Page 11: Unpacking The Equipment
1 – Plastic Door Assembly 1 – Motor stiffener bracket 4 – Plastic Cone Sections 2 – Tension Spring 1 – Round Safety Mesh 1 – Cable 1 – Flat Safety Mesh Bolts and Nuts 1 – Motor slide © Munters AB, 2019... - Page 12 [EE]….. 8 – Ø4.8x13 Self-tapping Screw WARNING Unauthorized tampering/replacement of one or more parts of the machine, or the use of accessories, tools or materials other than those recommended by the manufacturer, are prohibited and release the manufacturer from all liability. © Munters AB, 2019...
-
Page 13: Fan Dimensions
(earmuffs,earplugs, etc.) if necessary, depending on the overall level of sound pressure in the installation area, and the daily personal exposure of the employees. In areas where the overall sound level reaches excessive values, personal protective equipment must be used. © Munters AB, 2019... -
Page 14: Installation Instructions
There must be no obstacle neither in front or behind the fans. The outgoing airflow must be kept free at least of a length of 3-times fan diameter and the ingoing airflow must be kept free at least in a radius of 1.5 m distance in front of the fan. © Munters AB, 2019... - Page 15 Tensioner Bracket using Bolt [I] and Washer [J]. The Belt Tensioner has to be perpendicular to the Central Support. Hold tensioner at this setting and tighten the 10mm bolt to 50 Nm. See Figure Figure 2B © Munters AB, 2019...
- Page 16 4. Then place the Cup Cover Nut [M] over the Hex Nut and fasten in place with (1) Tapping Screw [B]. See Figure 4. Set aside the Support Assembly for use in a later step. Figure 4 © Munters AB, 2019...
- Page 17 Attach the Support Assembly using (4) Long Bolts [CC], (4) Washers [A] and (4) Nuts [DD] and in the opposite corners attach the Cone/Strut Mounting Bracket to the orifice using (1) Short Bolt [AA], Washer [A] and Nut [DD]. See Figure Figure 6 © Munters AB, 2019...
- Page 18 Line up the 4 holes in the Main Frame with the holes in the orifice and fasten using (8) Self-tapping Screws [EE] paying attention to stay at least 15 mm from the Orifice edge to avoid damaging it. See Figure Figure 8A Figure 8B © Munters AB, 2019...
- Page 19 Drip Shield ledge and center the panel on the opening. Then secure the Orifice to the wall using (16) proper screws (Not Provided). See Figure 10A and 10B. NOTE The proper type of fixing screw has to be selected depending on the material of the wall of the installation. Figure 10A Figure 10B © Munters AB, 2019...
- Page 20 Step 11 Carefully remove folded Butterfly assembly from box. Open doors and lay them flat on solid surface with the Munters Logo down. The Bottom of the doors has the Hinge Pin with the Nylon Washers. The Wing sits down in the Groove of the upper right and lower left doors.
- Page 21 Step 11A Carefully turn doors over and pull upper Latch Pin down until the end is flush with top of doors. Make sure Long Hinge Pin (bottom) does not fall out. See Figure 11A. Figure 11A © Munters AB, 2019...
- Page 22 Separate the Doors and push them into the closed position. Now push Latch Pin up into place, then turn the short leg of the Latch Pin into place against the Door and secure in place using (1) Self-tapping screw [B]. Latch Pin should extend up through the upper plate in the Main Frame. See Figure 11C. Figure 11C © Munters AB, 2019...
- Page 23 Cable Clamp [R]. See Figure 12A. Figure 12A Step 12B On the room side of each door drill a 3mm dia. Hole in each door through the center of the middle dimple shown. Figure 12B. Figure 12B © Munters AB, 2019...
- Page 24 See Figure 13B. Repeat this step until all 4 cone sectors are connected and laying flat. © Munters AB, 2019...
- Page 25 Short Bolt [AA], Washer [A] and Nut [DD], with the nut on the inside of the cone. At the inner pair of holes attach (1) Cone Bracket to the inner hole using (1) Short Bolt [AA], Washer [A] and Nut [DD] with the bolt head on the outside of the cone. See Figure 14B. Figure 14B © Munters AB, 2019...
- Page 26 Cone Brackets and fastening with Nut [DD]. A long screwdriver may be needed to help align the holes through the Cone Bracket, Cone, Damper Frame and Fiberglass Orifice. See Figure 15B. Figure 15B © Munters AB, 2019...
- Page 27 Step 17 Loop Cable that was installed in a previous step, around the lower, middle joint in guard and fasten to itself with Cable Clamp [R]. Make sure cable is pulled snug. See Figure Figure 17 © Munters AB, 2019...
- Page 28 The Motor Pulley is already assembled on the Motor by means of a Screw M8x20 and a Washer Ø8x32. See Figure Figure 19 Step 20 Set the Motor on the Motor Slide. See Figure Figure 20 © Munters AB, 2019...
- Page 29 The proper type of fixing screw has to be selected depending on the material of the wall of the installation. Figure 21B Step 22 Use a straight edge or level to check the alignment of the Central Pulley, Tensioner Pulley and the Motor Pulley. See Figure Figure 22 © Munters AB, 2019...
- Page 30 Slide V-belt over Propeller and install by wrapping it around the 2 smaller pulleys and starting it over the larger pulley, continue rolling it onto the larger pulley until it fits onto pulley. See Figure Figure 23 Step 19 Take the flat mesh. See Figure Figure 24 © Munters AB, 2019...
- Page 31 The flat mesh can be installed in case of a thickness wall ≥ 120mm. For lower thicknesses, if the fan is at NOTE a height of less than 2.7m from the ground, a dedicated mesh must be ordered separately. Figure 24B © Munters AB, 2019...
-
Page 32: Electrical Wiring
Connection to the power supply must be done by means of a thermal overload protection switch, whose size depends on motor power. For safety reasons the overload switch can be locked by a padlock, not supplied by Munters. Electrical earthing must be carried out according to local regulations before the motor is connected to the supply voltage. - Page 33 NOTE Failure to operate the fan with an overload protection device will render the motor guarantee null and void. Such motor overload protection devices can be ordered from Munters and be supplied with the fans. NOTE The connection cable must be completely extracted from the fan housing in order to avoid being damaged by moving parts.
-
Page 34: Operation
It is absolutely normal for the damper door not to open completely. The air flow is calculated in the configuration with the two doors not completely open but with an angle of 20° between them. Ambient temperature during operation Ambient humidity during operation - 15°C / + 40°C < 90% Max. operating pressure 50 Pa © Munters AB, 2019... -
Page 35: Maintenance
Support. tighten the 10mm bolt to 50 Nm. Slide V-belt over Propeller and install by wrapping it around the 2 smaller pulleys and starting it over the larger pulley, continue rolling it onto the larger pulley until it fits onto pulley. © Munters AB, 2019... -
Page 36: Troubleshooting
• Override thermostat set incorrectly • Set to the correct temperature • Control set for continuous operation • Set control correctly It is normal that the damper does not open completely. No corrective actions are needed. © Munters AB, 2019... -
Page 37: Winterizing
Snow guards are designed to prevent sudden, dangerous snow and ice slides when attached to the building roof according to manufacturers recommendations. The supplier listing above is given as a reference only. Munters does not endorse any specific snow guard product and no performance warranty is implied. © Munters AB, 2019... -
Page 38: Exploded View
11. EXPLODED VIEW © Munters AB, 2019... - Page 39 SPRING WASHER Ø8 X 15 HEX NUT M6 WITH FLANGE M8 HEX NUT M6×30 HEX SCREW M8×65 HEX SCREW M10×50 HEX SCREW Ø10 GROWER WASHER M10×25 HEX SCREW PLAIN WASHER D08x24 GROWER WASHER Ø8.4 x 14.4 PROPELLER © Munters AB, 2019...
- Page 40 Germany +49 (0) 25 58 - 93 92-0, India Phone +91 20 6681 8900, info@munters.in, Indonesia Phone +66 2 642 2670, info@munters.co.th, Israel Phone +972 3 920 6200, Italy Phone +39 0183 5211, info@munters.it, Japan Phone +81 3 5970 0021, mkk@munters.jp, Korea Phone +82 2 7618 701, munters@munters.co.kr,...
Need help?
Do you have a question about the WM54 and is the answer not in the manual?
Questions and answers