
Related Manuals for Endura EC1C-BK2


Summary of Contents for Endura EC1C-BK2
- Page 1 ™ Single Unit Calibrating Charger CHARGES / CALIBRATES BATTERIES FOR KNG RADIOS User Manual Model: EC1C-BK2...
-
Page 3: Table Of Contents
ENDURA EC1C-BK2 Table of Contents Topic Page Introduction Important (read before use) Caution (read before use) EC1C-BK2 Features Charging A Battery Calibrating A Battery Fault Conditions & Advisements Replacing A Charging Pod Warranty And Service Specifications Accessories (EC1C-BK2) -
Page 4: Introduction
Introduction Thank you for purchasing an Endura™ EC1C-BK2. This product is designed to be used as a standard desktop charger or to calibrate KNG radio Li-Ion batteries. The following batteries are compatible with EC1C-BK2: KAA0100 / KAA0101 / KAA0103 BP0101LI / BP0101LIXT Calibration Mode (CAL) is a selectable feature that enables you to “refresh”... -
Page 5: Important (Read Before Use)
Important Read all Caution statements below and this User Manual before attempting to charge or calibrate a battery. Always charge new batteries completely before initial use. Recycle batteries when they can no longer be used. Do not discard unwanted batteries in the trash or incinerate. Batteries exposed to fire or excessive heat may explode. -
Page 6: Caution (Read Before Use)
Do not remove the charger’s housing or make any modification to the charger. Use only the power supply provided with EC1C-BK2. If a replacement is required, see section Accessories. Use of other power supplies may damage the charger or batteries you may be attempting to charge. -
Page 7: Ec1C-Bk2 Features
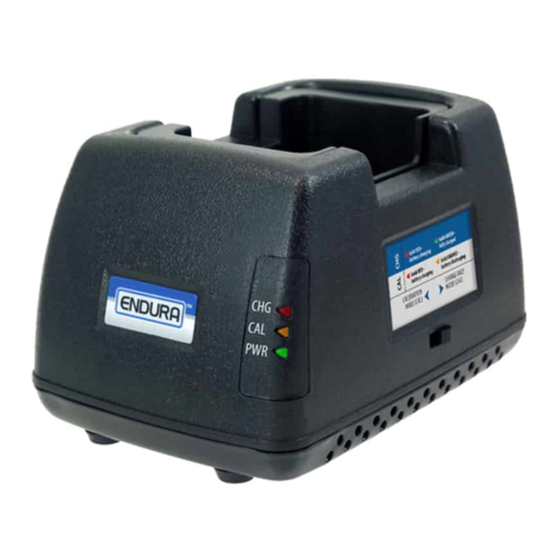
EC1C-BK2 Features Switch for selecting Calibration Mode or Charge Only Mode. Metal charger base with Charge status LED – illuminates green, cooling fan vent (do not red, or orange. cover). AC to DC power supply. Charging pod. DC power connection – back of charger. -
Page 8: Charging A Battery
Charging A Battery (Charge Only Mode) Connect EC1C-BK2 to power with the power supply. Set the switch on the side of the charger to Charge Only Mode (CHG). Place the battery to be charged in the charging pod. The battery may also be charged while attached to the radio. - Page 9 ORANGE for a few seconds. Allow the CHG LED to go off before placing another battery in the charging pod. The EC1C-BK2 is designed to charge batteries with a temperature monitoring circuit when the battery temperature is between 0°C and 45°C (32°...
-
Page 10: Calibrating A Battery
Calibrating A Battery (Calibration Mode) Connect EC1C-BK2 to power with the power supply provided. Set the switch on the side of the charger to Calibration Mode (CAL). Place the battery to be calibrated in the charging pod. If the battery is attached to the radio, keep the radio powered-off while calibrating. - Page 11 Calibrating A Battery (continued) If the CAL LED flashes RED, a fault has been detected. If it flashes ORANGE, you are receiving an advisement. The flash pattern indicates a specific condition. See section Fault Conditions & Advisements for details. If the battery is removed before calibration is completed, the calibration process terminates.
-
Page 12: Fault Conditions & Advisements
Fault Conditions & Advisements When the charge status LED flashes RED, a fault condition exists. A fault condition requires immediate attention. When the status LED flashes ORANGE, you are receiving an advisement about the battery. The flash patterns for fault conditions are as follows: LED Pattern Fault Description Flashes RED... - Page 13 Fault Conditions & Advisements (continued) LED Pattern Advisement Solid ORANGE Brief reset period for charger after battery is removed. Allow the LED to go off before inserting another battery. (Battery removed.) Flashes ORANGE Battery temperature remains at 0°C (32° F) or below after two hours of / GREEN monitoring.
-
Page 14: Replacing A Charging Pod
Should replacement be necessary, follow these steps: Unplug EC1C-BK2 from its power source. The charging pod is secured to the base with a single screw. To remove, turn the locking screw on the bottom of the charging pod counter- clockwise until it no longer holds the pod. -
Page 15: Warranty And Service
Warranty And Service During Warranty EC1C-BK2 is made from high quality materials and designed to provide years of reliable service. The following warranty applies: Power Products Unlimited, LLC (PPU) warrants this product to be free from defects in workmanship and materials for two-years from date of purchase by the end user. This warranty applies to the original purchaser and is void if the product has been altered, misused, damaged, neglected, or if repair is required because of normal wear and tear. -
Page 16: Specifications
Specifications Dimensions (W x L x H) 96 x 131 x 87 mm / 3.8 x 5.2 x 3.3 inches Weight 0.39 kg / 0.85 lbs. (charger only) Compatible Chemistries Li-Ion / LiPo Ambient Operating Temperature 5° C - 40° C / 41° F - 104° F Power Supply Input 100V –... -
Page 17: Accessories (Ec1C-Bk2)
Accessories Information Part Number Description TWC1-PS Power supply. UL listed. Input: 100-240V, 50-60Hz, 0.5A. (Included with EC1C-BK2.) Output: 15.0V, 1.0A. TWP-BK2 Charging pod. Includes fastening screw. For Li-Ion (Included with EC1C-BK2.) batteries only. EC1C-MB2 Desktop bracket for holding Includes power supply for powering two two units. - Page 19 2170 Brandon Trail • Alpharetta, GA 30004 www.powerproducts.com ©2020 Power Products Unlimited, LLC. Endura Chargers By Power Products Power Products, Endura, and Smart-Adaptable-Reliable are trademarks of Smart – Adaptable – Reliable™ Power Products Unlimited, LLC. All rights reserved.
Need help?
Do you have a question about the EC1C-BK2 and is the answer not in the manual?
Questions and answers