Advertisement
Available languages
Available languages
Quick Links
ARTICOLI & APPARECCHI PER MEDICINA
Gima S.p.A.
Via Marconi, 1 - 20060 Gessate (MI) Italy
gima@gimaitaly.com - export@gimaitaly.com
www.gimaitaly.com
STAZIONE DIAGNOSTICA
DA PARETE VISIO 2000 - 3,5V
Manuale d'uso
ATTENZIONE:
Gli operatori devono leggere
e capire completamente questo
manuale prima di utilizzare il prodotto.
31545
GIMA S.p.A.
Via Marconi, 1
20060 Gessate (MI) Italy
Made in U.A.E.
Advertisement

Related Manuals for Gima VISIO 2000


Summary of Contents for Gima VISIO 2000
- Page 1 ARTICOLI & APPARECCHI PER MEDICINA Gima S.p.A. Via Marconi, 1 - 20060 Gessate (MI) Italy gima@gimaitaly.com - export@gimaitaly.com www.gimaitaly.com STAZIONE DIAGNOSTICA DA PARETE VISIO 2000 - 3,5V Manuale d’uso ATTENZIONE: Gli operatori devono leggere e capire completamente questo manuale prima di utilizzare il prodotto.
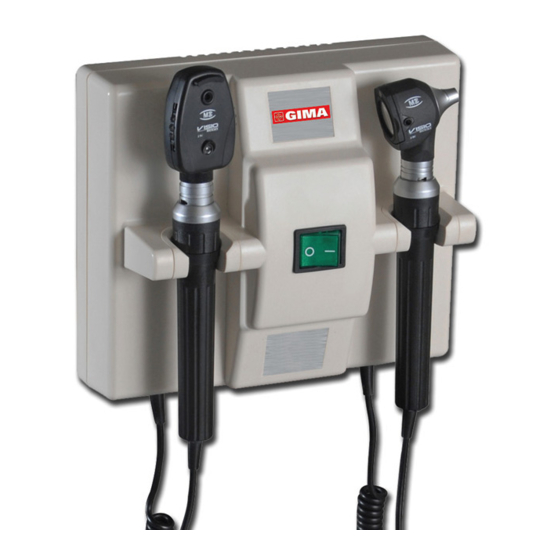
- Page 2 Il sistema è accattivante, modulare, e facile da mettere in ordine e installare. Il Trasformatore da Parete VISIO 2000 è la soluzione perfetta per la frenetica vita quotidiana nelle cliniche e negli ospedali. L’unità ha un’alimentazione elettrica centralizzata, che elimina la necessità di batterie normali o ricaricabili.
- Page 3 Unità di Base dotata di 2 manici. In essi sono inseriti rispettivamente una testa di otoscopio VISIO 2000 e una testa di oftalmoscopio VISIO 2000. b. L’unità fornisce una tensione di uscita costante di 3,5V indipendente dalla rete elettrica: questo assicura l’erogazione della giusta quantità...
- Page 4 Il prodotto deve essere utilizzato esclusivamente da personale qualificato. Non utilizzate il prodotto se è danneggiato: rivolgetevi al vostro rivenditore. Evitate riparazioni approssimative: le riparazioni devono essere eseguite utilizzando esclusivamente ricambi originali, che devono essere installati conformemente all’uso previsto. Non utilizzate lampade da più di 4 watt. Le lampadine rotte possono procurare lesioni o tagli: maneggiatele con cura e sostituitele immediatamente.
- Page 5 Installazione Fissate la staffa sulla parete con le viti incluse, assicurandovi che le parti scorrevoli della staffa non siano rivolte verso la parete e quelle lisce siano invece al suo livello (come da figura). A seconda delle parti scorrevoli potrebbero essere necessarie viti di altro tipo.
- Page 6 Spegnere completamente l’unità prima di sostituire la lampada. Sostituzione della Lampada nella Testa dell’Otoscopio Con l’Otoscopio VISIO 2000 F.O., prima di tutto sbloccare la testa dalla maniglia e tirare la lampada (D) verso il basso come in Fig. 2. Inserire la nuova lampada.
- Page 7 Lampada di Ricambio, 3,5V Sostituzione della Lampada nella Testa dell’Oftalmoscopio Smontare la testa dell’oftalmoscopio dalla maniglia e tirare la lampada (G) verso il basso come in Fig. 3. Pulire il vetro della nuova lampada e inserirlo in modo tale che il perno di centraggio (H) si inserisca nella fessura.
- Page 8 I) Lenti Per pulire le lenti potete utilizzare un applicatore con punta in cotone inumidito con una soluzione di acqua e detergente delicato. Non utilizzate pulitori abrasivi o ad ultrasuoni, alcol o altre sostanze chimiche per pulire le lenti: questi metodi deteriorano le lenti o la qualità...
- Page 9 La garanzia è valida per il tempo di 12 mesi dalla data di fornitura GIMA. Durante il periodo di validità della garanzia si provvederà alla riparazione e/o sostituzione gratuita di tutte le parti difettose per cause di fabbricazione ben accertate, con esclusione delle spese di mano d’opera o eventuali trasferte, trasporti...
- Page 10 Corrente alternata AC Corrente diretta DC L’apparecchio contiene un fusibile di protezione Non utilizzare se danneggiato Seguire le istruzioni d’uso Mantenere asciutto! Maneggiare con cura Il Trasformatore da Parete Visio 2000 è Classificato UL...
- Page 11 PROFESSIONAL MEDICAL PRODUCTS Gima S.p.A. Via Marconi, 1 - 20060 Gessate (MI) Italy gima@gimaitaly.com - export@gimaitaly.com www.gimaitaly.com VISIO 2000 WALL DIAGNOSTIC STATION - 3.5V User manual ATTENTION: The operators must carefully read and completely understand the present manual before using the product.
- Page 12 The system is attractive, modular, and easy to order and install. The VISIO 2000 Wall Transformer is the perfect solution for hectic everyday clinical and hospital life. The unit has a centralized electrical supply, eliminating the need for conventional and rechargeable batteries.
- Page 13 Features a. Basic Unit equipped with 2 handles. Each handle fitted with a VISIO 2000 Otoscope head and a VISIO 2000 Ophtalmoscope head. b. The unit provides a constant 3.5V output voltage independent of mains voltage function.
- Page 14 Precautions The handles should be handled carefully. No modification of this equipment is allowed. Do not use the equipment in case it is damaged. Apply to your retailer. Avoid precarious repairs. Repairs shall be carried out with original spare parts only, which shall be installed according to the intended use.
-
Page 15: Installation
Installation Fasten wall bracket on the wall with enclosed screws, making sure that the sliding sides of wall bracket face away from the wall and the smooth surface of the wall bracket is flush with the wall (as shown). Depending on the sliding surface, alternative screws may be needed. - Page 16 Switch Off the Unit Completely before changing the lamp. Changing the Lamp in Otoscope Head With the VISIO 2000 F.O. Otoscope, first unlock the head from the handle and pull the lamp (D) downwards as in Fig. 2. Push in the new lamp.
- Page 17 Replacement Lamp, 3.5V Changing the Lamp in Ophthalmoscope Head Unmount the ophthalmoscope head from the handle and pull the lamp (G) downwards as in Fig.3. Wipe the new lamp glass clean and insert it so that the locating pin (H) fits into the slit. Replacement Lamp, 3.5V Cleaning Do not sterilize the product.
- Page 18 I) Lens The lens can be cleaned by using a moistened cotton-tipped applicator with a solution of water with mild detergent. Do not use abrasive Ultrasonic cleaner, alcohol or other chemicals to clean the lenses as this degrade lens or mirror quality, as they will scratch the coated surface of the lenses.
- Page 19 The warranty is valid for 12 months from the date of supply of GIMA. During the period of validity of the warranty, GIMA will repair and/or replace free of charge all the defected parts due to production reasons.
- Page 20 Alternating current AC Direct current AC The device contains protection fuse Do not use if damages Follow instructions for use Keep dry! Handle with care The Visio 2000 Wall Transformer is UL Classified...
Need help?
Do you have a question about the VISIO 2000 and is the answer not in the manual?
Questions and answers