Table of Contents
Advertisement
Quick Links
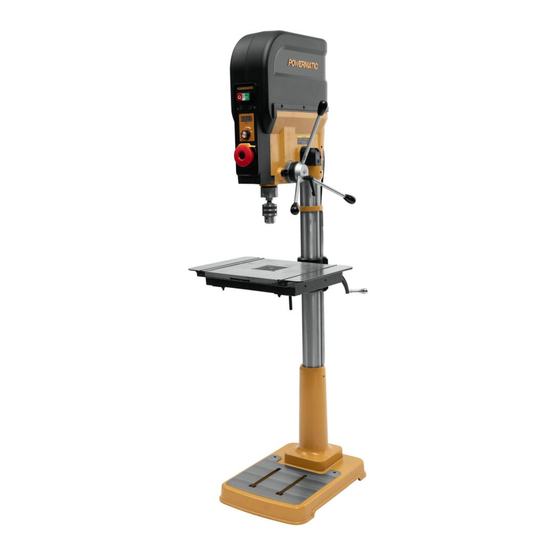
Operating Instructions and Parts Manual
20-inch Variable Speed Drill Press
Model PM2820EVS
Powermatic
427 New Sanford Road
LaVergne, Tennessee 37086
Ph.: 800-274-6848
www.powermatic.com
This .pdf document is bookmarked
Shown with optional
1792822 Tool Holder
Part No. M-1792820
Edition 1 05/2020
Copyright © 2020 Powermatic
Advertisement
Table of Contents

Related Manuals for Powermatic PM2820EVS


Summary of Contents for Powermatic PM2820EVS
- Page 1 This .pdf document is bookmarked Operating Instructions and Parts Manual 20-inch Variable Speed Drill Press Model PM2820EVS Shown with optional 1792822 Tool Holder Powermatic 427 New Sanford Road LaVergne, Tennessee 37086 Part No. M-1792820 Ph.: 800-274-6848 Edition 1 05/2020 www.powermatic.com Copyright © 2020 Powermatic...
-
Page 2: Important Safety Instructions
If used for other purposes, 20. Give your work undivided attention. Looking Powermatic disclaims any real or implied around, carrying on a conversation and “horse- warranty and holds itself harmless from any play”... - Page 3 29. Don’t use in dangerous environment. Don’t use WARNING: Drilling, sawing, sanding or power tools in damp or wet location, or expose machining wood products generates wood dust them to rain. Keep work area well lighted. and other substances known to the State of California to cause cancer.
-
Page 4: About This Manual
If there are questions or comments, please contact your local supplier or Powermatic. Powermatic can also be reached at our web site: www.powermatic.com. -
Page 5: Table Of Contents
13.3.1 PM2820EVS Control Panel – Exploded View ..................26 13.3.2 PM2820EVS Control Panel – Parts List ....................27 13.4.1 PM2820EVS Top Cover & PCB Assembly – Exploded View .............. 28 13.4.2 PM2820EVS Top Cover & PCB Assembly – Parts List ............... 28 ... -
Page 6: Specifications
4.0 Specifications Table 1 Model number PM2820EVS Stock number 1792820 Motor and electrical Motor type brushed DC Horsepower Phase Single Voltage 120 V Cycle 60 Hz Listed FLA (full load amps) Main on/off switch manual push button, with safety key and power indicator lamp... -
Page 7: Base Hole Centers For Pm2820Evs
L = length, W = width, H = height The specifications in this manual were current at time of publication, but because of our policy of continuous improvement, Powermatic reserves the right to change specifications at any time and without prior notice, without incurring obligations. -
Page 8: Unpacking
Figure 5-1 shipping agent. If any parts are missing, contact your distributor or Powermatic. (Check machine first to see if any parts were pre-assembled.) Do not discard carton or packing material until drill press is assembled and running satisfactorily. -
Page 9: Assembly
6.0 Assembly machine. Use a high grade of plywood at least 3/4" thick. It should be large enough to prevent vibration, sliding or moving of drill press during The drill press should be placed in a dry area, with operation. Do not use a mobile base with this a level floor and good lighting. - Page 10 Figure 6-5 12. Screw locking handle (L, Figure 6-5) into table bracket. Tighten locking handle to secure table bracket’s position on column. Figure 6-8 6.2.1 Drill head mounting If lifting by hand: Loosen handle (L, Figure 6-5) and turn crank Drill head weighs over 150 lbs.
- Page 11 Slide fence into t-slots from front edge of table. To secure fence, push down cam handles. See Figure 6-12. 6.2.2 Table and insert leveling Position fence across tables and check for gaps between fence and tables. Do this at several points front to back.
-
Page 12: Electrical Connections
The PM2820EVS drill press is rated and prewired for 120V power. The drill press comes with a plug designed for use on a circuit with a grounded outlet that looks like the one pictured in A, Figure 14. -
Page 13: Extension Cords
8.1.2 Swing table away 7.2 Extension cords Refer to Figure 8-1. The use of extension cords is discouraged; try to position equipment near the power source. If an When drilling into a long workpiece, swing table out extension cord becomes necessary, be sure to use of the way and use drill press base as your table. -
Page 14: Depth Stop
Figure 8-3 Figure 8-4 Method #2: 8.3 Depth stop Mark the desired depth of cut on the side of the The depth stop is used for repetitive drilling of holes workpiece (Figure 8-6). of identical depth. Loosen lock handle (H) and use downfeed Depth stop can be established by one of two handle (G) to lower the bit to the mark. -
Page 15: Quill Retraction Lock
11. Slightly back off the lock ring (J), that is, rotate Take a length of board (A, Figure 8-8) and draw it clockwise. a perpendicular line (B) on one side using a square. 12. Slightly rotate downfeed handle to bring bit up to more accurate depth. -
Page 16: Led Lights
Cross Hair Alignment bulb is bad, there will be no indication. Always check before use. Place board (K, Figure 8-10) flat on table. Do not allow board to move from this position; use Spindle rotation ON – (D) clamps if needed. Bring the bit down until it Spindle rotation OFF –... -
Page 17: Operation
Note: Avoid wax that contains silicone or other 10.3 General Inspection synthetic ingredients; these materials can find their Before each operation of your PM2820EVS drill way into lumber and make staining and finishing press, make a habit of checking that all locking difficult. -
Page 18: Troubleshooting The Pm2820Evs Drill Press
12.0 Troubleshooting the PM2820EVS Drill Press 12.1 Mechanical and electrical Table 4 * WARNING: Some corrections may require a qualified electrican. Symptom Possible Cause Correction * Not connected to power. Check all plug connections. Drill press will not start Fuse blown, or circuit breaker tripped on Replace fuse, or reset circuit breaker. -
Page 19: Error Codes On Digital Readout
12.2 Error codes on digital readout Table 5 Error Correction Error source Description code Press off button to clear error If load exceeds 15A for over 5 seconds, ERR-1 Overload protector code, then press on to restart PCB shuts off motor. machine. -
Page 20: Replacement Parts
Non-proprietary parts, such as fasteners, can be found at local hardware stores, or may be ordered from Powermatic. Some parts are shown for reference only, and may not be available individually. 13.1.1 PM2820EVS Gear Box Assembly – Exploded View... -
Page 21: Pm2820Evs Gear Box Assembly - Parts List
3 ....PM2820EVS-103 ..Gear Box Cover ....................1 ....PM2820EVS-MA ..Motor Assembly (item #4,14,25,28,38,46,48,49,61-67,75) ........1 4 ....PM2820EVS-104 ..DC Motor (item #25 & 67) ..................1 ....PM2820EVS-MCB ..Motor Carbon Brush (not shown) ................ - Page 22 66 ....TS-1534041 ....Pan Head Screw ............M5x10 ......2 67 ....PM2820EVS-167 ..Motor Label ......................1 68 ....PM2820EVS-168 ..Clutch Warning Label ................... 1 69 ....PM2820EVS-169 ..Magnet Collar set ....................1 71 ....
-
Page 23: Pm2820Evs Quill And Laser Assembly - Exploded View
13.2.1 PM2820EVS Quill and Laser Assembly – Exploded View 2 3... -
Page 24: Pm2820Evs Quill And Laser Assembly - Parts List
32 ....PM2820EVS-232 ..Feed Handle ......................3 33 ....PM2820EVS-233 ..Depth Pointer ....................... 1 34 ....PM2820EVS-234 ..Laser Seat Cover, Right (Includes #23) ............... 1 35 ....PM2820EVS-235 ..Laser Seat Cover, Left (Includes #35-1) .............. 1 35-1 .... - Page 25 Index No. Part No. Description Size Qty. 60 ....TS-1550061 ....Flat Washer ..............M8 ........1 61 ....PM2820EVS-261 ..Spring Retainer....................1 62 ....PM2820EVS-262 ..Insert Plate ......................1 2 5...
-
Page 26: Pm2820Evs Control Panel - Exploded View
13.3.1 PM2820EVS Control Panel – Exploded View 2 6... -
Page 27: Pm2820Evs Control Panel - Parts List
23 ....PM2820EVS-323 ..LED Light Wire, momentary switch to Power (not shown) ........1 24 ....PM2820EVS-324 ..LED Light wire, momentary switch & Power to LED light (not shown) ....1 25 ....PM2820EVS-325 ..Sensor, High Speed Range (not shown) .............. 1 26 .... -
Page 28: Pm2820Evs Top Cover & Pcb Assembly - Exploded View
11 ....TS-1503041 ....Socket Head Cap Screw ..........M6x16 ......2 12 ....TS-2285121 ....Machine Screw ............M5x12 ......1 13 ....PM2820EVS-413 ..Clutch H & L Speed Label ..................1 14 ....PM2820EVS-414 ..Clutch Warning Label ................... 1 15 .... -
Page 29: Pm2820Evs Work Table Assembly - Exploded View
13.5.1 PM2820EVS Work Table Assembly – Exploded View 2 9... -
Page 30: Pm2820Evs Work Table Assembly - Parts List
15 ....TS-2284121 ....Machine Screw ............M4x12 ......2 16 ....TS-1523031 ....Set Screw..............M6x10 ......1 17 ....PM2820EVS-517 ..Socket Head Button Screw .......... M3x5 ....... 4 18 ....PM2820EVS-518 ..Lock Handle ......................1 19 .... -
Page 31: Pm2820Evs Fence Assembly - Exploded View
....PM2800B-WSA ... Work Stop Assembly (index #1, 8, 9, 13, 14) ............1 2 ....PM2800B-040 ..... Cam Lock Handle ....................2 3 ....PM2820EVS-603 ..Plastic Set Screw ............M8x16 ......2 4 ....PM2800B-046 ..... Left Fence Cap ....................1 5 .... -
Page 32: Pm2820Evs Column Assembly - Exploded View
2 ....TS-1506041 ....Socket Head Cap Screw ..........M12x35 ......4 3 ....PM2820EVS-703 ..Rack ........................1 4 ....PM2820EVS-704 ..Column Holder Kit (Includes #5 & #7) ..............1 5 ............. Column ........................ 1 6 .... -
Page 33: Optional Accessories
14.0 Optional accessories The following items will add functionality to your machine. See our website for more details, and to order accessories. 1792821 Storage Set 1792822 Tool Holder 1792824 Wood Table with Microjig accessory 1792825 Down Draft Table 3 3... -
Page 34: Electrical Connections For Pm2820Evs Drill Press
15.0 Electrical Connections for PM2820EVS Drill Press 3 4... -
Page 35: Warranty And Service
16.0 Warranty and Service Powermatic warrants every product it sells against manufacturers’ defects. If one of our tools needs service or repair, please contact Technical Service by calling 1-800-274-6846, 8AM to 5PM CST, Monday through Friday. Warranty Period The general warranty lasts for the time period specified in the literature included with your product or on the official Powermatic branded website. - Page 36 427 New Sanford Road LaVergne, Tennessee 37086 Phone: 800-274-6848 www.powermatic.com 3 6...
Need help?
Do you have a question about the PM2820EVS and is the answer not in the manual?
Questions and answers