Table of Contents
Advertisement
This .pdf document is bookmarked
Operating Instructions and Parts Manual
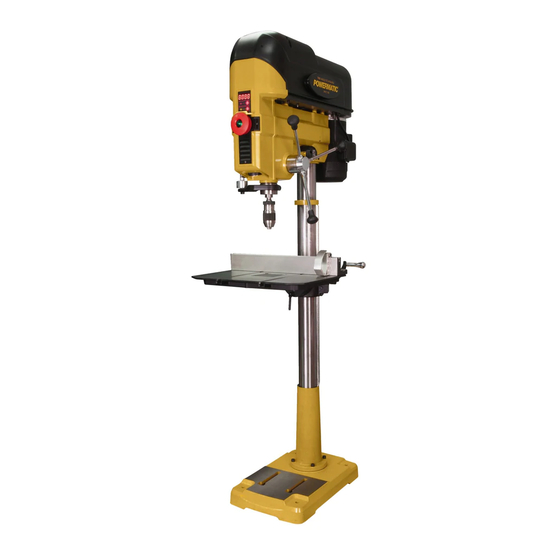
18-inch Variable Speed Drill Press
Model PM2800B
WALTER MEIER (Manufacturing) Inc.
427 New Sanford Road
LaVergne, Tennessee 37086
Part No. M-1792800B
Ph.: 800-274-6848
Revision A1 02/2013
www.waltermeier.com
Copyright © 2013 Walter Meier (Manufacturing) Inc.
Advertisement
Table of Contents

Subscribe to Our Youtube Channel
Related Manuals for Powermatic PM2800B


Summary of Contents for Powermatic PM2800B
- Page 1 This .pdf document is bookmarked Operating Instructions and Parts Manual 18-inch Variable Speed Drill Press Model PM2800B WALTER MEIER (Manufacturing) Inc. 427 New Sanford Road LaVergne, Tennessee 37086 Part No. M-1792800B Ph.: 800-274-6848 Revision A1 02/2013 www.waltermeier.com Copyright © 2013 Walter Meier (Manufacturing) Inc.
-
Page 2: Warranty And Service
This warranty covers only the initial purchaser of the product. WHAT IS THE PERIOD OF COVERAGE? The general POWERMATIC warranty lasts for the time period specified in the product literature of each product. WHAT IS NOT COVERED? The Five Year Warranty does not cover products used for commercial, industrial or educational purposes. Products with a Five Year Warranty that are used for commercial, industrial or education purposes revert to a One Year Warranty. -
Page 3: Table Of Contents
12.0 Troubleshooting the PM2800B Drill Press ....................18 13.0 Replacement Parts ............................. 18 13.1.1 Exploded View for PM2800B ....................... 19 13.1.2 Part List for PM2800B ......................... 20 14.0 Electrical Connections for PM2800B Drill Press ..................24... -
Page 4: Safety Warnings
that are specifically designed to filter out microscopic particles. 11. Do not operate this machine while tired or under the influence of drugs, alcohol or any 3.0 Safety warnings medication. 12. Make certain the switch is in the OFF position 1. -
Page 5: About This Manual
This manual is provided by Walter Meier (Manufacturing) Inc. covering the safe operation and maintenance procedures for a Powermatic Model PM2800B Drill Press. This manual contains instructions on installation, safety precautions, general operating procedures, maintenance instructions and parts breakdown. Your machine has been designed and constructed to provide years of trouble-free operation if used in accordance with the instructions as set forth in this document. -
Page 6: Specifications
5.0 Specifications Model number ............................PM2800B Stock number ............................1792800B Motor and electricals: Motor type ................totally enclosed fan cooled, induction, capacitor start Horsepower ..............................1 HP Phase................................. single Voltage ........................115/230V (prewired 115V) Cycle ................................60Hz Listed FLA (full load amps) ........................15/7.5 A Starting amps ............................ -
Page 7: Base Hole Centers For Pm2800B
5.1 Base Hole Centers for PM2800B Figure 1 The specifications in this manual were current at time of publication, but because of our policy of continuous improvement, Walter Meier (Manufacturing) Inc., reserves the right to change specifications at any time and... -
Page 8: Setup And Assembly
2. If you do not wish permanent attachment to 6.0 Setup and assembly the floor, the drill press can be bolted to a plywood panel which will serve as an 6.1 Shipping contents expanded base and further stabilize the machine. Use a high grade of plywood at least Drill press head 3/4"... - Page 9 7. Slide table elevating handle (D, Figure 3) onto protruding shaft of worm, and tighten set screw in handle with a 3mm hex wrench. Crank the handle counterclockwise to lower table bracket down the column. 8. Place ring (E, Figure 3) onto column and slide it down over top edge of rack.
-
Page 10: Electrical Connections
19. Rotate chuck until the jaws are completely retracted into the chuck (to prevent damage to The PM2800B drill press is rated at 115/230V jaws). Use two or three sharp taps from a power, and is pre-wired for 115 volt. The drill press... -
Page 11: Voltage Conversion
D, Figure 12. Contact 2. Grounded, cord-connected tools intended for your local authorized Powermatic Service use on a supply circuit having a nominal rating less Center or qualified electrician for proper than 150 volts: procedures to install the plug. -
Page 12: Adjustments
8.0 Adjustments 8.1 Table movement 8.1.1 Raise and lower Referring to Figure 13: Loosen column locking handle (A, Figure 13). Turn table elevating handle (B) to raise or lower table along column rack. Re-tighten locking handle (A) before attempting to drill. Figure 14 2. -
Page 13: Changing Spindle Speeds
Figure 16 8.3 Changing spindle speeds Change speeds only while drill press is running. With the drill press running, rotate handwheel Figure 17 (shown in Figure 7) until desired speed is displayed on LED readout at front of head. Speed range is 8.5 Work stop 250 to 3000 RPM. -
Page 14: Laser Adjustment
Figure 18 Figure 20 8.7 Laser adjustment Vertical Alignment Referring to Figures 19 through 22: 4. Use the socket head screw (H, Figure 21) located toward front of laser assembly, to adjust verticality of laser line. Turn screw as Do not look directly into the needed (2.5mm hex wrench), and move board laser beam or view it directly with optical side-to-side as needed, until laser light (E) -
Page 15: Operating Controls
9. Re-check vertical alignment to ensure that the laser lines did not shift during the procedure. The laser is now calibrated properly and the location of your holes can be centered at the cross hairs for accurate drilling. Figure 23 10.0 Operation Figure 22 9.0 Operating controls... -
Page 16: General Inspection
find their way into lumber and make staining and 10.3 General Inspection finishing difficult. Before each operation of your Model 2800B drill The quill return spring should receive SAE 20 oil press, make a habit of checking that all locking once yearly. -
Page 17: Lamp Replacement
assembly (A) until it releases from the seat, as shown. 2. Unscrew front plate (B) from head, pull out the plate, and disconnect the lamp wires from the electrical board. Remove old lamp assembly. 3. Install new lamp assembly and push it firmly into the seat. -
Page 18: Troubleshooting The Pm2800B Drill Press
12.0 Troubleshooting the PM2800B Drill Press Table 2 Trouble Probable Cause Remedy Not connected to power. Check all plug connections. Drill press will not start Fuse blown, or circuit breaker tripped. Replace fuse, or reset circuit breaker. (power light is OFF). -
Page 19: Exploded View For Pm2800B
13.1.1 Exploded View for PM2800B... -
Page 20: Part List For Pm2800B
45 ....PM2800B-045 ... Fence ......................1 46 ....PM2800B-046 ... Left Fence Cap ....................1 47 ....PM2800B-047 ... Phillips C’sunk Hd. Tapping Screw ......M5x12 ......2 48 ....TS-155010 ....Flat Washer ............. Ø16mm ......1 49 .... - Page 21 89 ....628494 ...... Phillips Pan Hd. Machine Screw ......M5x6 ......1 90 ....PM2800B-090 ... Switch Label ....................1 91 ....PM2800B-091 ... Hex Socket Truss Hd. Screw ........M5-0.8x16 ..... 3 92 ....PM2800B-092 ... Push-Pull Type Switch Assembly ..............1 92-1 ...
- Page 22 131 .... PM2800B-131 ... Spring ......................2 132 .... PM2800B-132 ... Laser Module ....................2 133 .... PM2800B-109 ... Phillips Pan Hd. Tapping Screw ......M3-24x6 ......4 134 .... PM2800B-134 ... Spring ......................2 135 .... PM2800B-135 ... Laser Plunge Bracket (Left) ................1 136 ....
- Page 23 196 .... PM2800B-196 ... Center Pulley ....................1 197 .... 6290832 ....Phillips Truss Hd. Screw .......... M5x8 ......6 198 .... PM2800B-198 ... Hex Socket Truss Hd. Screw ........M5-0.8x8 ....... 2 199 .... PM2800B-199 ... Flat Washer ....................2 200 ....
-
Page 24: Electrical Connections For Pm2800B Drill Press
14.0 Electrical Connections for PM2800B Drill Press 115V 230V...
Need help?
Do you have a question about the PM2800B and is the answer not in the manual?
Questions and answers