Powermatic PJ1696 Operating Instructions And Parts Manual
16-inch
Hide thumbs
Also See for PJ1696:
- Specifications (4 pages) ,
- Operating instructions and parts manual (40 pages) ,
- Operating instructions and parts manual (36 pages)
Table of Contents
Advertisement
Quick Links
This .pdf document is bookmarked
Operating Instructions and Parts Manual
16-inch Jointer
Model PJ1696
For machines with serial no. 12061696217 and higher
Powermatic
427 New Sanford Road
LaVergne, Tennessee 37086
Part No. M-0460269
Ph.: 800-274-6848
Revision D2 10/2019
www.powermatic.com
Copyright © 2014 Powermatic
Advertisement
Table of Contents

Related Manuals for Powermatic PJ1696


Summary of Contents for Powermatic PJ1696
- Page 1 For machines with serial no. 12061696217 and higher Powermatic 427 New Sanford Road LaVergne, Tennessee 37086 Part No. M-0460269 Ph.: 800-274-6848 Revision D2 10/2019 www.powermatic.com Copyright © 2014 Powermatic ...
-
Page 2: Warranty And Service
Warranty and Service Powermatic warrants every product it sells against manufacturers’ defects. If one of our tools needs service or repair, please contact Technical Service by calling 1-800-274-6846, 8AM to 5PM CST, Monday through Friday. Warranty Period The general warranty lasts for the time period specified in the literature included with your product or on the official Powermatic branded website. -
Page 3: Table Of Contents
Parts List: Bed Assembly (PJ1696 Jointer) ..................... 24 Bed Assembly (PJ1696 Jointer) ........................25 Parts List: Cutterhead Guard Assembly (PJ1696 Jointer) ................26 Cutterhead Guard Assembly (PJ1696 Jointer) ....................27 Parts List: Infeed Table Assembly (PJ1696 Jointer) ..................28 ... -
Page 4: Warning
Warning Read the manual. Read, understand, and follow the safety instructions found in this manual. Know the limitations and hazards in using the model PJ1696 Jointer. Decals are placed on each machine as reminders of good safety practice. Installation. If mounting machine to the floor, use high quality anchor bolts through the mounting holes on the base. - Page 5 Do not equip or use this jointer with a motor larger than 7-1/2 Horsepower at 5,200 R.P.M. Use of a larger horsepower motor or higher cutterhead speed voids the warranty and Powermatic holds itself harmless for any injury which may result.
-
Page 6: Safety Label
Familiarize yourself with the following safety notices used in this manual: This means that if precautions are not heeded, it may result in minor injury and/or possible machine damage. This means that if precautions are not heeded, it may result in serious injury or possibly even death. - - SAVE THESE INSTRUCTIONS - - Safety Label Familiarize yourself with the location and content of this decal on your machine. ... -
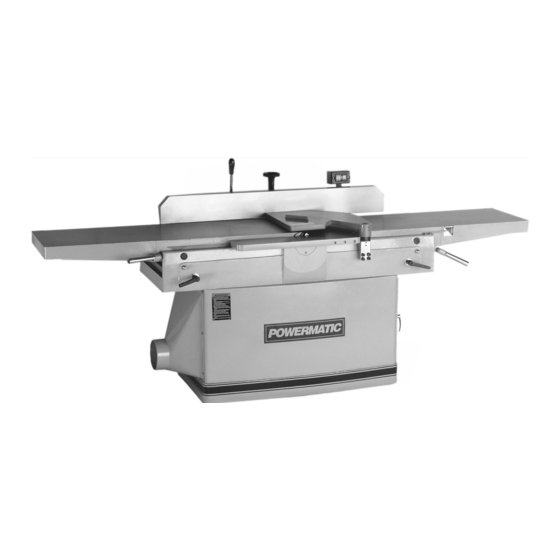
Page 7: Features: Pj1696 Jointer
Features: PJ1696 Jointer Figure 4 Outfeed table Guard Bracket Block Fence Pushbutton Switch Fence Handle Cabinet Lock Lever Table Lock Cast Housing Door Latch Control Handle - Forward/Backward Cabinet Door Rack Column Table Raising/Lowering Handle Cutterhead Guard Plate... -
Page 8: Introduction
Introduction This manual is provided by Powermatic Inc. covering the safe operation and maintenance procedures for a Powermatic Model PJ1696 Jointer. This manual contains instructions on installation, safety precautions, general operating procedures, maintenance instructions and parts breakdown. This machine has been designed and constructed to provide years of trouble free operation if used in accordance with instructions set forth in this manual. -
Page 9: Receiving The Jointer
Receiving the Jointer Carefully unpack the jointer and all loose items from the wood crate and inspect for damage. Any damage should be reported to your distributor and shipping agent immediately. Before proceeding further, read your manual thoroughly to familiarize yourself with proper... -
Page 10: Dust Hood
Figure 7 Figure 9 Dust Hood Electrical Connection Mount the dust hood (C, Figure 8), to the left side of the jointer using the seven 1/4-20 x 1/2 screws (D, Figure 8) provided on the machine. Before Electrical connections must mounting the dust hood, make sure the hole in the be made by a qualified electrician. -
Page 11: Adjustments
17mm/19mm wrench Replacing Knife Inserts Drive Belt The cutterhead on the PJ1696 is a solid steel helical insert design with 56 two-sided standard Remove the three crown nuts and washers (A, knives, and two rabbet knives on the outboard end Figure 10) on the belt cover with a 17mm wrench, of the cutterhead. -
Page 12: Infeed Table Adjustment
Turn the cutterhead until one row of knives is at its highest point. Lower the outfeed table until the straight edge contacts a knife. Rock the cutterhead slightly to make sure the apex of the knife is contacting the straight edge. Lock the outfeed table at that setting. -
Page 13: Fence Adjustments
Operating Instruction NOTE: If you are inexperienced at jointing, use scrap pieces of lumber to check settings and get the feel of operations before attempting regular work. Always use guard and keep hands away from cutterhead. Make sure all knives or knife inserts are secured in the cutterhead. -
Page 14: Rabbeting
See Figure 22. NOTE: It is easier and safer to Always use a hold down or take a series of shallow cuts. push block when surfacing short stock or stock less than 3 inches thick. Jointing Warped Surfaces If the wood to be jointed is dished or warped, take light cuts until the surface is flat. -
Page 15: Beveling
The cutterhead runs in two single-row sealed and IMPORTANT: If the bearings (G, Figure 27) need shielded ball bearings, which are pre-lubricated for replacement, Powermatic strongly recommends life - no maintenance is necessary. this be done by qualified service personnel. The... -
Page 16: Blade Inserts
To re-install the cutterhead, reverse the above An advantage of the helical style cutterhead is that procedure. NOTE: Before reinstalling, make if knife inserts develop nicks, these inserts can be sure the machine's curved seats of the base individually flipped or replaced without the need to casting are free of dirt, dust or grease, to help disturb the other inserts. -
Page 17: Replacement Parts
Replacement parts are listed on the following pages. To order parts or reach our service department, call 1- 800-274-6848, Monday through Friday (see our website for business hours, www.powermatic.com). Having the Model Number and Serial Number of your machine available when you call will allow us to serve you quickly and accurately. -
Page 18: Parts List: Cutterhead Assembly (Pj1696 Jointer)
Index No. Part No. Description Size ....PJ1696-001 ....Cutterhead Assembly (Items 1 thru 12 & 17 thru 21) ........1 1 ....PJ1696-014 ....Cutterhead ..................... 1 2 ....PJ1696-002 ....Left Bearing Housing ..................1 3 ....BB-6204ZZ ....Ball Bearing ....................2 4 .... -
Page 19: Cutterhead Assembly (Pj1696 Jointer)
Cutterhead Assembly (PJ1696 Jointer) 19 ... -
Page 20: Parts List: Fence Assembly (Pj1696 Jointer)
Parts List: Fence Assembly (PJ1696 Jointer) Index No. Part No. Description Size ....PJ1696-100 ....Fence Assembly (Items 19 thru 41) ............... 1 1 ....PJ1696-101 ....Fence Support ....................1 ....PJ1696-102 ....Bracket ......................1 3 .... -
Page 21: Fence Assembly (Pj1696 Jointer)
Fence Assembly (PJ1696 Jointer) 21 ... -
Page 22: Parts List: Stand Assembly (Pj1696 Jointer)
18 ....TS-1503021 ....Socket Head Cap Screw ......... M6 x 10 ......9 19 ....PJ1696-211 ....Switch ......................1 21 ....PJ1696-212 ....Pan Head Machine Screw ........M5 x 16 ......2 22 ....PJ1696-213 ....Dust Chute ..................... 1 23 .... -
Page 23: Stand Assembly (Pj1696 Jointer)
Stand Assembly (PJ1696 Jointer) 23 ... -
Page 24: Parts List: Bed Assembly (Pj1696 Jointer)
12 ....PJ1696-305 ....Pivot Shaft ..................... 2 13 ....PJ1696-319 ....Cap Nut ..............1/2-13 ......2 14 ....PJ1696-306 ....Hex Cap Screw ............1/2-13 x 2 3/4 ....2 15 ....TS-0680061 ....Flat Washer ............. 1/2 ......... 2 16 .... -
Page 25: Bed Assembly (Pj1696 Jointer)
Bed Assembly (PJ1696 Jointer) 25 ... -
Page 26: Parts List: Cutterhead Guard Assembly (Pj1696 Jointer)
6 ....TS-1523051 ....Socket Set Screw ............ M6 x 16 ......2 7 ....TS-1523031 ....Socket Set Screw ............ M6 x 10 ......1 8 ....PJ1696-408 ....Special Washer ..................... 1 9 ....PJ1696-409 ....Flat Head Machine Screw........M8 x 16 ......1 ... -
Page 27: Cutterhead Guard Assembly (Pj1696 Jointer)
Cutterhead Guard Assembly (PJ1696 Jointer) 27 ... -
Page 28: Parts List: Infeed Table Assembly (Pj1696 Jointer)
12 ....PJ1696-508 ....Adjustment Shaft ................... 2 13 ....TS-1525031 ....Socket Set Screw ............ M10 x 16 ....... 8 14 ....PJ1696-509 ....Special Bolt, for Spring ..........1/4-20 x 3 ...... 2 15 ....TS-0570011 ....Hex Nut ..............1/4-20 ......4 16 .... -
Page 29: Infeed Table Assembly (Pj1696 Jointer)
Infeed Table Assembly (PJ1696 Jointer) 29 ... -
Page 30: Parts List: Outfeed Table Assembly (Pj1696 Jointer)
2 ....PJ1696-602A .... Outfeed Table ....................1 3 ....TS-1505061 ....Socket Head Cap Screw ......... M10 x 40 ....... 4 4 ....PJ1696-603 ....Table Lifting Support Base ................1 5 ....PJ1696-604 ....Table Raising Link Bar .................. 2 6 .... -
Page 31: Outfeed Table Assembly (Pj1696 Jointer)
Outfeed Table Assembly (PJ1696 Jointer) 31 ... -
Page 32: Parts List: Motor Assembly (Pj1696 Jointer)
8 ....TS-2311101 ....Hex Nut (Full)............M10 ....... 3 9 ....PJ1696-704 ....Support ......................1 10 ....PJ1696-705 ....Rod ................M12 x 150 ..... 1 11 ....TS-2360121 ....Flat Washer ............. M12 ....... 2 12 ....TS-2311121 ....Hex Nut (Full)............M12 ....... 5 13 .... -
Page 33: Electrical Connections
Electrical Connections 33 ... -
Page 34: Preventive Maintenance
Preventive Maintenance Checklist for Model PJ1696 Jointer Monthly: Inspect entire machine for loose bolts, nuts, screws. Tighten and replace as necessary. Clean table and cutterhead area, removing sawdust and chips with a soft bristle brush. Remove gum and pitch with oven cleaner. - Page 35 35 ...
- Page 36 427 New Sanford Road LaVergne, Tennessee 37086 Phone: 800‐274‐6848 www.powermatic.com 36 ...
Need help?
Do you have a question about the PJ1696 and is the answer not in the manual?
Questions and answers