Table of Contents
Advertisement
Quick Links
Advertisement
Table of Contents

Related Manuals for Powermatic PJ1696T


Summary of Contents for Powermatic PJ1696T
- Page 1 Operating Instructions and Parts Manual 16-inch Jointer Models: PJ1696 and PJ1696T For machines with serial no. 12061696217 and higher Powermatic 427 New Sanford Road LaVergne, Tennessee 37086 Part No. M-0460269 Ph.: 800-274-6848 Edition 5 06/2023 www.powermatic.com Copyright © 2014 Powermatic...
-
Page 2: Warranty And Service
Warranty and Service Powermatic warrants every product it sells against manufacturers’ defects. If one of our tools needs service or repair, please contact Technical Service by calling 1-800-274-6846, 8AM to 5PM CST, Monday through Friday. Warranty Period The general warranty lasts for the time period specified in the literature included with your product or on the official Powermatic branded website. -
Page 3: Table Of Contents
Warranty and Service ............................2 Table of Contents ..............................3 Warning ................................. 4 Safety Label ................................6 Features: PJ1696 & PJ1696T Jointers ......................... 7 Introduction ................................8 Specifications ................................ 8 Receiving the Jointer ............................. 9 Installation and Assembly ............................. 9 Fence Installation .............................. -
Page 4: Warning
Make certain the work area is well lighted and that a proper exhaust system is used to minimize dust. Powermatic recommends the use of anti-skid floor strips on the floor area where the operator normally stands, and that each machine's work area be marked off. Provide adequate workspace around the machine. - Page 5 Do not equip or use this jointer with a motor larger than 7-1/2 Horsepower at 5,200 R.P.M. Use of a larger horsepower motor or higher cutterhead speed voids the warranty and Powermatic holds itself harmless for any injury which may result.
-
Page 6: Safety Label
Safety Label Familiarize yourself with the location and content of this decal on your machine. Figure 3... -
Page 7: Features: Pj1696 & Pj1696T Jointers
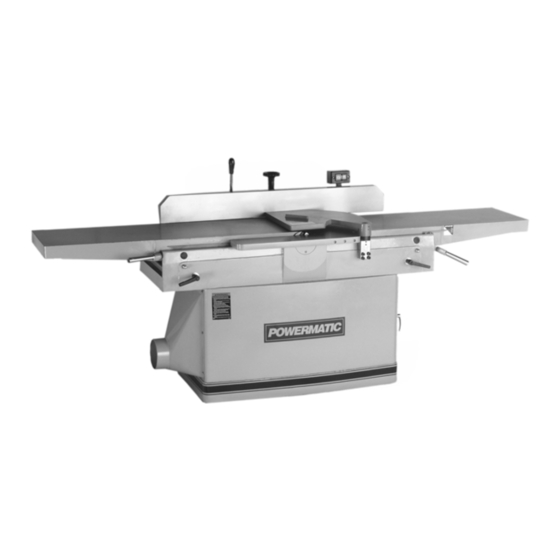
Features: PJ1696 & PJ1696T Jointers Figure 4 Outfeed table Guard Bracket Block Fence Pushbutton Switch Fence Handle Cabinet Lock Lever Table Lock Cast Housing Door Latch Control Handle - Forward/Backward Cabinet Door Rack Column Table Raising/Lowering Handle Cutterhead Guard Plate... -
Page 8: Introduction
Introduction This manual is provided by Powermatic Inc. covering the safe operation and maintenance procedures for Powermatic Model PJ1696 and PJ1696T Jointers. This manual contains instructions on installation, safety precautions, general operating procedures, maintenance instructions and parts breakdown. This machine has been designed and constructed to provide years of trouble-free operation if used in accordance with instructions set forth in this manual. -
Page 9: Receiving The Jointer
Do not use an abrasive pad. After cleaning, it is recommended that you cover all unpainted surfaces with a good quality paste wax. Note: Model PJ1696T has an industrial-grade, low-friction, corrosion-resistant coating and will not require cleaning with solvents. Crate contents:... -
Page 10: Dust Hood
Electrical Connection Electrical connections must be made by a qualified electrician. The machine must be properly grounded to help avoid electric shock and possible death. IMPORTANT: Make sure electrical characteristics are the same between the motor nameplate and the power source, and make sure the circuit on which the jointer will be used is properly fused and that the wire size is correct. -
Page 11: Adjustments
Adjustments Disconnect jointer from power supply before making adjustments. Model PJ1696T industrial-grade, low-friction, corrosion- resistant coating on infeed and outfeed tables, fence, and rabbeting ledge. While the coating is durable, it can be damaged if metal or other hard and/or sharp objects strike, gouge, or scratch the surface. -
Page 12: Infeed Table Adjustment
3. Lower the outfeed table until the straight edge contacts a knife. Rock the cutterhead slightly to make sure the apex of the knife is contacting the straight edge. Lock the outfeed table at that setting. After the outfeed table has been set at the correct height, it should not be changed except for special operations or after replacing knives. -
Page 13: Fence Adjustments
Operating Instruction Model PJ1696T industrial-grade, low-friction, corrosion- resistant coating on infeed and outfeed tables, fence, and rabbeting ledge. While the coating is durable, it can be damaged if metal or other hard and/or sharp objects strike, gouge, or scratch the surface. Significant damage to the coating may affect its performance. -
Page 14: Surfacing
Surfacing 7. Reconnect power. Lower infeed table 1/32” at a time and make successive cuts until the Jointing the face of stock, or surfacing, is shown in desired depth of rabbet has been obtained. Figure 21. Adjust the infeed table for depth of cut. See Figure 22. -
Page 15: Beveling
Maintenance Disconnect machine from power source before performing any maintenance. Failure to comply may cause serious injury. Figure 26 Model PJ1696T industrial-grade, low-friction, corrosion- 6. Slide the cutterhead out the rabbeting side. resistant coating on infeed and outfeed tables, 7. Loosen lock screw (A, Figure 27) and remove fence, and rabbeting ledge. -
Page 16: Blade Inserts
IMPORTANT: If the bearings (G, Figure 27) need works easier and results in longer blade life. The replacement, Powermatic strongly recommends penalty paid for a dull blade is less blade life and this be done by qualified service personnel. The greater wear and tear on all parts of the machine. -
Page 17: Replacement Parts
Replacement parts are listed on the following pages. To order parts or reach our service department, call 1- 800-274-6848, Monday through Friday (see our website for business hours, www.powermatic.com). Having the Model Number and Serial Number of your machine available when you call will allow us to serve you quickly... -
Page 18: Parts List: Cutterhead Assembly
Parts List: Cutterhead Assembly – Parts List Index No. Part No. Description Size ....PJ1696-001 ....Cutterhead Assembly (Items 1 thru 12 & 17 thru 21) ........1 1 ....PJ1696-014 ....Cutterhead ..................... 1 2 ....PJ1696-002 ....Left Bearing Housing ..................1 3 .... -
Page 19: Cutterhead Assembly
Cutterhead Assembly – Exploded View... -
Page 20: Parts List: Fence Assembly
33 ....TS-1540081 ....Hex Nut (Full) ............M12 ....... 1 34 ....6295360 ....Fence (model PJ1696) .................. 1 ....PM1-55 ...... Fence (model PJ1696T) ................1 35 ....PJ1696-120 ....Handle Rod ....................1 36 ....PJ1696-121 ....Handle ......................1 37 .... -
Page 21: Fence Assembly
Fence Assembly – Exploded View... -
Page 22: Parts List: Stand Assembly
Parts List: Stand Assembly – Parts List Index No. Part No. Description Size 1 ....PJ1696-201 ....Stand ......................1 2 ....TS-0680042 ....Flat Washer ............. 3/8 ....... 10 3 ....TS-0060031 ....Hex Cap Screw ............3/8-16 x 3/4 ....4 4 .... -
Page 23: Stand Assembly
Stand Assembly – Exploded View... -
Page 24: Parts List: Bed Assembly
33 ....TS-0209031 ....Socket Head Cap Screw ......... 3/8-16 x 3/4 ....3 34 ....PJ1696-401 ....Rabbeting Table (model PJ1696) ..............1 ....PM1-56 ...... Rabbeting Table (model PJ1696T) ..............1 35 ....PJ1696-318 ....Bracket Block ....................1 36 .... -
Page 25: Bed Assembly
Bed Assembly – Exploded View... -
Page 26: Parts List: Cutterhead Guard Assembly
8 ....PJ1696-408 ....Special Washer ..................... 1 9 ....PJ1696-409 ....Flat Head Machine Screw ........M8 x 16 ......1 10 ....PM1-58 ...... Non-Marring Strip (model PJ1696T) .............. 1 11 ....TS-1532032 ....Phillips Pan Hd Mach Screw ................. 4... -
Page 27: Cutterhead Guard Assembly
Cutterhead Guard Assembly – Exploded View... -
Page 28: Parts List: Infeed Table Assembly
1 ....PJ1696-501 ....Infeed Table Lip ..................... 1 2 ....PJ1696-502 ....Infeed Table (model PJ1696) ................ 1 ....PM1-59 ...... Infeed Table (model PJ1696T) ..............1 3 ....TS-1505061 ....Socket Head Cap Screw ......... M10 x 40 ....... 4 4 .... -
Page 29: Infeed Table Assembly
Infeed Table Assembly – Exploded View... -
Page 30: Parts List: Outfeed Table Assembly
1 ....PJ1696-601 ....Outfeed Table Lip ..................1 2 ....PJ1696-602A .... Outfeed Table (model PJ1696) ..............1 ....PM1-60 ...... Outfeed Table (model PJ1696T) ..............1 3 ....TS-1505061 ....Socket Head Cap Screw ......... M10 x 40 ....... 4 4 .... -
Page 31: Outfeed Table Assembly
Outfeed Table Assembly – Exploded View... -
Page 32: Parts List: Motor Assembly
Parts List: Motor Assembly – Parts List Index No. Part No. Description Size 1 ....PJ1696-701 ....Motor........7-1/2HP, 3Ph 230/460V, 60Hz ......1 2 ....PJ1696-702 ....Motor Sheave ....................1 3 ....TS-1525011 ....Socket Set Screw ............ M10 x 10 ....... 2 4 .... -
Page 33: Electrical Connections
Electrical Connections... -
Page 34: Preventive Maintenance
Preventive Maintenance Checklist for Jointer Monthly: Inspect entire machine for loose bolts, nuts, screws. Tighten and replace as necessary. Clean table and cutterhead area, removing sawdust and chips with a soft bristle brush. Remove gum and pitch with oven cleaner. Lubricate adjusting screws beneath infeed and outfeed tables with a good grade non- hardening grease. - Page 36 427 New Sanford Road LaVergne, Tennessee 37086 Phone: 800-274-6848 www.powermatic.com...
Need help?
Do you have a question about the PJ1696T and is the answer not in the manual?
Questions and answers