Table of Contents
Advertisement
Advertisement
Table of Contents

Related Manuals for Audio Pro STEREO ONE


Summary of Contents for Audio Pro STEREO ONE
- Page 1 STEREO ONE ACE BASS CD-RECEIVER (ENG) OPERATING INSTRUCTIONS...
-
Page 3: Table Of Contents
13 Direct tuning to a radio frequency 13 Radio station pre-sets 14 Radio Data System [RDS] functions 16 Adjusting the sound 17 Timer functions 17 Setting the timer 18 Other important information 19 Stereo One ACE PLUS speakers 20 Troubleshooting 21 Technical data... -
Page 4: Before Connecting To Power Source
BEFORE CONNECTING TO POWER SOURCE Unpacking Carefully unpack the unit, making sure that all the accessories are included in the packaging (see below). Examine the receiver to make sure that it has not been damaged during transport. If your unit is damaged or it does not work, inform your dealer immediately. -
Page 5: Security
SECURITY Power source This unit is intended for use with a 230 V AC power sup- ply only. Connecting to a different power source may lead to accidents or fire and can damage the unit. Check the voltage of the power source before you connect this unit. Power cable This unit has a detachable power cable. -
Page 6: Controls And Indicators
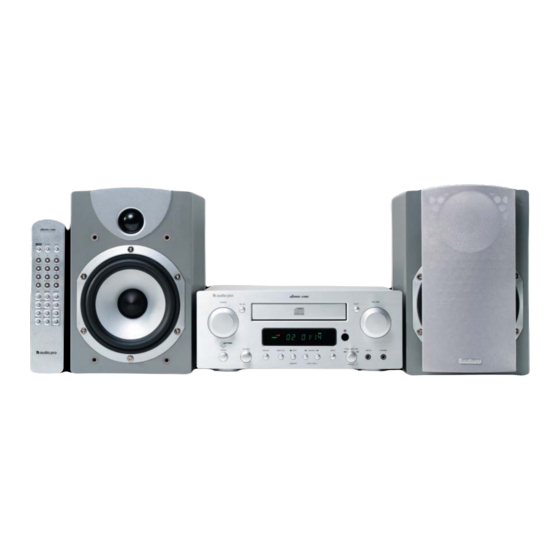
CONTROLS AND INDICATORS HEAD UNIT FRONT PANEL 1) Power switch Press this button to turn on the receiver, provided it is in standby mode (indicated by the red LED on the ace-bass indicator (#19 on the diagram). If it is not illu- minated, then the receiver is turned off, in which case, turn on the ON/OFF switch at the back of the unit (ON). - Page 7 CONTROLS AND INDICATORS Tuner mode: turn the knob to the right to select the next pre-set radio station. Keep turning the knob to move through pre-sets on the radio dial. Turn the knob to the left to select preceding pre-set radio stations. 10) Line in An additional audio source, for example, an Mp3 or a portable CD player, can be connected here with a 3.5...
-
Page 8: The Remote Control
CONTROLS AND INDICATORS REMOTE CONTROL 1) Power switch Press this button to turn on the receiver, assuming that it is in standby mode (the ace-bass indicator LED is red). If it is not red, the receiver is off. Turn on the receiver with the ON/OFF switch at the back of the unit. -
Page 9: Head Unit
3) ACE BASS switch This switch must always be in the ON position when Stereo One Ace Plus speakers are used. If different speakers are connected, this switch must always be in the OFF position. -
Page 10: Installation
INSTALLATION Connecting the speakers Connect the included speaker cables according to the drawing below. The two ends of the cables are different. Connect the cable ends with the 3.5 mm [1/8 inch] plugs and forked crimp terminals to the respective speak- ers. -
Page 11: Using The Remote Control
INSTALLATION Using the remote control Insert the AAA batteries included in the packaging into the battery opening on the back of the remote control. Make sure that the polarities (+ and -) are aligned correctly. The remote control’s operating range (approxi- mate) Note that the remote control’s power button only works if the power switch on the back of the head... -
Page 12: Cd Functions
CD FUNCTIONS Playing a CD Press EJECT to open the CD tray. Place a CD in the tray with the label facing up. Press EJECT to close the tray. Press PLAY to listen to the first track. Shown on the display: Track number Pausing the CD Press PLAY to pause the CD. -
Page 13: Tuner Functions
TUNER FUNCTIONS Manual search of FM/AM radio stations Select TUNER as an audio source using the SOURCE button. Select FM-stereo, FM-mono or AM with the FM/AM button. On the remote control, use the INPUT and BAND buttons. Turn the TUNING knob to the right to search up on the radio dial or to the left to search down on the radio dial. - Page 14 RDS [RADIO DATA SYSTEM] FUNCTIONS RDS (Radio Data System) RDS is a system that sends information (digital data) for FM broadcasts together with the broadcast signal. Radio parts developed for RDS reception can convert these digital data for the display of program names, program types, current time, etc.
- Page 15 RADIO FUNCTIONS - RDS RDS program types (PTY) Program type News Current affairs Information Sports Education Drama Culture Science Varied Pop music Rock music Easy-listening music Light music Classical music Other music Weather Finance Children Social issues Religion Call-in program Travel Leisure Jazz music...
-
Page 16: Adjusting The Sound
ADJUSTING THE SOUND Adjusting the volume Turn the volume knob clockwise (to the right) to raise the volume or counter-clockwise (to the left) to lower the volume. The scale shown on the display ranges from 00- 40, that is, from VOL OO (minimum) to VOL MAX (maximum). -
Page 17: Timer Functions
TIMER FUNCTIONS Timer The timer can be set for one event within a 24-hour period (ONCE) or for recurring events (EVERY DAY). The time settings for both of these functions are kept in memory even when they are not activated. Both functions can be activated simultaneously. -
Page 18: Other Important Information
ACE BASS selector switch on back panel. This selector switch must always be in the ON position when the Stereo One ACE PLUS speakers a connected. The selector switch is locked in the ON position at the factory. -
Page 19: Stereo One Ace Plus Speakers
Thanks to Audio Pro’s patented ACE BASS technology, Stereo One ACE PLUS, together with the Stereo One CD receiver, offers a unique audio experience. -
Page 20: Troubleshooting
TROUBLESHOOTING If a unit does not function or perform as expected, the problem is not always a mechanical one. The solution may be found in the table below. Check here before you contact your retailer or authorized serv- ice center Symptom: Absence of sound No sound from the left or right speaker... -
Page 21: Technical Data
Tweeter:...1” Silk dome Woofer:...5 1/4” Polyglass cone Cross-over frequency:...3.300Hz Frequency response:...38Hz - 40.000Hz Impedance:...4 Ω Dimensions: Width:...160 mm Height:...240 mm Depth:...320 mm Audio Pro follows the policy to constantly develop the products. Therefore, specifications can be changed without further notice. -
Page 22: Your Own Notes
YOUR OWN NOTES:... - Page 24 Audio Pro AB Box 1015 S-251 10 Helsingborg Sweden www.audiopro.com...
Need help?
Do you have a question about the STEREO ONE and is the answer not in the manual?
Questions and answers
Szukam schematu do AUDIO PRO STEREO ONE
Schematics for the Audio Pro Stereo One can be found on HiFiEngine.
This answer is automatically generated
Dzień dobry, szukam schematu serwisowego do tego sprzetu