Chapters
Table of Contents

Related Manuals for HomeMatic IP Wired HmIPW-WRC6


Summary of Contents for HomeMatic IP Wired HmIPW-WRC6
- Page 1 Installations- und Bedienungsanleitung Installating instruction and operating manual Wired Wandtaster – 6-fach S. 2 Wired Wall-mount Remote p. 29 Control – 6 buttons HmIPW-WRC6...
- Page 2 Lieferumfang Anzahl Bezeichnung Homematic IP Wired Wandtaster – 6-fach Wechselrahmen Montageplatte Schrauben 3,2 x 15 mm Schrauben 3,2 x 25 mm Beschriftungsvorlage Bedienungsanleitungen Beiblatt mit Sicherheitshinweisen Dokumentation © 2021 eQ-3 AG, Deutschland Alle Rechte vorbehalten. Ohne schriftliche Zustimmung des Herausgebers darf diese Anleitung auch nicht auszugsweise in...
- Page 5 click click...
- Page 6 Homematic IP * HmIP Gerät anlernen / Teach-in HmIP device Homematic IP...
-
Page 8: Table Of Contents
Montage in Mehrfachkombinationen ......18 Anlernen ................18 5.4.1 Anlernen an die Zentrale CCU3 ......19 5.4.2 Anlernen an die Homematic IP Cloud per Wired Access Point ..........22 Bedienung ................24 Fehlercodes und Blinkfolgen ........25 Wiederherstellung der Werkseinstellungen ....26 Wartung und Reinigung ..........27... -
Page 9: Hinweise Zur Anleitung
Hinweise zur Anleitung Hinweise zur Anleitung Lesen Sie diese Anleitung sorgfältig, bevor Sie Ihre Homematic IP Geräte in Betrieb nehmen. Bewahren Sie die Anleitung zum späteren Nachschlagen auf! Wenn Sie das Gerät anderen Personen zur Nutzung über- lassen, übergeben Sie auch diese Anleitung. - Page 10 Gefahrenhinweise Verwenden Sie das Gerät nicht, wenn es von au- ßen erkennbare Schäden, z. B. am Gehäuse, an Bedienelementen oder an den Anschlussbuchsen ausweist. Lassen Sie das Gerät im Zweifelsfall von einer Fachkraft prüfen. Betreiben Sie das Gerät nur in Innenräumen und setzen Sie es keinem Einfluss von Feuchtigkeit, Vibrationen, ständiger Sonnen- oder anderer Wärmeeinstrahlung, übermäßiger Kälte und kei-...
- Page 11 Homematic IP Wired Bus vorgesehen. Der Homematic IP Wired Bus ist ein SELV-Stromkreis. Eine gemeinsame Führung der Netzspannung und des Homematic IP Wired Bus in Installations- oder Verteilerdosen ist nicht zulässig. Die not- wendige Isolation einer Netzspannung der Haus- installation zum Homematic IP Wired Bus ist immer einzuhalten.
-
Page 12: Funktion Und Geräteübersicht
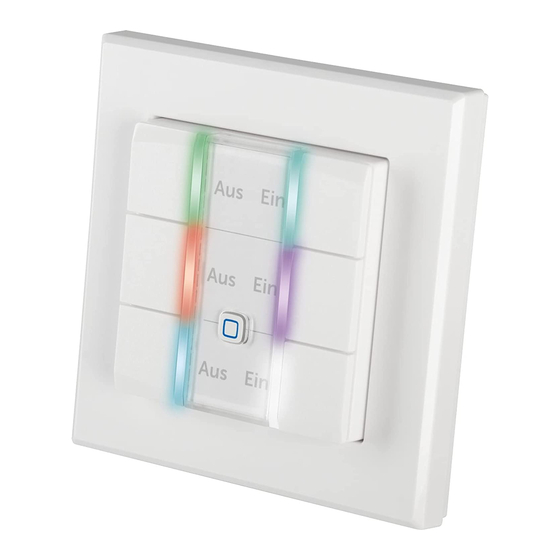
Geschäfts- und Gewerbebereichen sowie in Kleinbetrieben bestimmt. Funktion und Geräteübersicht Der Homematic IP Wired Wandtaster verfügt über drei frei konfigurierbare Tastenpaare und kann flexibel im Homematic IP Wired System eingesetzt werden, um Gerä- te und Funktionen zu steuern. Mit nur einem Tastendruck ist es bspw. -
Page 13: Allgemeine Systeminformationen
Sie haben die Möglichkeit, alle Geräte des Systems komfortabel und individuell über die Bedienoberfläche der Zentrale CCU3 oder flexibel per Smartphone über die Homematic IP App in Verbindung mit der Homema- tic IP Cloud zu konfigurieren. Welcher Funktionsumfang sich innerhalb des Systems im Zusammenspiel mit wei- teren Komponenten ergibt, entnehmen Sie bitte dem Homematic ... -
Page 14: Inbetriebnahme
Inbetriebnahme Inbetriebnahme Installationshinweise Da der Bus vom Homematic IP Wired Access Point (HmIPW-DRAP) gespeist wird, müssen Sie für die Spannungsversorgung des Geräts zu- nächst einen Homematic IP Wired Access Point (HmIPW-DRAP) in Betrieb nehmen. Bitte notieren Sie sich vor der Installation die auf dem Gerät angebrachte Gerätenummer (SGTIN) - Page 15 Inbetriebnahme Mit einer unsachgemäßen Installation riskieren Sie schwere Sachschäden, z. B. durch Brand. Es droht für Sie die persönliche Haftung bei Personen- und Sachschäden. Wenden Sie sich an einen Elektroinstallateur! Erforderliche Fachkenntnisse für die Installation: Für die Installation sind insbesondere folgende Fachkenntnisse er- forderlich: •...
-
Page 16: Installation
Inbetriebnahme Aus Gründen der elektrischen Sicherheit dürfen zum Anschluss des Homematic IP Wired Bus aus- schließlich folgende Leitungen eingesetzt werden: • Fernmeldeleitung J-Y(ST)Y mit 2 x 2 x 0,8 (= 0,5 mm²) oder 4 x 2 x 0,8 (= 0,5 mm²), geschirmt, TP •... - Page 17 Schalten Sie den entsprechenden Strang des an- kommenden Homematic IP Wired Busses ab. • Schließen Sie den Homematic IP Wired Bus an die Busanschlussklemmen an (s. Abbildung 3). Zum Anschließen und Lösen der einzelnen Adern be- tätigen Sie den orangen Betätigungsdrücker mit Hilfe eines kleinen Schraubendrehers.
-
Page 18: Montage In Mehrfachkombinationen
Sie mit dem Anlernen beginnen. Detaillierte Informationen zu den Einrichtungs- und Steuerungsmöglichkeiten entnehmen Sie bitte dem Homematic IP Wired Systemhandbuch. Damit das Gerät in Ihr System integriert werden und mit anderen Geräten kommunizieren kann, muss es zunächst angelernt werden. Sie haben folgende Einrichtungs- und... -
Page 19: Anlernen An Die Zentrale Ccu3
Anlernen an die Homematic IP Cloud Für eine flexible Steuerung per kostenloser Smartphone- App können Sie das Gerät an die Homematic IP Cloud an- lernen (s. „5.4.2 Anlernen an die Homematic IP Cloud per Wired Access Point“ auf Seite 22). Dabei ist es möglich, die Wired Geräte... - Page 20 Inbetriebnahme lernen Sie den Homematic IP Wired Access Point • Starten Sie die Benutzeroberfläche „WebUI“ auf Ihrem PC. • Klicken Sie auf den Button „Geräte anlernen“ im rechten oberen Bereich des Browserfensters. • Um den Anlernmodus zu aktivieren, klicken Sie im nächsten Fenster auf „HmIP Gerät anlernen“.
- Page 21 Neu angelernte Geräte und die zugehörigen Kanäle ste- hen erst dann für Bedien- und Konfigurationsaufgaben zur Verfügung, nachdem sie im Posteingang konfiguriert wur- den. Weitere Informationen finden Sie im Homematic IP Wired Systemhandbuch unter www.homematic-ip.com. Im Betrieb ohne aktiven Internetzugang wählen Sie die Option „Homematic IP Gerät ohne...
-
Page 22: Anlernen An Die Homematic Ip Cloud Per Wired Access Point
5.4.2 Anlernen an die Homematic IP Cloud per Wired Access Point Wenn Sie Ihre Homematic IP Wired Geräte flexibel per Smartphone-App steuern möchten, können Sie die Homematic IP Wired Geräte einfach an die Homematic IP Cloud anlernen. Gehen Sie dazu wie folgt vor: •... - Page 23 • Vergeben Sie in der App einen Namen für das Ge- rät und ordnen Sie es einem Raum zu. Wenn Sie bereits Homematic IP Geräte im Smart- Home-System nutzen oder Ihre Wired-Geräte mit Funk-Komponenten von Homematic IP kombi- nieren möchten, können Sie die Homematic IP Wired-Geräte auch einfach an einen (bestehen-...
-
Page 24: Bedienung
Tastenpaare definiert. Dabei hat jeweils die rechte Taste die Funktion „Ein/Heller/Hoch“ und die linke Taste „Aus/Dunkler/Runter“. Über die sechs Tasten bzw. Kanäle können andere Geräte und Funktionen des Homematic IP Systems gesteuert werden. Zusätzlich können die LEDs gewünschte Zustände anzeigen. -
Page 25: Fehlercodes Und Blinkfolgen
Fehlercodes und Blinkfolgen Fehlercodes und Blinkfolgen Blinkcode Bedeutung Lösung Kurzes Datenübertra- Warten Sie, bis oranges gung die Übertragung Blinken beendet ist. 1x langes Vorgang Sie können mit grünes bestätigt der Bedienung Leuchten fortfahren. 1x langes rotes Vorgang Versuchen Sie es Leuchten fehlgeschlagen erneut. -
Page 26: Wiederherstellung Der Werkseinstellungen
Drücken Sie die Systemtaste erneut für 4 s, bis die LED grün aufleuchtet (s. Abbildung 10). • Lassen Sie die Systemtaste wieder los, um das Wiederherstellen der Werkseinstellungen abzuschließen. Das Gerät führt einen Neustart durch. Nach dem Neustart können Sie das Gerät wieder in Ihr Homematic IP System integrieren. -
Page 27: Wartung Und Reinigung
Wartung und Reinigung Wartung und Reinigung Das Gerät ist wartungsfrei. Überlassen Sie eine Reparatur einer Fachkraft. Reinigen Sie das Gerät mit einem weichen, sauberen, trockenen und fusselfreien Tuch. Verwenden Sie keine lösemittelhaltigen Reinigungsmittel, das Kunststoffge- häuse und die Beschriftung können dadurch angegriffen werden. - Page 28 Technische Daten Gewicht: 68 g Technische Änderungen vorbehalten. Entsorgungshinweis Gerät nicht im Hausmüll entsorgen! Elektroni- sche Geräte sind entsprechend der Richtlinie über Elektro- und Elektronik-Altgeräte über die örtlichen Sammelstellen für Elektronik-Altgeräte zu entsorgen. Konformitätshinweis Das CE-Zeichen ist ein Freiverkehrszeichen, das sich ausschließlich an die Behörden wendet und keine Zusicherung von Eigenschaften beinhaltet.
- Page 29 Package contents Quantity Description Homematic IP Wired Wall-mount Remote Control – 6 buttons Clip-on frame Mounting plate Screws 3.2 x 15 mm Screws 3.2 x 25 mm Labelling template Operating manuals Supplement with safety instructions Documentation © 2021 eQ-3 AG, Germany All rights reserved.
- Page 30 Teaching-in ................40 5.4.1 Connecting to Homematic IP Central Control Unit CCU3 ..........41 5.4.2 Connecting to the Homematic IP cloud via Wired Access Point .......... 44 Operation ................ 46 Error codes and flashing sequences ......47 Restore factory settings ..........48 Maintenance and cleaning ..........
-
Page 31: Information About This Manual
Information about this manual Please read this manual carefully before operating your Homematic IP components. Keep the manual so you can refer to it at a later date if you need to. If you hand over the device to other persons for use, please hand over this manual as well. - Page 32 Hazard information Do not use the device if there are signs of dam- age to the housing, control elements or connect- ing sockets, for example. If you have any doubts, have the device checked by an expert. The device may only be operated indoors and must be protected from the effects of moisture, vibrations, solar or other methods of heat radia- tion, cold and mechanical loads.
- Page 33 The device is intended for operation within the Homematic IP Wired bus only. The Homematic IP Wired bus is a SELV power circuit. Common cable routing of power supply and the Homematic IP Wired bus in installation or junction boxes is not permitted.
-
Page 34: Function And Device Overview
The Homematic IP Wired Wall-Mount Remote Control has three pairs of individually configurable buttons for versatile use in the Homematic IP Wired System to mana- ge devices and operate functions. One touch of a button can, for example, switch lights on or off, raise or lower roller shutters or activate/deactivate alarm modes. -
Page 35: General System Information
System button (teach-in button and LED) Buttons (channels 1–6) and LEDs (channels 7–13) General system information This device is part of the Homematic IP smart home system and works with the Homematic IP protocol. All devices of the system can be configured comfortably and individually with the user interface of the Central Control Unit CCU3 or flexibly via the Homematic IP smartphone... -
Page 36: Start-Up
Start-up Start-up Installation instructions Since the bus is powered by the Homematic IP Wired Access Point (HmIPW-DRAP), you must first set-up a Homematic IP Wired Access Point (HmIPW-DRAP) to enable power supply for the device. Before installation, please note the device num-... - Page 37 Start-up Incorrect installation also means that you are running the risk of serious damage to property, e.g. from fire. You may be personally liable in the event of injuries or damage to property. Contact an electrical installer! Specialist knowledge required for installation: The following specialist knowledge is particularly important during installation: •...
-
Page 38: Installation
Access Point (HmIPW-DRAP). The shield may not be connected to the wall-mount remote control. Installation The bus is powered by the Homematic IP Wired Access Point (HmIPW-DRAP). For further infor- mation, please refer to the operating manual of the corresponding Wired Access Points. -
Page 39: Installation In Multiple Combinations
Disconnect the corresponding line of the incom- ing Homematic IP wired bus. • Connect the Homematic IP wired bus to the bus connecting terminals (see figure 3). To connect and loosen the single wires, press the orange clamp using a small screwdriver. -
Page 40: Teaching-In
Teaching-in Please read this entire section before starting the teach-in procedure. Please refer to the Homematic IP Wired System Manual for detailed information on setup and control options. To integrate the device into your system and enable it to communicate with other devices, you must first teach it in. -
Page 41: Connecting To Homematic Ip Central Control Unit Ccu3
Connecting to the Homematic IP cloud For flexible use via the free smartphone app, you can connect the device to the Homematic IP cloud (see “5.4.2 Connecting to the Homematic IP cloud via Wired Access Point” on page 44). You can •... - Page 42 Start-up • To activate teach-in mode, click “Teach-in HmIP device” in the next window. The teach-in mode of the Central Control Unit will be activated for 60 seconds. An information box shows how much teach-in time remains. • After connecting the power supply, the device is active for 3 minutes.
- Page 43 Newly connected devices and the corresponding chan- nels are ready for operation and configuration only after they have been configured in the inbox. You will find fur- ther information in the Homematic IP Wired Installation Guide at www.homematic-ip.com. For operating without an Internet connection, “Teaching-in of...
-
Page 44: Connecting To The Homematic Ip Cloud Via Wired Access Point
Wired Access Point If you want to control your Homematic IP Wired devices flexibly via the smartphone app, they can be connected to the Homematic IP cloud. To do this, proceed as fol- lows: • Open the Homematic IP app on your smart- phone. - Page 45 In the app, give the device a name and allocate it to a room. If you are already using Homematic IP devices in your smart home system or if you want to com- bine your Homematic IP Wired devices with wire-...
-
Page 46: Operation
The LEDs can also be used to indicate required states. Use the WebUI user interface or the Homematic IP app to set the functions of the buttons and the LEDs according to your personal needs. -
Page 47: Error Codes And Flashing Sequences
Error codes and flashing sequences Error codes and flashing sequences Flashing code Meaning Solution Short orange Data transfer Wait until the flashing transmission is completed. 1x long green Operation You can continue light confirmed operation. 1x long red Operation Please try again. lighting failed Short orange... -
Page 48: Restore Factory Settings
Restore factory settings Restore factory settings The factory settings of the device can be re- stored. If you do this, you will lose all your set- tings. To restore the factory settings of the device, please pro- ceed as follows: •... -
Page 49: Technical Specifications
Technical specifications Technical specifications Device short description: HmIPW-WRC6 Supply voltage: 24 V , +5 % -20 %, SELV Current consumption: 40 mA (max.) Standby power consumption in standby: 45 mW Cable type and cross section Rigid cable 0.12-0.50 mm² Installation: only in normal commer- cial switch boxes (device boxes) in accordance... - Page 50 Technical specifications Instructions for disposal Do not dispose of the device with regular domes- tic waste! Electronic equipment must be dis- posed of at local collection points for waste elec- tronic equipment in compliance with the Waste Electrical and Electronic Equipment Directive. Information about conformity The CE sign is a free trading sign addressed ex- clusively to the authorities and does not include...
- Page 51 Bevollmächtigter des Herstellers: Manufacturer’s authorised representative: eQ-3 AG Maiburger Straße 29 26789 Leer / GERMANY www.eQ-3.de...
Need help?
Do you have a question about the IP Wired HmIPW-WRC6 and is the answer not in the manual?
Questions and answers