Advertisement
Available languages
Available languages
Quick Links
Page 1 of 26
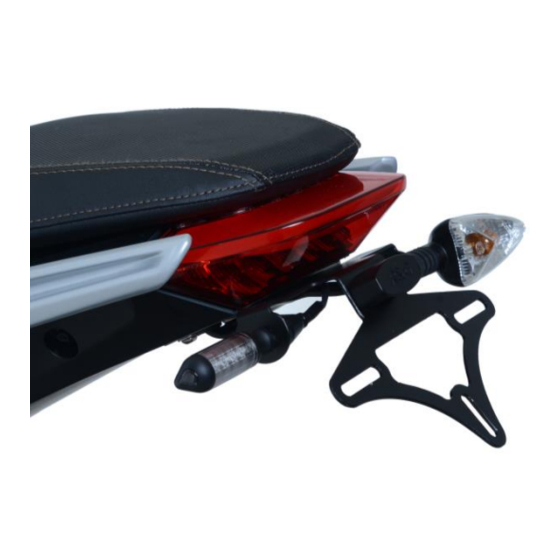
FITTING INSTRUCTIONS FOR LP0286BK LICENCE PLATE BRACKET
(FOR USE WITH STANDARD AND R&G MINI INDICATORS (8mm))
T
HIS KIT CONTAINS THE ITEMS PICTURED AND LABELLED OVER PAGE
S
IF IN ANY DOUBT WHEN FITTING OUR PRODUCTS, CONSULT ONE OF OUR DEALERS OR
P
LEASE NOTE THAT THE WAY THE KIT IS PACKED DOES NOT NECESSARILY REPRESENT THE WAY OF
I
N THE EVENT OF RUBBER WASHERS BEING USED TO HOLD COMPONENTS ONTO BOLTS
DIGITAL COPIES OF THESE INSTRUCTIONS ARE AVAILABLE FROM:
Unit 1, Shelley's Lane, East Worldham, Alton, Hampshire, GU34 3AQ
Tel: +44 (0)1420 89007 Fax: +44 (0)1420 87301
FOR ZERO SRF 2019-
OME PARTS MAY BE SHOWN FOR CLARITY OF INSTRUCTIONS ONLY
D
O NOT PROCEED UNTIL YOU ARE SURE ALL PARTS ARE PRESENT
P
LEASE READ ALL INSTRUCTIONS BEFORE PROCEEDING
HAVE FITTED BY A QUALIFIED TECHNICIAN.
MOUNTING TO THE BIKE
THESE RUBBER WASHERS CAN BE THROWN AWAY
WWW.RG-RACING.COM
.
R&G
www.rg-racing.com
LP0286
.
.
.
.
,
.
Email:
info@rg-racing.com
Advertisement

Related Manuals for R&G LP0286


Summary of Contents for R&G LP0286
- Page 1 Page 1 of 26 LP0286 FITTING INSTRUCTIONS FOR LP0286BK LICENCE PLATE BRACKET FOR ZERO SRF 2019- (FOR USE WITH STANDARD AND R&G MINI INDICATORS (8mm)) HIS KIT CONTAINS THE ITEMS PICTURED AND LABELLED OVER PAGE OME PARTS MAY BE SHOWN FOR CLARITY OF INSTRUCTIONS ONLY...
- Page 2 Page 2 of 26 LP0286 TOOLS REQUIRED GENERAL TORQUE SETTINGS • Set of metric Allen keys to include 3 & 4mm A/F sizes. M4 BOLT = 8Nm • T25 and T30 Torx bits or keys. M5 BOLT = 12Nm M6 BOLT = 15Nm •...
- Page 3 Page 3 of 26 LP0286 R&G Unit 1, Shelley’s Lane, East Worldham, Alton, Hampshire, GU34 3AQ Tel: +44 (0)1420 89007 Fax: +44 (0)1420 87301 www.rg-racing.com Email: info@rg-racing.com...
- Page 4 Page 4 of 26 LP0286 PICTURE 1 PICTURE 2 PICTURE 3 PICTURE 4 PICTURE 5 PICTURE 6 R&G Unit 1, Shelley’s Lane, East Worldham, Alton, Hampshire, GU34 3AQ Tel: +44 (0)1420 89007 Fax: +44 (0)1420 87301 www.rg-racing.com Email: info@rg-racing.com...
- Page 5 Page 5 of 26 LP0286 PICTURE 7 PICTURE 8 PICTURE 9 PICTURE 10 PICTURE 11 PICTURE 12 R&G Unit 1, Shelley’s Lane, East Worldham, Alton, Hampshire, GU34 3AQ Tel: +44 (0)1420 89007 Fax: +44 (0)1420 87301 www.rg-racing.com Email: info@rg-racing.com...
- Page 6 Page 6 of 26 LP0286 PICTURE 13 PICTURE 14 PICTURE 15 PICTURE 16 PICTURE 17 PICTURE 18 R&G Unit 1, Shelley’s Lane, East Worldham, Alton, Hampshire, GU34 3AQ Tel: +44 (0)1420 89007 Fax: +44 (0)1420 87301 www.rg-racing.com Email: info@rg-racing.com...
- Page 7 Page 7 of 26 LP0286 PICTURE 19 PICTURE 20 PICTURE 21 PICTURE 22 PICTURE 23 PICTURE 24 R&G Unit 1, Shelley’s Lane, East Worldham, Alton, Hampshire, GU34 3AQ Tel: +44 (0)1420 89007 Fax: +44 (0)1420 87301 www.rg-racing.com Email: info@rg-racing.com...
- Page 8 Page 8 of 26 LP0286 PICTURE 25 PICTURE 26 PICTURE 27 PICTURE 28 PICTURE 29 PICTURE 30 R&G Unit 1, Shelley’s Lane, East Worldham, Alton, Hampshire, GU34 3AQ Tel: +44 (0)1420 89007 Fax: +44 (0)1420 87301 www.rg-racing.com Email: info@rg-racing.com...
- Page 9 Page 9 of 26 LP0286 PICTURE 31 PICTURE 32 PICTURE 33 PICTURE 34 PICTURE 35 PICTURE 36 R&G Unit 1, Shelley’s Lane, East Worldham, Alton, Hampshire, GU34 3AQ Tel: +44 (0)1420 89007 Fax: +44 (0)1420 87301 www.rg-racing.com Email: info@rg-racing.com...
- Page 10 Page 10 of 26 LP0286 PICTURE 37 PICTURE 38 PICTURE 39 PICTURE 40 PICTURE 41 PICTURE 42 R&G Unit 1, Shelley’s Lane, East Worldham, Alton, Hampshire, GU34 3AQ Tel: +44 (0)1420 89007 Fax: +44 (0)1420 87301 www.rg-racing.com Email: info@rg-racing.com...
-
Page 11: Fitting Instructions
Page 11 of 26 LP0286 PICTURE 43 PICTURE 44 FITTING INSTRUCTIONS • To fit the R&G tail tidy, first remove the pillion seat using the key as shown in picture 1. • Undo the bolt arrowed in picture 2 and remove the rider seat. - Page 12 Page 12 of 26 LP0286 • Fit one of the rubber wiring grommets (item 12) into the licence plate mounting bracket (item 19) as shown below (a small amount of liquid detergent/soap will aid this process). • Place the licence plate mounting bracket (item 19) into position as shown above and reuse the original bolts to secure in position as arrowed in pictures 29 and 30.
- Page 13 Page 13 of 26 LP0286 • Feed the wires of the new R&G licence plate illuminator (item 9) through the central hole in the new licence plate bracket (item 1) as shown in pictures 35 and 36. • Secure using the washers and nut supplied as shown in picture 35.
- Page 14 Page 14 of 26 LP0286 • Depending on local laws, attach enclosed reflector (item 18) in an appropriate location. • Test the license plate illuminator and all lights before riding. ISSUE 1 24/04/2020 (NSY) CONSUMER NOTICE The catalogue description and any exhibition of samples are only broad indications of the Products and R&G may make design changes which do not diminish their performance or visual appeal and supplying them in such state shall conform to the order.
- Page 15 Page 15 of 26 LP0286 NOTICE DE MONTAGE POUR LP0286BK SUPPORT DE PLAQUE POUR ZERO SRF 2019- (POUR CLIGNOTANTS STANDARD ET MINI CLIGNOTANTS R&G (8mm)) E KIT CONTIENT LES ARTICLES ILLUSTRES ET ETIQUETES SUR LA PAGE ERTAINES PARTIES PEUVENT ETRE PRESENTES UNIQUEMENT POUR LA CLARTE DES INSTRUCTIONS...
-
Page 16: Outils Requis
Page 16 of 26 LP0286 OUTILS REQUIS VALEURS DE SERRAGE RECOMMANDÉES • Clés Allen 3 & 4mm. M4 BOULON = 8Nm • Clé torx T25 et T30. M5 BOULON = • Clé à molette 10mm. M6 BOULON = • Tournevis cruciforme. - Page 17 Page 17 of 26 LP0286 R&G Unit 1, Shelley’s Lane, East Worldham, Alton, Hampshire, GU34 3AQ Tel: +44 (0)1420 89007 Fax: +44 (0)1420 87301 www.rg-racing.com Email: info@rg-racing.com...
-
Page 18: Notice De Montage
Page 18 of 26 LP0286 NOTICE DE MONTAGE • Pour installer le support arrière R&G, retirez d'abord le siège passager à l'aide de la clé comme indiqué sur la photo 1. • Desserrez le boulon fléché sur la photo 2 et retirez le siège du pilote. - Page 19 Page 19 of 26 LP0286 • Remontez en place tous les panneaux latéraux d'origine du siège et le plateau inférieur comme à l’origine. Si vous réutilisez les clignotants d'origine Retirez le couvercle du support de clignotant comme indiqué sur la photo 31.
- Page 20 Page 20 of 26 LP0286 • Placez les deux entretoises filetées (article 5) sur les filetages exposés et serrez comme indiqué sur la photo 39. • Positionnez l'entretoise (article 6) sur le trou et maintenez-la en place avec une petite quantité...
- Page 21 Page 21 of 26 LP0286 MONTAGEANLEITUNG FÜR LP0286BK KENNZEICHENHALTER FÜR ZERO SRF 2019- (VERWENDUNG MIT STANDARD- UND R&G MINIBLINKER (8mm)) EILE SIND UNTEN ABGEBILDET UND GEKENNZEICHNET IE ABGEBILDETEN EILE DIENEN LEDIGLICH ZUR RKLÄRUNG Ü BERPRÜFEN IE ZUERST DASS ALLE EILE VORHANDEN SIND...
- Page 22 Page 22 of 26 LP0286 SIE BENÖTIGEN FOLGENDES WERKZEUG: ALLGEM ANZUGSDREHMOMENT • Satz Inbusschlüssel inkl. 3 & 4mm A/F M4 SCHRAUBE = 8Nm • T25 und T30 Torx-Einsätze oder -Schlüssel M5 SCHRAUBE = 12Nm M6 SCHRAUBE = 15Nm • 10mm Schraubenschlüssel oder Steckschlüssel M8 SCHRAUBE = 20Nm •...
- Page 23 Page 23 of 26 LP0286 R&G Unit 1, Shelley’s Lane, East Worldham, Alton, Hampshire, GU34 3AQ Tel: +44 (0)1420 89007 Fax: +44 (0)1420 87301 www.rg-racing.com Email: info@rg-racing.com...
- Page 24 Page 24 of 26 LP0286 MONTAGEANLEITUNG • Um den R&G Kennzeichenhalter montieren zu können, entfernen Sie zuerst den Soziussitz mit dem Schlüssel (siehe Abbildung 1). • Lösen Sie die Schraube, die in Abbildung 2 markiert ist und entfernen Sie den Fahrersitz.
- Page 25 Page 25 of 26 LP0286 • Die R&G Miniblinker (R&G Artikel-Nr. RG370 = mit Glühbirne, RG371= LED oder RG372 = Aero LED) montieren Sie wie folgt: • Die Blinker Ihrer Wahl in die großen Öffnungen im Kennzeichenhalter (Artikel 1) einsetzen und mit der Flanschmutter befestigen wie in Abbildung 34 abgebildet.
- Page 26 Page 26 of 26 LP0286 • Die Kennzeichenbeleuchtung am original Steckverbinder wie verbinden mit der mitgelieferten Verbindung (Artikel13). • Wenn Sie die Originalblinker wiederverwenden, verbinden Sie sie mit dem Kabelbaum wie ursprünglich wieder. • Wenn Sie die R&G Miniblinker verwenden, empfehlen wir, die original Verbinder an den...
Need help?
Do you have a question about the LP0286 and is the answer not in the manual?
Questions and answers