Diesse MINI-CUBE User Manual
Automatic instrument for esr determination with modified westergren method
Hide thumbs
Also See for MINI-CUBE:
- Service manual (62 pages) ,
- User manual (59 pages) ,
- Quick start manual (3 pages)

Related Manuals for Diesse MINI-CUBE


Summary of Contents for Diesse MINI-CUBE
- Page 1 USER MANUAL Software Release No. 1.xx and 1.xx.xx Rev. 1.8 issued in July 2020 Automatic instrument for ESR determination with modified Westergren method Only for in vitro diagnostic use Rx Only Rev 1.8 07/2020 1/50...
- Page 2 M I N I - C U B E – U S E R M A N U A L This manual is applicable to the following MINI-CUBE instrument models: Catalog Number Description 10392 MINI-CUBE (Streck reference number 240401) Accessories:...
- Page 3 The information contained in this manual may be subject to modifications without prior notice. No page in this manual may be reproduced in any form or by any means, electronic, mechanical or otherwise, for any use whatsoever without prior written permission from DIESSE DIAGNOSTICA SENESE S.p.A. 3/50...
- Page 4 M I N I - C U B E – U S E R M A N U A L MANUFACTURER DIESSE DIAGNOSTICA SENESE S.p.A. Via delle Rose 10, 53035 Monteriggioni (SI), Italy Tel. ++39 0577 587111 Fax. ++39 0577 318690 WWW.DIESSE.IT LEGAL REPRESENTATIVE...
- Page 5 M I N I - C U B E – U S E R M A N U A L SYMBOLS Legend of symbols used: The instrument meets the requirements of the European Directive on in vitro diagnostic medical devices (98/79/EC). In vitro diagnostic medical device Date of manufacture Serial number...
- Page 6 BIO-CONTAMINATION HAZARDS When an analysis system like the MINI-CUBE is used, all precautions must be taken regarding biological risks. The samples do not require preparation. The samples must be disposed of in accordance with laboratory instructions and with local laws.
-
Page 7: Table Of Contents
QUALITY CONTROL ............................ 36 ..........................38 ERFORMING ANALYSIS TROUBLESHOOTING ..........................39 ......................... 40 EASURING BNORMAL AMPLES CONNECTION TO A HOST COMPUTER ....................41 PERFORMANCES ............................43 MINI-CUBE P ............................. 43 RECISION MINI-CUBE C ..........................46 ORRELATION BIBLIOGRAPHY ............................48 7/50 Rev 1.8 07/2020... -
Page 8: Intended Use
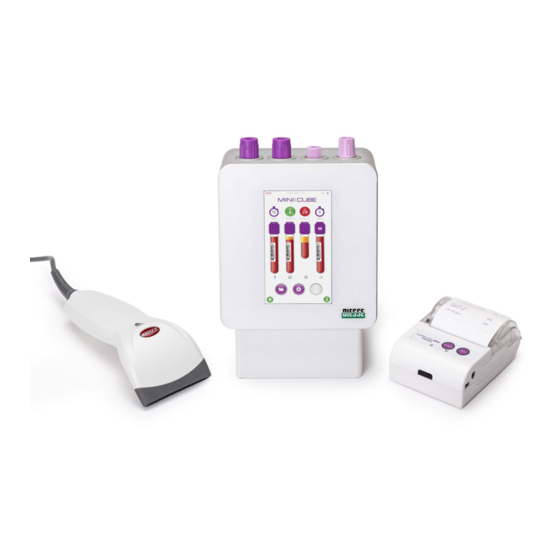
K2EDTA or K3EDTA. INTRODUCTION Presentation of the instrument he MINI-CUBE (Fig 1.0) is an automated instrument designed to measure the erythrocyte sedimentation rate (ESR) of blood samples anti-coagulated with EDTA, directly from the EDTA tube. The instrument analyzes four blood samples simultaneously on a random access and continual loading basis. - Page 9 M I N I - C U B E – U S E R M A N U A L Fig. 1.0 The instrument is designed with the temperature correction always activated and relates the results to a temperature of 18°C according to Manley’s Nomogram (graph 1.0).
-
Page 10: Clinical Significance Of Esr
M I N I - C U B E – U S E R M A N U A L Clinical Significance of ESR The erythrocyte sedimentation rate measures the distance travelled by red blood cells in autologous plasma for a certain period of time. In normal conditions, red blood cells tend to reciprocally move apart due to the presence of negative electric loads from the numerous residues of sialic acid present at a membrane glycoprotein level. -
Page 11: Materials Required For Use Of The Instrument
Precautions The MINI-CUBE system offers a closed tube system which provides less exposure to potentially infectious samples; however, all necessary precautions and personal protective equipment for handling biological material apply. Waste material should be disposed of in accordance with your local waste requirements. -
Page 12: Maintenance Procedure
U S E R M A N U A L Maintenance procedure The MINI-CUBE is designed to require minimal maintenance. For any type of maintenance activity: Switch-off the instrument and disconnect from the power source. Use all appropriate personal protective equipment during operation. -
Page 13: Technical Data
Chapter TECHNICAL DATA Technical description Fig. 2.0 The MINI-CUBE module consists of a single body containing all the operating functions necessary for analyzing the sample. The motor lifts the reading unit which utilizes four optical sensors (one per Reading unit position) to verify the suitability of the sample and detect the sample level at baseline and level after 20 minutes of sedimentation. -
Page 14: External Connections Of The Instrument
U S E R M A N U A L External connections of the instrument The MINI-CUBE has a Bluetooth 4.0 connection for an external printer (optional accessory). The power supply, serial/USB ports for connection to a computer (A), a USB port... -
Page 15: Technical Features
M I N I - C U B E – U S E R M A N U A L Technical features Internal use Input: 100-240 Vac, 50-60Hz, 0.5A Output: 9Vdc@2A marked UL POWER SUPPLY LPS, DC output shall be provided a reinforced insulation between primary and secondary circuits DIMENSIONS (mm) 135 x 191 x 125... -
Page 16: Installation
M A N U A L Chapter INSTALLATION The MINI-CUBE is a precision instrument and must be handled with appropriate care and precautions. Inappropriate operations may damage the internal optoelectronic components and cause mechanical damage. Follow the instructions in this chapter in order to ensure proper operation of the instrument and safety of the operator. -
Page 17: Materials Provided
M I N I - C U B E – U S E R M A N U A L Materials provided The MINI-CUBE is supplied with the following materials: User Manual USB mass storage with multi-lingual manual ... -
Page 18: Unpacking The Instrument
M I N I - C U B E – U S E R M A N U A L Unpacking the instrument 1. Open the box from the top and remove the User Manual, Quick Reference Guide and accessories. Fig. -
Page 19: Setup
The main power source must be compatible with the voltage and current specifications indicated on the back of the instrument. Contact Streck Technical Services for compatibility prior to attempting to connect any non-Diesse external accessories (i.e. barcode reader, printer, USB drive). 19/50... -
Page 20: Installation Procedure
3. Connect the power supply unit cable to the main power source. 4. Optional - connect the barcode scanner and Bluetooth printer. Once the MINI-CUBE is powered on, a series of beeps will be heard indicating that the system recognized the scanner. Follow the printer installation steps in chapter 4 to enable the printer. -
Page 21: Use
M I N I - C U B E – U S E R M A N U A L Chapter Instructions for the operator Before reading this section of the Manual, it is important to read the previous chapters in order to avoid problems with the operation of the instrument. Compatible test tubes ... -
Page 22: Test Tube Labeling
M A N U A L Test tube labeling The MINI-CUBE can accept sample tubes with a maximum of 1 secondary label adhered as close to the lavender EDTA cap as possible and with a label-free gap on one side. As the samples are loaded, it is important to align the label- free gap with the dot on the insertion ring so the label-free gap is towards the right of the analyzer (fig. -
Page 23: Description Of The Mini-Cube Menu
U S E R M A N U A L Description of the MINI-CUBE menu Slide the power switch on the back of the instrument to turn on the MINI-CUBE. HOME Fig. 4.2 It is recommended to use a stylus on the touch screen display. Once powered on, the Home page (Fig. -
Page 24: Performing An Analysis
The counter in the top left hand corner of the screen shows the number of tests remaining in the MINI-CUBE. For each result produced, the instrument decreases the number of tests available by one. The counter font color will change depending on the number of tests remaining;... -
Page 25: Inserting The Test Tubes
M I N I - C U B E – U S E R M A N U A L Bluetooth: This symbol indicates that the Bluetooth connection is enabled and the system is ready to communicate with accessories (e.g. a printer). Temperature: Indicates the internal temperature of the instrument in °C or °F. - Page 26 M I N I - C U B E – U S E R M A N U A L Fig. 4.4 To enter the sample ID manually before inserting a test tube, touch any empty position on the display (Fig. 4.5) to open the “New Sample” window. Fig.
-
Page 27: Starting The Analysis Cycle
M I N I - C U B E – U S E R M A N U A L When this setting is enabled, ALL tubes will be identified as MAP tubes. Insert the MAP tube in any empty tube position. MAP tubes will be displayed as a short (pediatric) tube with the letter M on the cap for MAP. - Page 28 M I N I - C U B E – U S E R M A N U A L During the analysis cycle, the user can access the Archive and Settings menus although access to edit some instrument settings will be reduced while a sample is running.
-
Page 29: Archive
M I N I - C U B E – U S E R M A N U A L ARCHIVE Fig. 4.7 The archive consists of the Patients Archive, Results Archive and QC Archive. Each archive can contain up to 5000 records. In the Patients Archive, you can search for a patient by name, surname and patient ID, clicking on the relative key in succession, entering the first letters or complete name in the specific search bar. - Page 30 M I N I - C U B E – U S E R M A N U A L Fig. 4.8 Click on the export icon to print the list of patients or filter the database by name, patient ID, sample ID or date. The following are associated with sample in the archive: the date and time of the analysis cycle;...
- Page 31 M I N I - C U B E – U S E R M A N U A L Fig. 4.9 NAME: Displays the patient Name and Surname SEX: Patient gender. DOB: Patient Date of Birth PATIENT ID: To insert the patient code in the “Patient ID” field, the barcode on the card needs to be scanned or edited manually.
- Page 32 M I N I - C U B E – U S E R M A N U A L TEMPERATURE: The instrument’s internal working temperature. The temperature is displayed in green if the test is performed with temperature correction enabled. If temperature correction is disabled, the temperature is displayed in red.
-
Page 33: Settings
M I N I - C U B E – U S E R M A N U A L SETTINGS Fig. 4.11 From the Settings menu, the user can customize various functions: BLUETOOTH: Enable or disable the Bluetooth connection with other devices. BLUET.VISIBLE: Enables visibility for Bluetooth connections such as a Smartphone. - Page 34 M I N I - C U B E – U S E R M A N U A L DATE/TIME: Set the date and time format. Military time is an option and the following date formats are available: DD/MM/YYYY MM/DD/YYYY YYYY/DD/MM REFERENCE: Indicate the reference scale to be used for test results...
- Page 35 In this sub-menu, the user can load more tests by inserting the transponder in the slot at the base of the instrument, and following the instructions displayed on the screen (Fig.4.13). Fig. 4.13 SERVICE: Service menu that can only be accessed by personnel authorized by DIESSE Diagnostica Senese S.p.A. 35/50 Rev 1.8 07/2020...
-
Page 36: Quality Control
It is recommended to run two levels of control each day of patient testing with the Diesse MINI-CUBE. In the QC archive, the user can view the historical QC data. Results are stored by the position in the instrument and may be viewed by clicking on the corresponding number. - Page 37 M I N I - C U B E – U S E R M A N U A L Click on the Download icon print the QC list or filter it by barcode or date. Click and hold a control string to enter the record displaying details (name, lot, expiry, expected results ranges).
-
Page 38: Performing Qc Analysis
4). To run a QC sample, scan the QC barcode (previously recorded in the settings menu), and then load in any free position. The MINI-CUBE will recognize a QC tube by the registered lot number, and will display an image on the screen with a barcode label, whether the QC sample is manually entered or barcoded, as shown in Fig. -
Page 39: Troubleshooting
M I N I - C U B E – U S E R M A N U A L Chapter TROUBLESHOOTING If any problem persists, contact Streck Technical Services at 800.843.0912 x7510. ERROR MESSAGES CAUSE/REMEDY The system is attempting to initialize but test tubes were detected. -
Page 40: Measuring Abnormal Samples
In the MINI-CUBE, the sample may go undetected or yield variable results. Visually inspect the sample at the conclusion of the test to confirm the presence of a clear interface. -
Page 41: Connection To A Host Computer
USB Port (Square Type B Connector). In this case a software Driver (STM32_SW) has to be installed on the PC. To set the communication with the MINI-CUBE through a virtual COM port over USB. On the MINI CUBE the parameter “HOST BY USBH” has to be set OFF in the Service Menu 2- Using a serial RS232 COM port on the PC. - Page 42 M A N U A L SIGNAL Rx of data from Host Tx of data towards Host Detailed specifics of the communication protocol are available for consultation on the web site at the following address: www.diesse.it/ MINI-CUBE SPECIFICATION PROTOCOL Rev 1.8 07/2020 42/50...
-
Page 43: Performances
ESR-Chex Level 1 (Normal) Lot 5159 Exp. Date 2016-06 ESR-Chex Level 2 (Abnormal) Lot 5159 Exp. Date 2016-06 Instruments: MINI-CUBE – Instrument A Serial 1039200026 Software Version 0.64 MINI-CUBE – Instrument B Serial 1039200027 Software Version 0.64 MINI-CUBE – Instrument C Serial 1039200029 Software Version 0.64... - Page 44 M I N I - C U B E – U S E R M A N U A L ESR Value (mm/h) Streck ESR-Chex Replicate Normal Abnormal Mean 0.00 7.46 14.1 Intra-assay precision (Within-lab): Means of 20 replicates of each QC blood sample tested on one instrument by a single operator during 5 working days.
- Page 45 M I N I - C U B E – U S E R M A N U A L Inter-instrument precision: Means of 60 replicates of each QC blood sample tested on 3 instruments by a single operator during 5 working days. ESR Value (mm/h) Streck ESR-Chex Instrument...
-
Page 46: Mini-Cube Correlation
MINI-CUBE Correlation Overview: This study was conducted to verify correlation of the automated Diesse MINI-CUBE system with different sample volumes (4.0 mL, 3.0 mL, 2.0 mL and 500 µL) to the Modified Westergren benchmark method. 500 μL samples were prepared in both BD Microtainer®... - Page 47 Identification numbers assigned to each donor were entered into the MINI-CUBE systems. When prompted, the tubes were inserted into a free position in the MINI-CUBE to initiate testing. Results in mm/hr automatically printed at the conclusion of the measurement.
-
Page 48: Bibliography
M I N I - C U B E – U S E R M A N U A L Chapter BIBLIOGRAPHY 1. Westergren A.: The Technique of the red cell sedimentation reaction. Am. Rev. Tuberc. 1926; 14: 94-101. 2. Fabry TL.: Mechanism of erythrocyte sedimentation and aggregation. Blood 1987;... - Page 49 M I N I - C U B E – U S E R M A N U A L Attachment A The current version of the CE Declaration of Conformity may be downloaded from the DIESSE website, www.diesse.it. 49/50 Rev 1.8 07/2020...
- Page 50 M I N I - C U B E – U S E R M A N U A L THIS PAGE LEFT INTENTIONALLY BLANK Rev 1.8 07/2020 50/50...
Need help?
Do you have a question about the MINI-CUBE and is the answer not in the manual?
Questions and answers