Mychef Cook User Manual
Hide thumbs
Also See for Cook:
- Product manual (82 pages) ,
- Installation manual (13 pages) ,
- Technical & service manual (71 pages)
Table of Contents
Advertisement
Quick Links
Advertisement
Table of Contents

Related Manuals for Mychef Cook


Summary of Contents for Mychef Cook
-
Page 2: Table Of Contents
INDEX INTRODUCTION ......................3 MYCHEF COOK/BAKE ....................4 Control Panel ......................4 2.1.1 Switching on the equipment ................8 2.1.2 Cooking modes ....................9 2.1.3 Cooking control .................... 10 2.1.4 Start of the cooking cycle ................11 2.1.5 End of cycle ....................12 2.1.6... -
Page 3: Introduction
INTRODUCTION This manual has been carefully prepared and reviewed to provide reliable information and assistance for proper installation, use, and maintenance that will ensure proper operation and prolong the life of the oven. This manual is divided into two parts, the first part dedicated to the installation of the equipment at the working point, and the second part focused on the cleaning and maintenance of the oven. -
Page 4: Mychef Cook/Bake
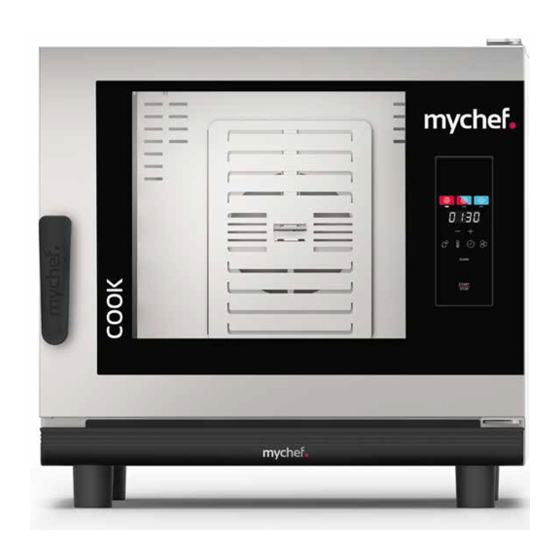
MYCHEF COOK AND MYCHEF BAKE Control Panel The figure below shows the control panel for the Mychef Cook and Mychef Bake ovens. It consists of a central screen with displays, indicators and buttons. Figure 1. Control panel. - Page 5 The functionality of each of them is explained below: Figure 2. Control panel detail.
- Page 6 Block Function Description Convection button Convection mode selection button. Convection mode indicator Mark the chosen mode. Mixed mode button Mixed mode selection button. Mixed mode indicator Mark the chosen mode. Steam button Steam mode selection button. Steam mode indicator Mark the chosen mode. Display Displays the selected parameter: humidity, temperature, time or fan speed...
- Page 7 The parameter display format is explained below: Icon Function The moisture level is shown with an H in the first digit. The humidity value is shown below. The chamber temperature is shown with a T in the first digit. The temperature value in degrees Celsius is shown below.
-
Page 8: Switching On The Equipment
This icon indicates that a cooking or cleaning process has been completed. The message DOOR appears when the door is opened during a cooking or cleaning process. In the case of an error, the first two digits of the display show ER, followed by the error number. -
Page 9: Cooking Modes
Figure 4: Safety thermostat (A) and service switch (B). 2.1.2 Cooking modes There are three cooking modes: convection, mixed and steam. To select a particular mode, tap on the corresponding button. Figure 5: Cooking mode selector. The convection mode acts as a forced convection oven without adding or removing moisture from the baking chamber. -
Page 10: Cooking Control
Steam 30ºC to 130ºC 100% Table 3: Cooking modes in Mychef ovens In order to prolong the life of your oven, it may automatically reduce the maximum temperature of the baking chamber. In all cooking modes it is possible to humidify the chamber at will. To do so, press the HUMIDITY button until the oven sprays water into the baking chamber. -
Page 11: Start Of The Cooking Cycle
By pressing the START/STOP button, the oven will start to heat the chamber and will stop when the set time has passed. At this point, the time indicator will display the keyword "End", the oven will beep for one second and the interior light will illuminate until the user finishes cooking by lightly pressing the START/STOP button. -
Page 12: End Of Cycle
Figure 9: Cooking indicator. If the door is opened during cooking, the timer stops, and the following message is shown in the central display: Figure 10: Door open indicator. 2.1.5 End of cycle At the end of a cooking cycle, the unit signals this status visually and acoustically. Specifically: A beep is emitted. -
Page 13: Automatic Cleaning
This allows you to use only one CleanDuo tablet per wash, with the consequent savings and ease of use. Use CleanDuo in the Cook and Bake ovens, both equipped with the automatic washing system. The use of other products will void the warranty. - Page 14 grids should be placed during the washing process. It should always be done without load, to ensure that the equipment is properly cleaned. The automatic cleaning cycle can then be started. To do this, select the cleaning program on the control panel by pressing the CLEAN button. The cleaning program appears on the central display.
- Page 15 Figure 14: Cooling completed. At this point it is important to stop the fan using the START/STOP button, open the door and insert the detergent tablet into the dedicated housing. Once entered, close the door again to start the cleaning program. Never place the detergent with the convection fan running.
- Page 16 Before starting any cleaning process, check that no temperature adjustment of the firing chamber is required. To introduce the detergent tablet into the chamber it is essential to stop the fan. It is important not to introduce the detergent while it is in operation in order to prevent the detergent from being dragged away by the air current which could endanger the health of the user.
-
Page 17: Configuration Menu
Configuration menu To access the configuration menu, with the furnace turned off, press the CONVECTION and START/STOP buttons simultaneously. Figure 16: Accessing the configuration menu. When entering the configuration menu, the three mode indicators, convection, mixed and steam, will light up simultaneously. To navigate through the parameters, press the CONVECTION button and adjust the parameter number with the +/- buttons. - Page 18 Figure 17: Example. Display of parameter P1 and its value (01) This block allows the consultation of the internal configuration parameters of the furnace and facilitates the diagnosis of faults and malfunctions, as well as their solution to the technical assistance service. Registration Name Parameter...
-
Page 19: Errors And Alarms
Errors and alarms Errors and alarms can occur during the preparation and execution of cooking or washing processes. If this is the case, the central display will show the error or alarm code. Figure 18: Error indicator. The table below shows the various errors and alarms, as well as possible solutions to them: Error Internal definition... - Page 20 ERROR PROBE4 TEMP SENSOR SHORTED Reserved. Not used. ERROR PROBE5 TEMP SENSOR NOT Reserved. Not used. CONNECTED ERROR PROBE5 TEMP SENSOR SHORTED Reserved. Not used. ERROR PROBE6 TEMP SENSOR NOT Reserved. Not used. CONNECTED ERROR PROBE6 TEMP SENSOR SHORTED Reserved. Not used. ERROR PROBE7 TEMP SENSOR NOT Reserved.
Need help?
Do you have a question about the Cook and is the answer not in the manual?
Questions and answers